


Create successful ePaper yourself
Turn your PDF publications into a flip-book with our unique Google optimized e-Paper software.
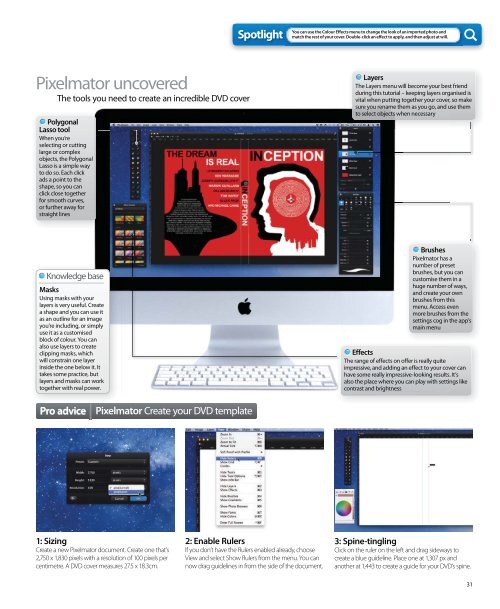
Pixelmator uncovered<br />
The tools you need to create an incredible DVD cover<br />
Polygonal<br />
Lasso tool<br />
When you’re<br />
selecting or cutting<br />
large or complex<br />
objects, the Polygonal<br />
Lasso is a simple way<br />
to do so. Each click<br />
ads a point to the<br />
shape, so you can<br />
click close together<br />
for smooth curves,<br />
or further away for<br />
straight lines<br />
Knowledge base<br />
Masks<br />
Using masks with your<br />
layers is very useful. Create<br />
a shape and you can use it<br />
as an outline for an image<br />
you’re including, or simply<br />
use it as a customised<br />
block of colour. You can<br />
also use layers to create<br />
clipping masks, which<br />
will constrain one layer<br />
inside the one below it. It<br />
takes some practice, but<br />
layers and masks can work<br />
together with real power.<br />
Pro advice Pixelmator Create your DVD template<br />
1: Sizing<br />
Create a new Pixelmator document. Create one that’s<br />
2,750 x 1,830 pixels with a resolution of 100 pixels per<br />
centimetre. A DVD cover measures 27.5 x 18.3cm.<br />
Spotlight<br />
2: Enable Rulers<br />
If you don’t have the Rulers enabled already, choose<br />
View and select Show Rulers from the menu. You can<br />
now drag guidelines in from the side of the document.<br />
You can use the Colour Eff ects menu to change the look of an imported photo and<br />
match the rest of your cover. Double-click an eff ect to apply, and then adjust at will.<br />
Layers<br />
The Layers menu will become your best friend<br />
during this tutorial – keeping layers organised is<br />
vital when putting together your cover, so make<br />
sure you rename them as you go, and use them<br />
to select objects when necessary<br />
Brushes<br />
Pixelmator has a<br />
number of preset<br />
brushes, but you can<br />
customise them in a<br />
huge number of ways,<br />
and create your own<br />
brushes from this<br />
menu. Access even<br />
more brushes from the<br />
settings cog in the app’s<br />
main menu<br />
Effects<br />
The range of effects on offer is really quite<br />
impressive, and adding an effect to your cover can<br />
have some really impressive-looking results. It’s<br />
also the place where you can play with settings like<br />
contrast and brightness<br />
3: Spine-tingling<br />
Click on the ruler on the left and drag sideways to<br />
create a blue guideline. Place one at 1,307 px and<br />
another at 1,443 to create a guide for your DVD’s spine.<br />
31