


You also want an ePaper? Increase the reach of your titles
YUMPU automatically turns print PDFs into web optimized ePapers that Google loves.
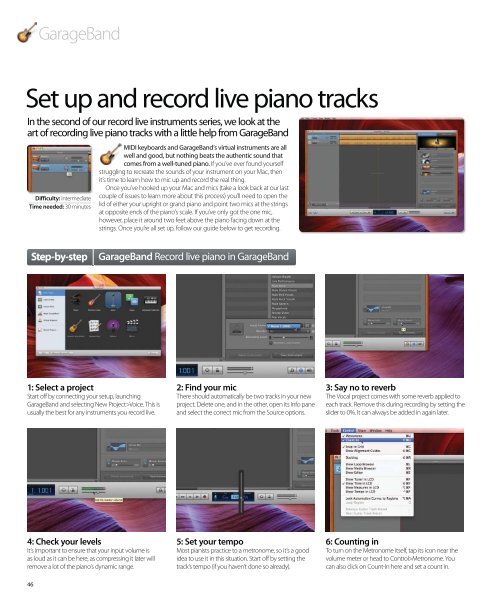
1: Select a project<br />
Start off by connecting your setup, launching<br />
GarageBand and selecting New Project>Voice. This is<br />
usually the best for any instruments you record live.<br />
4: Check your levels<br />
It’s important to ensure that your input volume is<br />
as loud as it can be here, as compressing it later will<br />
remove a lot of the piano’s dynamic range.<br />
46<br />
GarageBand<br />
Set up and record live piano tracks<br />
In the second of our record live instruments series, we look at the<br />
art of recording live piano tracks with a little help from GarageBand<br />
Difficulty: Intermediate<br />
Time needed: 30 minutes<br />
MIDI keyboards and GarageBand’s virtual instruments are all<br />
well and good, but nothing beats the authentic sound that<br />
comes from a well-tuned piano. If you’ve ever found yourself<br />
struggling to recreate the sounds of your instrument on your Mac, then<br />
it’s time to learn how to mic up and record the real thing.<br />
Once you’ve hooked up your Mac and mics (take a look back at our last<br />
couple of issues to learn more about this process) you’ll need to open the<br />
lid of either your upright or grand piano and point two mics at the strings<br />
at opposite ends of the piano’s scale. If you’ve only got the one mic,<br />
however, place it around two feet above the piano facing down at the<br />
strings. Once you’re all set up, follow our guide below to get recording.<br />
Step-by-step GarageBand Record live piano in GarageBand<br />
2: Find your mic<br />
There should automatically be two tracks in your new<br />
project. Delete one, and in the other, open its Info pane<br />
and select the correct mic from the Source options.<br />
5: Set your tempo<br />
Most pianists practice to a metronome, so it’s a good<br />
idea to use it in this situation. Start off by setting the<br />
track’s tempo (if you haven’t done so already).<br />
3: Say no to reverb<br />
The Vocal project comes with some reverb applied to<br />
each track. Remove this during recording by setting the<br />
slider to 0%. It can always be added in again later.<br />
6: Counting in<br />
To turn on the Metronome itself, tap its icon near the<br />
volume meter or head to Control>Metronome. You<br />
can also click on Count-In here and set a count in.