


You also want an ePaper? Increase the reach of your titles
YUMPU automatically turns print PDFs into web optimized ePapers that Google loves.
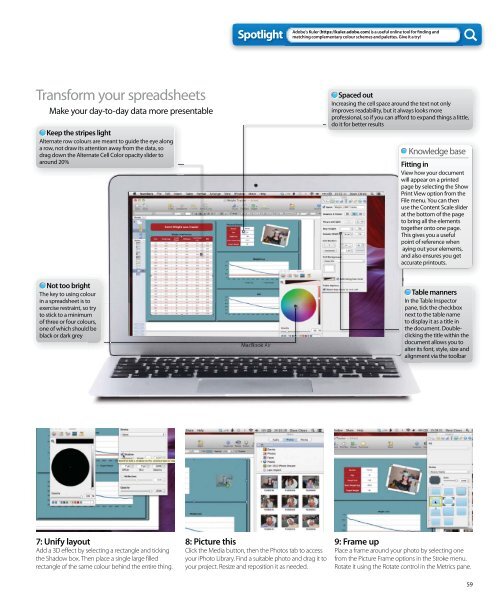
Transform your spreadsheets<br />
Make your day-to-day data more presentable<br />
Keep the stripes light<br />
Alternate row colours are meant to guide the eye along<br />
a row, not draw its attention away from the data, so<br />
drag down the Alternate Cell Color opacity slider to<br />
around 20%<br />
Not too bright<br />
The key to using colour<br />
in a spreadsheet is to<br />
exercise restraint, so try<br />
to stick to a minimum<br />
of three or four colours,<br />
one of which should be<br />
black or dark grey<br />
7: Unify layout<br />
Add a 3D effect by selecting a rectangle and ticking<br />
the Shadow box. Then place a single large filled<br />
rectangle of the same colour behind the entire thing.<br />
Spotlight<br />
8: Picture this<br />
Click the Media button, then the Photos tab to access<br />
your iPhoto Library. Find a suitable photo and drag it to<br />
your project. Resize and reposition it as needed.<br />
Adobe’s Kuler (https://kuler.adobe.com) is a useful online tool for fi nding and<br />
matching complementary colour schemes and palettes. Give it a try!<br />
Spaced out<br />
Increasing the cell space around the text not only<br />
improves readability, but it always looks more<br />
professional, so if you can afford to expand things a little,<br />
do it for better results<br />
Knowledge base<br />
Fitting in<br />
View how your document<br />
will appear on a printed<br />
page by selecting the Show<br />
Print View option from the<br />
File menu. You can then<br />
use the Content Scale slider<br />
at the bottom of the page<br />
to bring all the elements<br />
together onto one page.<br />
This gives you a useful<br />
point of reference when<br />
laying out your elements,<br />
and also ensures you get<br />
accurate printouts.<br />
Table manners<br />
In the Table Inspector<br />
pane, tick the checkbox<br />
next to the table name<br />
to display it as a title in<br />
the document. Doubleclicking<br />
the title within the<br />
document allows you to<br />
alter its font, style, size and<br />
alignment via the toolbar<br />
9: Frame up<br />
Place a frame around your photo by selecting one<br />
from the Picture Frame options in the Stroke menu.<br />
Rotate it using the Rotate control in the Metrics pane.<br />
59