


You also want an ePaper? Increase the reach of your titles
YUMPU automatically turns print PDFs into web optimized ePapers that Google loves.
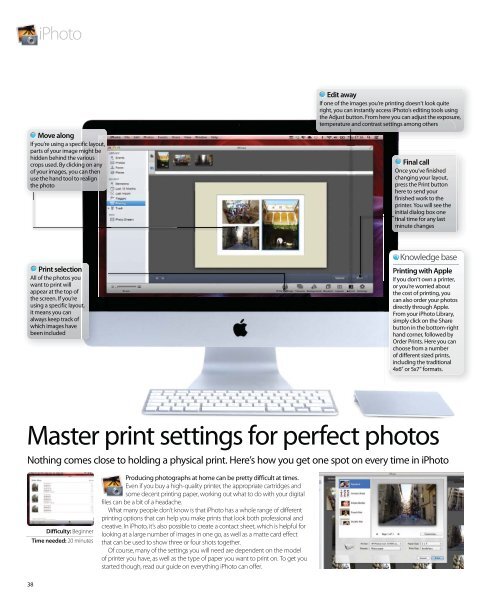
Master print settings for perfect photos<br />
Nothing comes close to holding a physical print. Here’s how you get one spot on every time in iPhoto<br />
Difficulty: Beginner<br />
Time needed: 20 minutes<br />
38<br />
iPhoto<br />
Move along<br />
If you’re using a specific layout,<br />
parts of your image might be<br />
hidden behind the various<br />
crops used. By clicking on any<br />
of your images, you can then<br />
use the hand tool to realign<br />
the photo<br />
Print selection<br />
All of the photos you<br />
want to print will<br />
appear at the top of<br />
the screen. If you’re<br />
using a specific layout,<br />
it means you can<br />
always keep track of<br />
which images have<br />
been included<br />
Producing photographs at home can be pretty difficult at times.<br />
Even if you buy a high-quality printer, the appropriate cartridges and<br />
some decent printing paper, working out what to do with your digital<br />
files can be a bit of a headache.<br />
What many people don’t know is that iPhoto has a whole range of different<br />
printing options that can help you make prints that look both professional and<br />
creative. In iPhoto, it’s also possible to create a contact sheet, which is helpful for<br />
looking at a large number of images in one go, as well as a matte card effect<br />
that can be used to show three or four shots together.<br />
Of course, many of the settings you will need are dependent on the model<br />
of printer you have, as well as the type of paper you want to print on. To get you<br />
started though, read our guide on everything iPhoto can offer.<br />
Edit away<br />
If one of the images you’re printing doesn’t look quite<br />
right, you can instantly access iPhoto’s editing tools using<br />
the Adjust button. From here you can adjust the exposure,<br />
temperature and contrast settings among others<br />
Final call<br />
Once you’ve finished<br />
changing your layout,<br />
press the Print button<br />
here to send your<br />
finished work to the<br />
printer. You will see the<br />
initial dialog box one<br />
final time for any last<br />
minute changes<br />
Knowledge base<br />
Printing with Apple<br />
If you don’t own a printer,<br />
or you’re worried about<br />
the cost of printing, you<br />
can also order your photos<br />
directly through Apple.<br />
From your iPhoto Library,<br />
simply click on the Share<br />
button in the bottom-right<br />
hand corner, followed by<br />
Order Prints. Here you can<br />
choose from a number<br />
of different sized prints,<br />
including the traditional<br />
4x6” or 5x7” formats.