- Page 1 and 2:
Logic Pro 9 User Manual
- Page 3 and 4:
Preface Chapter 1 Chapter 2 Chapter
- Page 5 and 6:
Chapter 8 Chapter 9 163 166 166 167
- Page 7 and 8:
Chapter 14 387 393 394 398 401 402
- Page 9 and 10:
Chapter 18 Chapter 19 Chapter 20 55
- Page 11 and 12:
Chapter 26 Chapter 27 Chapter 28 72
- Page 13 and 14:
Chapter 32 Chapter 33 Chapter 34 91
- Page 15 and 16:
Chapter 38 Chapter 39 Chapter 40 Ch
- Page 17 and 18:
Welcome to Logic Pro Logic Pro is a
- Page 19:
• Logic Studio Working with Apoge
- Page 22 and 23:
MIDI recordings are used to trigger
- Page 24 and 25:
A Logic Pro project file contains a
- Page 26 and 27:
MIDI Regions and Events MIDI region
- Page 28 and 29:
• External MIDI control surfaces
- Page 30 and 31:
MIDI Interface Your Mac computer do
- Page 32 and 33:
To facilitate this, an amplifier an
- Page 34 and 35:
Note: Condenser microphones require
- Page 36 and 37:
Note: USB audio interfaces should a
- Page 38 and 39:
AES/EBU The AES/EBU (Audio Engineer
- Page 40 and 41:
If the MIDI interface connected to
- Page 42 and 43:
For example, if you buy a new keybo
- Page 44 and 45:
µ Click the Preferences button in
- Page 46 and 47:
Networking Considerations The prima
- Page 48 and 49:
The Track Node buttons have four po
- Page 51 and 52:
Overview of the Logic Pro Interface
- Page 53 and 54:
The following is an overview of the
- Page 55 and 56:
• Track list: This is where you s
- Page 57 and 58:
The following image shows the Inspe
- Page 59 and 60:
You can add, edit, delete, and rena
- Page 61 and 62:
Introducing the Loop Browser The Lo
- Page 63 and 64:
Introducing the Library The Library
- Page 65 and 66:
• Path menu: Displays the levels
- Page 67 and 68:
Introducing Project Notes The Proje
- Page 69 and 70:
The Event List can display two type
- Page 71 and 72:
Introducing the Tempo List The Temp
- Page 73 and 74:
Introducing the Mixer The Mixer is
- Page 75 and 76:
Introducing the Piano Roll Editor T
- Page 77 and 78:
Local Menu Bars A window’s local
- Page 79 and 80:
Global Tracks All linear editing wi
- Page 81 and 82:
The Sample Editor is shown, display
- Page 83 and 84:
11 Select the software instrument t
- Page 85 and 86:
If you want to select an item that
- Page 87 and 88:
Customizing Your Window Setup 4 Log
- Page 89 and 90:
Key focus areas within windows—su
- Page 91 and 92:
To open a window Do one of the foll
- Page 93 and 94:
µ Click the close button at the to
- Page 95 and 96:
To adjust the size of a window Do o
- Page 97 and 98:
µ Set the default size for plug-in
- Page 99 and 100:
You can move the visible section by
- Page 101 and 102:
To zoom in µ Click the widely spac
- Page 103 and 104:
To change the zoom level using the
- Page 105 and 106:
Note: When a marquee selection is a
- Page 107 and 108:
• Content Link: This mode results
- Page 109 and 110:
2 Drag the buttons you want to add
- Page 111 and 112:
• Time and Bar: Displays the Bar
- Page 113 and 114:
µ Control-click (or right-click) a
- Page 115 and 116:
Note: Screensets 1 to 9 can be reca
- Page 117:
To delete the current screenset µ
- Page 120 and 121:
Setting the Playhead Position The p
- Page 122 and 123:
When typing in a full position usin
- Page 124 and 125:
• Play from Left Window Edge: Pla
- Page 126 and 127:
• Jump Between Cycle- and Project
- Page 128 and 129:
The cycle area is defined by the po
- Page 130 and 131:
This has no impact on the Bar ruler
- Page 132 and 133:
Defining a Cycle with Markers Dragg
- Page 134 and 135:
2 Click the Chase tab, then select
- Page 136 and 137:
2 Turn on or turn off individual fu
- Page 138 and 139:
• Signature/Division: The (Time)
- Page 140 and 141:
To open a new SMPTE or Bar Display
- Page 142 and 143:
2 Choose one of the following setti
- Page 144 and 145:
Opening Marker Areas and Windows Th
- Page 146 and 147:
Creating Markers You can create mar
- Page 148 and 149:
Markers created in these ways are a
- Page 150 and 151:
• Select the markers, then choose
- Page 152 and 153:
2 Type the new marker name in the M
- Page 154 and 155:
3 Choose settings in the Font windo
- Page 156 and 157:
To adjust a marker to fit a cycle
- Page 158 and 159:
Switching Between Marker Alternativ
- Page 160 and 161:
When you create a new project (or u
- Page 162 and 163:
3 Browse to the location where you
- Page 164 and 165:
If a project is already loaded, you
- Page 166 and 167:
Opening and Creating Projects Autom
- Page 168 and 169:
You can also import the following s
- Page 170 and 171:
Tip: You can customize the column v
- Page 172 and 173:
The Browser tab updates to show a t
- Page 174 and 175:
• Click the Settings button in th
- Page 176 and 177:
µ Click the Sample Rate display in
- Page 178 and 179:
Time signatures do not affect the p
- Page 180 and 181:
µ Open the Signature track, and do
- Page 182 and 183:
Click the Dim Master Volume button
- Page 184 and 185:
The following should be taken into
- Page 186 and 187:
Saving Projects When you choose Fil
- Page 188 and 189:
Saving a Project as a Template You
- Page 191 and 192:
Basic Operations 8 There are a numb
- Page 193 and 194:
2 Type in 45, followed by the Retur
- Page 195 and 196:
µ Click the Preferences button in
- Page 197 and 198:
• Save a new key command set: Ent
- Page 199 and 200:
Assigning Key Commands to Computer
- Page 201 and 202:
The Assignments field displays the
- Page 203 and 204:
Tools are accessed in the Tool menu
- Page 205 and 206: • Opens Tool Menu: Right-clicking
- Page 207 and 208: • Marquee Tool Click Zones: When
- Page 209 and 210: Flex Tool The Flex tool provides yo
- Page 211 and 212: Using Selection Techniques Whenever
- Page 213 and 214: To select all events (of a specifie
- Page 215 and 216: • Edit > Select Equal Colored Reg
- Page 217 and 218: Paste at Original Position This com
- Page 219: To erase the Undo History µ Choose
- Page 222 and 223: Understanding Tracks and Channel St
- Page 224 and 225: Configuring the Track Header The tr
- Page 226 and 227: • Buttons section: Select the che
- Page 228 and 229: To create one or more new tracks (a
- Page 230 and 231: Software Instrument Tracks You can
- Page 232 and 233: Creating Tracks Only The commands a
- Page 234 and 235: Creating Tracks for Selected Region
- Page 236 and 237: Naming Tracks in the Arrange Area Y
- Page 238 and 239: To create a track name Do one of th
- Page 240 and 241: Assigning Tracks to Environment Obj
- Page 242 and 243: Assigning Track Icons in the Track
- Page 244 and 245: A bullet to the left of the track n
- Page 246 and 247: Soloing When the Track Solo Buttons
- Page 248 and 249: To freeze a track 1 Click the Freez
- Page 250 and 251: You can now perform your edits, and
- Page 252 and 253: Clicking a Track Protect button tog
- Page 254 and 255: 3 Set the following parameters, as
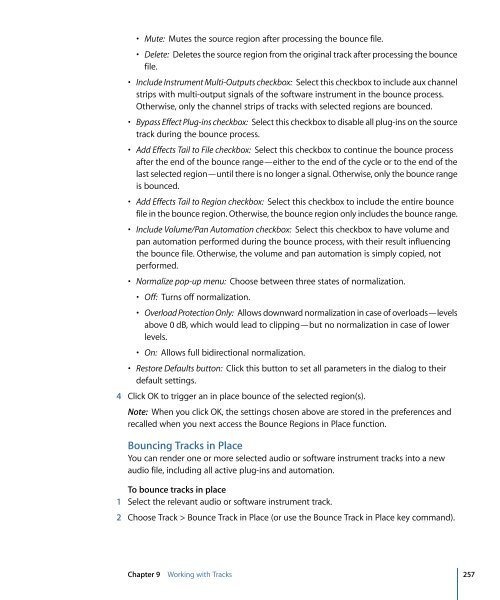
- Page 258 and 259: The Bounce Track in Place dialog ap
- Page 260 and 261: • Include Volume/Pan Automation c
- Page 262 and 263: The Arrange (and Mixer) channel str
- Page 264 and 265: Setting Channel Strip Input Format
- Page 266 and 267: To set the Pan or Balance position
- Page 268 and 269: A menu appears, showing all availab
- Page 270 and 271: To use the Hand tool in the Arrange
- Page 272 and 273: µ On channel strips where Insert s
- Page 274 and 275: The Library displays all channel st
- Page 276 and 277: You can remotely switch between cha
- Page 278 and 279: The plug-in window opens automatica
- Page 280 and 281: To adjust a parameter slider Do one
- Page 282 and 283: When the Link Button Is Switched Of
- Page 284 and 285: • Choose the Load Setting command
- Page 286 and 287: Replacing Setting-Compatible Plug-i
- Page 288 and 289: Hiding and Showing Extended Paramet
- Page 290 and 291: Learning About Effect Routings Ther
- Page 292 and 293: Similarly, you can completely chang
- Page 294 and 295: A post fader signal level, routed t
- Page 296 and 297: Tip: Many of the setup and routing
- Page 298 and 299: 3 Click GM Device in the left colum
- Page 300 and 301: To reassign tracks to channels usin
- Page 302 and 303: • If you use the Track Parameter
- Page 304 and 305: • Program, Volume, and Pan: Trans
- Page 306 and 307:
7 Insert the effects in the Insert
- Page 308 and 309:
Tuning Software Instruments The Fil
- Page 310 and 311:
Important: Start Logic Pro first, t
- Page 312 and 313:
2 Connect the output (or output pai
- Page 314 and 315:
You can see the results of the vali
- Page 316 and 317:
Disabling Plug-ins The Audio Units
- Page 318 and 319:
Logic Pro also supports Broadcast W
- Page 320 and 321:
Navigating in the Browser You can s
- Page 322 and 323:
Restricting the search to a particu
- Page 324 and 325:
To remove a single advanced conditi
- Page 326 and 327:
To access the Loop Browser in the A
- Page 328 and 329:
When you place Software Instrument
- Page 330 and 331:
Column view offers a standard Mac O
- Page 332 and 333:
As you can see from this example, t
- Page 334 and 335:
Creating a Collection of Your Favor
- Page 336 and 337:
4 Click the Play button to preview
- Page 338 and 339:
The dialog below opens. 2 Browse to
- Page 340 and 341:
Audio regions that point to compres
- Page 342 and 343:
2 Choose settings in the Import ReC
- Page 345 and 346:
Getting to Know Regions 12 When aud
- Page 347 and 348:
It is, of course, possible to direc
- Page 349 and 350:
Feature Quantize parameter availabl
- Page 351 and 352:
The Sample Editor opens, with the e
- Page 353 and 354:
To open the Audio Bin window µ Cho
- Page 355 and 356:
Warning: If any of the deleted regi
- Page 357 and 358:
Snapping Edits to Zero Crossings If
- Page 359:
Updating the Audio Region Arrangeme
- Page 362 and 363:
• Creating Multiple Copies of Reg
- Page 364 and 365:
4 In the Colors window that opens,
- Page 366 and 367:
To snap to an absolute, not relativ
- Page 368 and 369:
To change the drag mode µ Choose o
- Page 370 and 371:
Using Shortcut Menus Many selection
- Page 372 and 373:
2 Drag to select or Shift-select th
- Page 374 and 375:
To assign the same name to multiple
- Page 376 and 377:
c Click the OK button to replace th
- Page 378 and 379:
2 Drag the marquee rectangle to mak
- Page 380 and 381:
Using the Marquee Selection to Crea
- Page 382 and 383:
To restore a deleted audio region D
- Page 384 and 385:
µ Choose the View > Event Position
- Page 386 and 387:
• Nudge Region/Event Position Rig
- Page 388 and 389:
Note: If Hyper Draw or automation i
- Page 390 and 391:
Adjusting the Start or End Point of
- Page 392 and 393:
• Set the value in the Transport
- Page 394 and 395:
To copy a region (method 1) µ Opti
- Page 396 and 397:
To remove gaps between regions 1 Se
- Page 398 and 399:
All selected regions are cut at the
- Page 400 and 401:
The alias appears on the selected t
- Page 402 and 403:
2 In the dialog that appears, set t
- Page 404 and 405:
Note: The EXS instrument is saved t
- Page 406 and 407:
2 Select (turn on) the Loop option
- Page 408 and 409:
2 Choose Region > Loops > Convert t
- Page 410 and 411:
All selected regions located wholly
- Page 412 and 413:
Merging Regions (General Tools and
- Page 414 and 415:
No Mixdown Situation If there are s
- Page 416 and 417:
When opened, folders look just like
- Page 418 and 419:
You should ensure that the folder i
- Page 420 and 421:
Creating Fades A fade in starts at
- Page 422 and 423:
µ Select a region, then edit the F
- Page 424 and 425:
To change the playback speed Do one
- Page 426 and 427:
Editing Several Regions Simultaneou
- Page 428 and 429:
• Advanced Quantization: Q-Flam:
- Page 431 and 432:
Recording in Logic Pro 14 This chap
- Page 433 and 434:
µ Click the Sample Rate display in
- Page 435 and 436:
Setting Up the Metronome for Record
- Page 437 and 438:
For details about the Metronome pro
- Page 439 and 440:
Tip: You can leave the Input Monito
- Page 441 and 442:
To choose the recording file type 1
- Page 443 and 444:
Record-Enabling Tracks You can make
- Page 445 and 446:
• Multitrack recording: You can r
- Page 447 and 448:
Imagine a guitar solo being perform
- Page 449 and 450:
5 Open the take folder by doing one
- Page 451 and 452:
Audio Multitrack Recording You can
- Page 453 and 454:
The Autopunch feature can be used f
- Page 455 and 456:
5 Stop recording by clicking the St
- Page 457 and 458:
The recording appears as a single M
- Page 459 and 460:
4 Set a cycle area by doing one of
- Page 461 and 462:
Only the actual recording of MIDI e
- Page 463 and 464:
To record several MIDI tracks in Cy
- Page 465 and 466:
When you stop recording, you can wo
- Page 467 and 468:
2 Open the Overlapping Recordings p
- Page 469 and 470:
3 Select the checkboxes that corres
- Page 471 and 472:
To color a take in an open or close
- Page 473 and 474:
MIDI Step Input Recording The Step
- Page 475 and 476:
4 Click a key in the Step Input Key
- Page 477 and 478:
Triplets, Dotted Note Groups The
- Page 479:
The Space bar provides a Sustain fu
- Page 482 and 483:
Getting to Know Take Folders You wi
- Page 484 and 485:
The following key commands enable y
- Page 486 and 487:
Creating Comps You can use quick sw
- Page 488 and 489:
Extending a take region section (dr
- Page 490 and 491:
To alternate selected comp areas be
- Page 492 and 493:
Resizing Take Regions You can edit
- Page 494 and 495:
To cut a take folder µ Click the t
- Page 496 and 497:
The first cut occurs at the clicked
- Page 498 and 499:
To create a new take lane for a tak
- Page 500 and 501:
To create a new comp from the activ
- Page 502 and 503:
3 Type the new name in the dialog t
- Page 504 and 505:
To delete a take 1 Click the arrow
- Page 506 and 507:
2 Click the arrow in the top right
- Page 508 and 509:
To export an active take to a new t
- Page 510 and 511:
To export an active comp to a new t
- Page 512 and 513:
To move an active take to a new tra
- Page 514 and 515:
2 Click the arrow in the top right
- Page 516 and 517:
To flatten a take folder 1 Click th
- Page 518 and 519:
2 Click the arrow in the top right
- Page 520 and 521:
This command—Unpack Take Folder,
- Page 522 and 523:
This command—“Unpack Take Folde
- Page 525 and 526:
Flex Time Editing 16 Flex Time edit
- Page 527 and 528:
To assign a flex mode to an audio t
- Page 529 and 530:
Getting to Know the Flex Modes Flex
- Page 531 and 532:
• Crossfade: Adjusts the crossfad
- Page 533 and 534:
• If you click in the area where
- Page 535 and 536:
Moving Flex Markers and Time Stretc
- Page 537 and 538:
Note: Time compression or expansion
- Page 539 and 540:
2 Click in the upper half of the se
- Page 541 and 542:
A yellow guideline appears in the o
- Page 543 and 544:
µ Using the Flex tool, place the p
- Page 545 and 546:
To time stretch using region border
- Page 547 and 548:
Editing Audio in the Sample Editor
- Page 549 and 550:
µ Drag the Sample Editor button, w
- Page 551 and 552:
To control playback using the Preli
- Page 553 and 554:
Navigating Audio Files in the Sampl
- Page 555 and 556:
To select a particular section of a
- Page 557 and 558:
To select a section of an audio fil
- Page 559 and 560:
Using Transient Markers to Edit in
- Page 561 and 562:
• − button: Decreases the numbe
- Page 563 and 564:
This detects transients across the
- Page 565 and 566:
2 Choose the desired settings in th
- Page 567 and 568:
Tip: If you use the Silence functio
- Page 569 and 570:
Tip: You can also use the Invert fu
- Page 571 and 572:
2 Choose the desired settings in th
- Page 573 and 574:
To enter relative display mode Do o
- Page 575 and 576:
Note: You need to zoom the waveform
- Page 577 and 578:
The “Time and Pitch Machine” co
- Page 579 and 580:
Setting Tempo Parameters in the “
- Page 581 and 582:
Using the Sample Editor’s Groove
- Page 583 and 584:
Using the Sample Editor’s Audio E
- Page 585 and 586:
Setting Audio Energizer Parameters
- Page 587 and 588:
Applying Spike Reduction in the Sil
- Page 589 and 590:
Opening the Sample Editor’s “Au
- Page 591 and 592:
• Velocity Threshold: Sets the th
- Page 593 and 594:
• Quantize by: Open this pop-up m
- Page 595:
Using AudioSuite Plug-ins The Sampl
- Page 598 and 599:
Note: Bounced files can only follow
- Page 600 and 601:
The locator range should closely ma
- Page 602 and 603:
4 Choose Audio > Time Stretch Regio
- Page 604 and 605:
The selected regions are analyzed;
- Page 606 and 607:
To remove tempo information from an
- Page 608 and 609:
Getting to Know the Strip Silence W
- Page 610 and 611:
Automatic Anchor Creation When you
- Page 613 and 614:
Managing Audio Files 20 This chapte
- Page 615 and 616:
Grouping Files in the Audio Bin You
- Page 617 and 618:
To open or close one or more groups
- Page 619 and 620:
This expands or collapses all audio
- Page 621 and 622:
Logic Pro updates the path informat
- Page 623 and 624:
Note: If a file of the same name ex
- Page 625 and 626:
Note: If you want to simultaneously
- Page 627:
• Double-click the exclamation ma
- Page 630 and 631:
Understanding Region- and Event-bas
- Page 632 and 633:
The Q-Swing field is located just b
- Page 634 and 635:
You can also quantize sections of t
- Page 636 and 637:
3 In the Group Settings window, sel
- Page 638 and 639:
Quantizing MIDI Events Event-based
- Page 640 and 641:
2 Do one of the following, dependin
- Page 642 and 643:
Important: The source audio or MIDI
- Page 644 and 645:
• Granulation (ms): Determines th
- Page 647 and 648:
Introduction to MIDI Editing 22 Thi
- Page 649 and 650:
• Disabled: Double-clicking a MID
- Page 651 and 652:
2 Click the Editing tab, then choos
- Page 653 and 654:
• Deleting or moving portions of
- Page 655 and 656:
Editing MIDI Events in the Piano Ro
- Page 657 and 658:
• The vertical position of note e
- Page 659 and 660:
When the Link Button Is Turned Off
- Page 661 and 662:
The Snap menu setting applies to th
- Page 663 and 664:
• Click the original note with th
- Page 665 and 666:
Important: A Redo list is not displ
- Page 667 and 668:
• Nudge Region/Event Position Lef
- Page 669 and 670:
• Note Overlap Correction for Rep
- Page 671 and 672:
Using the Copy MIDI Events Settings
- Page 673 and 674:
You can override this behavior by h
- Page 675 and 676:
For more information on the Functio
- Page 677 and 678:
Customizing the Piano Roll Editor Y
- Page 679 and 680:
Editing MIDI in the Hyper Editor 24
- Page 681 and 682:
Getting to Know the Hyper Editor Th
- Page 683 and 684:
You can also alter the width and st
- Page 685 and 686:
To create multiple events in a line
- Page 687 and 688:
This is ideal when adding events wi
- Page 689 and 690:
To alter individual event values µ
- Page 691 and 692:
• Edit > Paste (or Command-V) pas
- Page 693 and 694:
2 Select the Auto Define checkbox i
- Page 695 and 696:
To rearrange the order of event def
- Page 697 and 698:
• C- Press (Channel Pressure): To
- Page 699 and 700:
Setting the MIDI Channel Number A c
- Page 701 and 702:
Creating a Hyper Set To create a ne
- Page 703:
µ Choose Delete Hyper Set from the
- Page 706 and 707:
Getting to Know the Event List All
- Page 708 and 709:
The Event List can also display a l
- Page 710 and 711:
This is particularly important for
- Page 712 and 713:
You can use these filter buttons al
- Page 714 and 715:
Protecting the Position of Events T
- Page 716 and 717:
µ Click-hold the specific position
- Page 718 and 719:
• Unselected Within Selection: Er
- Page 720 and 721:
Mapped Instrument Notes If the edit
- Page 722 and 723:
• Other manufacturers use various
- Page 724 and 725:
Meta Events Meta events are control
- Page 727 and 728:
Editing MIDI Events in the Transfor
- Page 729 and 730:
Depending on your needs, it may be
- Page 731 and 732:
Random Pitch, Velocity, Length Sets
- Page 733 and 734:
This preset is a great creative opt
- Page 735 and 736:
Reverse Pitch Inverts the pitch of
- Page 737 and 738:
Velocity Limiter Limits the velocit
- Page 739 and 740:
Quantize Note Length Quantizes the
- Page 741 and 742:
• Delete selected events: Choose
- Page 743 and 744:
• Fix: The event type is altered.
- Page 745 and 746:
Using the Map 128 vertical bars ref
- Page 747 and 748:
This transform set now appears at t
- Page 749 and 750:
To convert MIDI note events to MIDI
- Page 751:
2 Click Select And Operate. To dele
- Page 754 and 755:
754 Chapter 27 Mixing • Assigning
- Page 756 and 757:
756 Chapter 27 Mixing Getting to Kn
- Page 758 and 759:
• Master channel strip: A global
- Page 760 and 761:
760 Chapter 27 Mixing Understanding
- Page 762 and 763:
762 Chapter 27 Mixing The Group Set
- Page 764 and 765:
When you choose an inactive group,
- Page 766 and 767:
766 Chapter 27 Mixing Soloing Chann
- Page 768 and 769:
768 Chapter 27 Mixing When setting
- Page 770 and 771:
770 Chapter 27 Mixing To avoid clip
- Page 772 and 773:
772 Chapter 27 Mixing To change the
- Page 774 and 775:
The following sections explain how
- Page 776 and 777:
776 Chapter 27 Mixing You can creat
- Page 778 and 779:
778 Chapter 27 Mixing 4 Use the aux
- Page 780 and 781:
780 Chapter 27 Mixing 2 Within the
- Page 782 and 783:
782 Chapter 27 Mixing When using ou
- Page 784 and 785:
784 Chapter 27 Mixing To define a c
- Page 786 and 787:
786 Chapter 27 Mixing 2 Double-clic
- Page 788 and 789:
788 Chapter 27 Mixing • Doppler b
- Page 790 and 791:
790 Chapter 27 Mixing Using the Bin
- Page 792 and 793:
792 Chapter 27 Mixing Open the View
- Page 794 and 795:
To assign a controller to one of th
- Page 796 and 797:
• Output channel strips—used as
- Page 798 and 799:
798 Chapter 27 Mixing Note: To view
- Page 800 and 801:
800 Chapter 27 Mixing Using Link Mo
- Page 802 and 803:
To copy a mixer setup 1 Select the
- Page 804 and 805:
804 Chapter 27 Mixing The Record En
- Page 806 and 807:
To move to a specific channel strip
- Page 809 and 810:
Working with Automation 28 Logic Pr
- Page 811 and 812:
The gray automation area appears on
- Page 813 and 814:
2 Click the Arrange tab, then adjus
- Page 815 and 816:
To set the same automation mode for
- Page 817 and 818:
2 Select checkboxes in the “Write
- Page 819 and 820:
• Click outside of all track auto
- Page 821 and 822:
• Delete All Automation on Select
- Page 823 and 824:
A dialog asks if you want to conver
- Page 825 and 826:
To offset your automation when Snap
- Page 827 and 828:
Using Automation Quick Access The A
- Page 829 and 830:
To activate Hyper Draw for the curr
- Page 831 and 832:
To use the Note Velocity mode 1 Cho
- Page 833 and 834:
Bouncing Your Project 29 You can re
- Page 835 and 836:
Defining the Bounce Range Before bo
- Page 837 and 838:
Setting Global Parameters in the Bo
- Page 839 and 840:
• Normalize pop-up menu: You can
- Page 841 and 842:
If the PCM option is unselected in
- Page 843 and 844:
Select the “Use default values”
- Page 845 and 846:
Simulate Write Only The “Simulate
- Page 847:
You can choose between the followin
- Page 850 and 851:
Creating Apple Loops in Logic Pro W
- Page 852 and 853:
Because one-shots are handled like
- Page 854 and 855:
There are two possible reasons for
- Page 856 and 857:
As an alternative, you can use the
- Page 858 and 859:
The Change Display Only mode does n
- Page 860 and 861:
If you want to turn an Apple Loops
- Page 862 and 863:
• Selecting Multiple Regions in t
- Page 864 and 865:
Getting to Know the Score Editor Th
- Page 866 and 867:
Important: Score display parameters
- Page 868 and 869:
To switch between the default score
- Page 870 and 871:
• The Display Quantize setting sh
- Page 872 and 873:
To display the Insert Defaults sett
- Page 874 and 875:
To resize the Hyper Draw area µ Gr
- Page 876 and 877:
The palette windows can have differ
- Page 878 and 879:
Note Objects in the Part Box The Pa
- Page 880 and 881:
Dynamic Symbols in the Part Box Dyn
- Page 882 and 883:
Note: The symbols in this Part box
- Page 884 and 885:
Apart from 2/4, 3/4, 4/4, 6/8, and
- Page 886 and 887:
D.S., D.C., Segno, and Coda Signs i
- Page 888 and 889:
Page and Line Break Symbols in the
- Page 890 and 891:
• Absolute Change (all values set
- Page 892 and 893:
To paste the Clipboard contents int
- Page 894 and 895:
An alias can be assigned a staff st
- Page 896 and 897:
Resizing Notes and Symbols in the S
- Page 898 and 899:
Creating and Editing Tied Notes in
- Page 900 and 901:
• Tuplet note values: Choose from
- Page 902 and 903:
• Independent Grace: These are al
- Page 904 and 905:
Note: Church rests cannot be longer
- Page 906 and 907:
These commands place the correspond
- Page 908 and 909:
Editing Repeat Signs and Bar Lines
- Page 910 and 911:
To insert text in the score 1 Selec
- Page 912 and 913:
Setting Special Text Object Paramet
- Page 914 and 915:
• Tempo Symbols: Used for the dis
- Page 916 and 917:
When a global text object is select
- Page 918 and 919:
Setting All Words and Syllables to
- Page 920 and 921:
µ Double-click one of the extensio
- Page 922 and 923:
The Chord Grid Library window consi
- Page 924 and 925:
Getting to Know the Chord Grid Sele
- Page 926 and 927:
• Number of Strings field: Displa
- Page 928 and 929:
After inserting chord grid symbols
- Page 930 and 931:
To modify the chord of an existing
- Page 932 and 933:
To move an existing fingering dot D
- Page 934 and 935:
µ Option-click an existing dot to
- Page 936 and 937:
To create a barre Do one of the fol
- Page 938 and 939:
The string is muted. To unmute a st
- Page 940 and 941:
• Choose Layout > Chord Grid Libr
- Page 942 and 943:
Importing and Exporting Chord Grid
- Page 944 and 945:
• Up/Downstroke: Placement is at
- Page 946 and 947:
Note: If you perform this procedure
- Page 948 and 949:
Copying Signatures You can copy tim
- Page 950 and 951:
µ Choose a number from the Alterna
- Page 952 and 953:
When simultaneously changing the se
- Page 954 and 955:
Quantize setting 192 384 Correspond
- Page 956 and 957:
• Defeat Interpretation Syncopati
- Page 958 and 959:
Score This parameter is accessed vi
- Page 960 and 961:
Changing the Horizontal Position of
- Page 962 and 963:
Changing the Beaming of Notes By de
- Page 964 and 965:
• Independent Grace Changing the
- Page 966 and 967:
Note: Auto Style can only be chosen
- Page 968 and 969:
• Voice parameters: The parameter
- Page 970 and 971:
To copy a staff style and assign it
- Page 972 and 973:
5 Click the Import button. All staf
- Page 974 and 975:
Size Use this parameter to determin
- Page 976 and 977:
Head Controls the appearance of not
- Page 978 and 979:
2 Draw a line (between notes) where
- Page 980 and 981:
You can, of course, also insert not
- Page 982 and 983:
Note: As always, rests are displaye
- Page 984 and 985:
These options allow you to have two
- Page 986 and 987:
Getting to Know the Score Set Windo
- Page 988 and 989:
Brackets and bar lines can also be
- Page 990 and 991:
Scaling doesn’t take place on ins
- Page 992 and 993:
To switch to Page Score view Do one
- Page 994 and 995:
Editing Local Margins You can move
- Page 996 and 997:
3 Start printing by choosing File >
- Page 998 and 999:
Displaying Folders If the current d
- Page 1001 and 1002:
Project and File Interchange 32 Mov
- Page 1003 and 1004:
Sharing is essentially broken down
- Page 1005 and 1006:
By default, all items of the matchi
- Page 1007 and 1008:
2 Click the Create button in the di
- Page 1009 and 1010:
• Format 1 can contain multiple t
- Page 1011 and 1012:
3 Choose the destination directory,
- Page 1013 and 1014:
Importing and Opening OMF Files The
- Page 1015 and 1016:
Set the start time of first importe
- Page 1017 and 1018:
Working with Soundtrack Pro STAP Fi
- Page 1019 and 1020:
3 Define the following parameters,
- Page 1021 and 1022:
3 Define the following parameters,
- Page 1023 and 1024:
2 Define the following parameters,
- Page 1025 and 1026:
Advanced Tempo Operations 33 Logic
- Page 1027 and 1028:
The Tempo track displays tempo chan
- Page 1029 and 1030:
The display range (the scale shown
- Page 1031 and 1032:
Given this behavior, you should avo
- Page 1033 and 1034:
µ Drag the Tempo tab, which change
- Page 1035 and 1036:
• Try out different tempo variati
- Page 1037 and 1038:
Scaling Tempo Changes in the Tempo
- Page 1039 and 1040:
• Tempo Response: This parameter
- Page 1041 and 1042:
Beat Mapping Regions 34 You will ge
- Page 1043 and 1044:
Once selected, short horizontal lin
- Page 1045 and 1046:
There are a number of ways to impro
- Page 1047:
Tip: If using the “Tolerate missi
- Page 1050 and 1051:
• Creating and Editing Transposit
- Page 1052 and 1053:
Transposition events only affect MI
- Page 1054 and 1055:
µ Click the event with the Eraser
- Page 1057 and 1058:
Working in the Environment 36 It is
- Page 1059 and 1060:
You determine the MIDI signal flow
- Page 1061 and 1062:
2 Press Return to confirm the new n
- Page 1063 and 1064:
Moving Objects You can move objects
- Page 1065 and 1066:
• Object move up • Object move
- Page 1067 and 1068:
• Sequencer Input object: This re
- Page 1069 and 1070:
To make a direct output connection
- Page 1071 and 1072:
• No: Your cabling takes place, b
- Page 1073 and 1074:
To route the signal of special outp
- Page 1075 and 1076:
You can also move selections of Env
- Page 1077 and 1078:
Logic Pro maintains an internal lis
- Page 1079:
This creates the mini Environment w
- Page 1082 and 1083:
• Chord Memorizer Objects (p. 113
- Page 1084 and 1085:
If the checkbox is not selected, th
- Page 1086 and 1087:
• No Reset: If the No Reset param
- Page 1088 and 1089:
Program Names There are 128 program
- Page 1090 and 1091:
Cabling Directly to a Sub-Channel T
- Page 1092 and 1093:
• The names of GM Standard drum s
- Page 1094 and 1095:
Custom Bank Selects Logic Pro provi
- Page 1096 and 1097:
µ Choose New > Touch Tracks from t
- Page 1098 and 1099:
Transpos (Transposition) When you d
- Page 1100 and 1101:
Don’t worry about choosing the wr
- Page 1102 and 1103:
• The Options > Apply Buffer Temp
- Page 1104 and 1105:
• Behave as Menu: Select the Beha
- Page 1106 and 1107:
Value As This parameter determines
- Page 1108 and 1109:
4-Channel Vector Mode If you set a
- Page 1110 and 1111:
Data values of 126 and 127 have a s
- Page 1112 and 1113:
The positions of events in the list
- Page 1114 and 1115:
Although you can have any number of
- Page 1116 and 1117:
• Shift-Option-dragging any fader
- Page 1118 and 1119:
For faders, the Channel parameter c
- Page 1120 and 1121:
Bank The Bank parameter hides or sh
- Page 1122 and 1123:
Keyboard Objects You can use a keyb
- Page 1124 and 1125:
Logic Pro encloses all selected obj
- Page 1126 and 1127:
An arpeggiator features parameters
- Page 1128 and 1129:
Events that do not meet the conditi
- Page 1130 and 1131:
Copy Matching Events and Apply Oper
- Page 1132 and 1133:
Meta events 122 to 127 affect trans
- Page 1134 and 1135:
• Transposition pop-up menu: Defi
- Page 1136 and 1137:
To create a new chord memorizer µ
- Page 1138 and 1139:
2 Select the Listen checkbox in the
- Page 1140 and 1141:
By default, the Sequencer Input obj
- Page 1142 and 1143:
Internal Objects Internal objects i
- Page 1144 and 1145:
Channel Strip Objects The Environme
- Page 1146 and 1147:
• Aux: Auxilliary channel strip,
- Page 1149 and 1150:
Working with Video 38 Logic Pro all
- Page 1151 and 1152:
Using the Movie Window You can drag
- Page 1153 and 1154:
Video track settings can be adjuste
- Page 1155 and 1156:
Handling QuickTime Movie Audio Trac
- Page 1157 and 1158:
Working with Surround 39 Logic Pro
- Page 1159 and 1160:
LCRS Surround Format LCRS stands fo
- Page 1161 and 1162:
7.1 (SDDS-Sony Dynamic Digital Soun
- Page 1163 and 1164:
µ Click the Preferences button in
- Page 1165 and 1166:
2 Choose the surround format you wa
- Page 1167 and 1168:
µ Click one of the three Initializ
- Page 1169 and 1170:
To determine the project surround f
- Page 1171 and 1172:
To set a channel strip’s output f
- Page 1173 and 1174:
2 Click the Mixer tab, and choose a
- Page 1175 and 1176:
• A number of speaker icons surro
- Page 1177 and 1178:
Using the Surround Balancer If the
- Page 1179 and 1180:
Channel mapping, panning, and mixin
- Page 1181 and 1182:
When a multi-channel plug-in is fir
- Page 1183 and 1184:
Note: Use the Bounce Extensions pre
- Page 1185 and 1186:
Positioning the Surround Speakers T
- Page 1187 and 1188:
The center speaker is usually used
- Page 1189 and 1190:
Synchronizing Logic Pro 40 Logic Pr
- Page 1191 and 1192:
Using the Sync Button You can use t
- Page 1193 and 1194:
Note: When using Pickup Clock with
- Page 1195 and 1196:
Each arrange track can act as a tap
- Page 1197:
If MIDI and Audio Are Not Synchroni
- Page 1200 and 1201:
The audio interface input and outpu
- Page 1202 and 1203:
As an example: Imagine a simple son
- Page 1204 and 1205:
The last thing to do is to get arou
- Page 1206 and 1207:
Importing Split Channel Files Nothi
- Page 1208 and 1209:
Interleaved or Split Bounce File? I
- Page 1210 and 1211:
The Project Settings window feature
- Page 1212 and 1213:
To open the Synchronization project
- Page 1214 and 1215:
Logic Pro automatically interprets
- Page 1216 and 1217:
• Deviation slider: This display
- Page 1218 and 1219:
MIDI Synchronization Settings The M
- Page 1220 and 1221:
Logic Pro also obeys Full Frame Mes
- Page 1222 and 1223:
Metronome Settings The Metronome pr
- Page 1224 and 1225:
Recording Settings The Recording pr
- Page 1226 and 1227:
Core Audio Recording Settings • R
- Page 1228 and 1229:
• User: Root Key pop-up menu: All
- Page 1230 and 1231:
Detuned octaves are more noticeable
- Page 1232 and 1233:
Audio Settings The Audio project se
- Page 1234 and 1235:
MIDI Settings The MIDI project sett
- Page 1236 and 1237:
• Instrument Without MIDI Thru Fu
- Page 1238 and 1239:
• Control Changes, 0-15, 64-71, a
- Page 1240 and 1241:
The following describes the global
- Page 1242 and 1243:
• Hide Muted Regions checkbox: Ex
- Page 1244 and 1245:
• Page Offset field: This value i
- Page 1246 and 1247:
Logic Pro automatically converts no
- Page 1248 and 1249:
Pitch Logic Pro assigns each note t
- Page 1250 and 1251:
Chords & Grids Settings These are g
- Page 1252 and 1253:
Clefs & Signatures Settings These a
- Page 1254 and 1255:
Note: Only automatically displayed
- Page 1256 and 1257:
Note: If you have a high-resolution
- Page 1258 and 1259:
This makes playback sound much more
- Page 1260 and 1261:
• Chromatic: Allows you to use tw
- Page 1262 and 1263:
• FireWire: Choose this mode to o
- Page 1265 and 1266:
Preferences in Logic Pro 44 Prefere
- Page 1267 and 1268:
A separate preference file, also st
- Page 1269 and 1270:
• Create New Project using Defaul
- Page 1271 and 1272:
• Pointer Tool in Arrange Provide
- Page 1273 and 1274:
• Smooth Cycle Algorithm checkbox
- Page 1275 and 1276:
Audio Preferences in Logic Pro Audi
- Page 1277 and 1278:
Note: When setting an output device
- Page 1279 and 1280:
For full details about activating D
- Page 1281 and 1282:
• Low Latency Mode checkbox and L
- Page 1283 and 1284:
Bounce Extensions Pane The Bounce E
- Page 1285 and 1286:
Audio Sample Editor Preferences The
- Page 1287 and 1288:
Audio MP3 Preferences The MP3 pane
- Page 1289 and 1290:
Audio Nodes Preferences The Nodes p
- Page 1291 and 1292:
All selected checkboxes will send a
- Page 1293 and 1294:
MIDI Sync Preferences The Sync pane
- Page 1295 and 1296:
Display Preferences in Logic Pro Di
- Page 1297 and 1298:
• Display SMPTE, Display Tempo As
- Page 1299 and 1300:
Piano Roll Display Preferences Thes
- Page 1301 and 1302:
• Floating Palette View pop-up me
- Page 1303 and 1304:
Automation Preferences in Logic Pro
- Page 1305 and 1306:
Control Surface Preferences in Logi
- Page 1307:
Sharing Preferences in Logic Pro Sh
- Page 1310 and 1311:
1310 Glossary ALAC Abbreviation for
- Page 1312 and 1313:
1312 Glossary Auto Track Zoom Funct
- Page 1314 and 1315:
1314 Glossary Browser A tab in the
- Page 1316 and 1317:
1316 Glossary comping A process whe
- Page 1318 and 1319:
1318 Glossary DFS An abbreviation f
- Page 1320 and 1321:
1320 Glossary Event List A list tha
- Page 1322 and 1323:
1322 Glossary grid The Logic Pro gr
- Page 1324 and 1325:
1324 Glossary key The scale used in
- Page 1326 and 1327:
1326 Glossary master channel strip
- Page 1328 and 1329:
1328 Glossary mono Short for monoph
- Page 1330 and 1331:
1330 Glossary pan, pan position The
- Page 1332 and 1333:
1332 Glossary Q factor A term gener
- Page 1334 and 1335:
1334 Glossary sample rate When an a
- Page 1336 and 1337:
1336 Glossary Signature track Globa
- Page 1338 and 1339:
1338 Glossary Surround Panner Repla
- Page 1340 and 1341:
1340 Glossary Transform window Logi
- Page 1342:
1342 Glossary zoom An action that e


