Attention! Your ePaper is waiting for publication!
By publishing your document, the content will be optimally indexed by Google via AI and sorted into the right category for over 500 million ePaper readers on YUMPU.
This will ensure high visibility and many readers!

Your ePaper is now published and live on YUMPU!
You can find your publication here:
Share your interactive ePaper on all platforms and on your website with our embed function

Logic Pro 9 User Manual - Help Library - Apple
Logic Pro 9 User Manual - Help Library - Apple
Logic Pro 9 User Manual - Help Library - Apple
You also want an ePaper? Increase the reach of your titles
YUMPU automatically turns print PDFs into web optimized ePapers that Google loves.
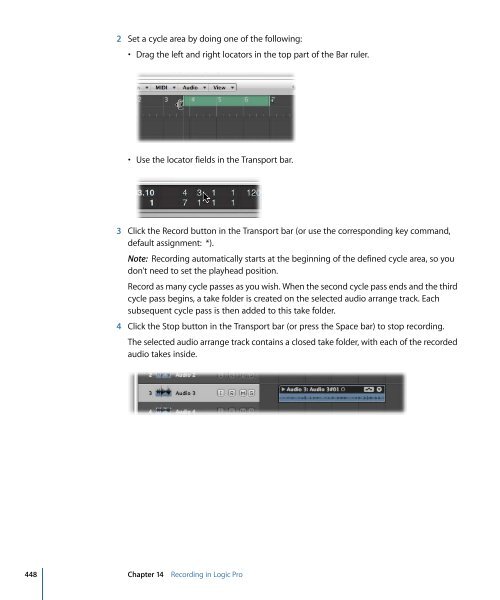
2 Set a cycle area by doing one of the following:<br />
• Drag the left and right locators in the top part of the Bar ruler.<br />
• Use the locator fields in the Transport bar.<br />
3 Click the Record button in the Transport bar (or use the corresponding key command,<br />
default assignment: *).<br />
Note: Recording automatically starts at the beginning of the defined cycle area, so you<br />
don’t need to set the playhead position.<br />
Record as many cycle passes as you wish. When the second cycle pass ends and the third<br />
cycle pass begins, a take folder is created on the selected audio arrange track. Each<br />
subsequent cycle pass is then added to this take folder.<br />
4 Click the Stop button in the Transport bar (or press the Space bar) to stop recording.<br />
The selected audio arrange track contains a closed take folder, with each of the recorded<br />
audio takes inside.<br />
448 Chapter 14 Recording in <strong>Logic</strong> <strong>Pro</strong>
2 Set a cycle area by doing one of the following: • Drag the left and right locators in the top part of the Bar ruler. • Use the locator fields in the Transport bar. 3 Click the Record button in the Transport bar (or use the corresponding key command, default assignment: *). Note: Recording automatically starts at the beginning of the defined cycle area, so you don’t need to set the playhead position. Record as many cycle passes as you wish. When the second cycle pass ends and the third cycle pass begins, a take folder is created on the selected audio arrange track. Each subsequent cycle pass is then added to this take folder. 4 Click the Stop button in the Transport bar (or press the Space bar) to stop recording. The selected audio arrange track contains a closed take folder, with each of the recorded audio takes inside. 448 Chapter 14 Recording in <strong>Logic</strong> <strong>Pro</strong>
5 Open the take folder by doing one of the following: • Click the disclosure triangle in the top-left corner of the take folder (or use the Un/disclose Take Folder key command). • Double-click the take folder. Recording Additional Audio Takes After recording single or multiple audio takes to a single arrange track, you can continue to record additional takes on the same track. • You can record over an existing region, or regions. • You can record over an existing take folder, or take folders. Although this is not a recording function per se, you can also drag and drop other recordings onto an existing take folder. Depending on the size of the recording, it will be added as either a new take or a new comp, and the take folder will be resized accordingly. Note: Take folders are created only when a recording has been made. If you attempt to drag a region onto another region that was originally imported (not recorded), this will not create a take folder. You can, however, “pack” a take folder from any selected regions—recorded or imported. For details, see Packing Regions into a Take Folder. Recording over an Existing Audio Region A take folder is automatically created when you record over an existing audio region. To record over an existing audio region 1 Set the playhead to a position where the new recording will overlap the existing region by a length that exceeds the count-in or pre-roll duration—which you have set in File > <strong>Pro</strong>ject Settings > Recording. 2 Click the Record button in the Transport bar (or use the corresponding key command, default assignment: *). Chapter 14 Recording in <strong>Logic</strong> <strong>Pro</strong> 449
- Page 1 and 2:
Logic Pro 9 User Manual
- Page 3 and 4:
Preface Chapter 1 Chapter 2 Chapter
- Page 5 and 6:
Chapter 8 Chapter 9 163 166 166 167
- Page 7 and 8:
Chapter 14 387 393 394 398 401 402
- Page 9 and 10:
Chapter 18 Chapter 19 Chapter 20 55
- Page 11 and 12:
Chapter 26 Chapter 27 Chapter 28 72
- Page 13 and 14:
Chapter 32 Chapter 33 Chapter 34 91
- Page 15 and 16:
Chapter 38 Chapter 39 Chapter 40 Ch
- Page 17 and 18:
Welcome to Logic Pro Logic Pro is a
- Page 19:
• Logic Studio Working with Apoge
- Page 22 and 23:
MIDI recordings are used to trigger
- Page 24 and 25:
A Logic Pro project file contains a
- Page 26 and 27:
MIDI Regions and Events MIDI region
- Page 28 and 29:
• External MIDI control surfaces
- Page 30 and 31:
MIDI Interface Your Mac computer do
- Page 32 and 33:
To facilitate this, an amplifier an
- Page 34 and 35:
Note: Condenser microphones require
- Page 36 and 37:
Note: USB audio interfaces should a
- Page 38 and 39:
AES/EBU The AES/EBU (Audio Engineer
- Page 40 and 41:
If the MIDI interface connected to
- Page 42 and 43:
For example, if you buy a new keybo
- Page 44 and 45:
µ Click the Preferences button in
- Page 46 and 47:
Networking Considerations The prima
- Page 48 and 49:
The Track Node buttons have four po
- Page 51 and 52:
Overview of the Logic Pro Interface
- Page 53 and 54:
The following is an overview of the
- Page 55 and 56:
• Track list: This is where you s
- Page 57 and 58:
The following image shows the Inspe
- Page 59 and 60:
You can add, edit, delete, and rena
- Page 61 and 62:
Introducing the Loop Browser The Lo
- Page 63 and 64:
Introducing the Library The Library
- Page 65 and 66:
• Path menu: Displays the levels
- Page 67 and 68:
Introducing Project Notes The Proje
- Page 69 and 70:
The Event List can display two type
- Page 71 and 72:
Introducing the Tempo List The Temp
- Page 73 and 74:
Introducing the Mixer The Mixer is
- Page 75 and 76:
Introducing the Piano Roll Editor T
- Page 77 and 78:
Local Menu Bars A window’s local
- Page 79 and 80:
Global Tracks All linear editing wi
- Page 81 and 82:
The Sample Editor is shown, display
- Page 83 and 84:
11 Select the software instrument t
- Page 85 and 86:
If you want to select an item that
- Page 87 and 88:
Customizing Your Window Setup 4 Log
- Page 89 and 90:
Key focus areas within windows—su
- Page 91 and 92:
To open a window Do one of the foll
- Page 93 and 94:
µ Click the close button at the to
- Page 95 and 96:
To adjust the size of a window Do o
- Page 97 and 98:
µ Set the default size for plug-in
- Page 99 and 100:
You can move the visible section by
- Page 101 and 102:
To zoom in µ Click the widely spac
- Page 103 and 104:
To change the zoom level using the
- Page 105 and 106:
Note: When a marquee selection is a
- Page 107 and 108:
• Content Link: This mode results
- Page 109 and 110:
2 Drag the buttons you want to add
- Page 111 and 112:
• Time and Bar: Displays the Bar
- Page 113 and 114:
µ Control-click (or right-click) a
- Page 115 and 116:
Note: Screensets 1 to 9 can be reca
- Page 117:
To delete the current screenset µ
- Page 120 and 121:
Setting the Playhead Position The p
- Page 122 and 123:
When typing in a full position usin
- Page 124 and 125:
• Play from Left Window Edge: Pla
- Page 126 and 127:
• Jump Between Cycle- and Project
- Page 128 and 129:
The cycle area is defined by the po
- Page 130 and 131:
This has no impact on the Bar ruler
- Page 132 and 133:
Defining a Cycle with Markers Dragg
- Page 134 and 135:
2 Click the Chase tab, then select
- Page 136 and 137:
2 Turn on or turn off individual fu
- Page 138 and 139:
• Signature/Division: The (Time)
- Page 140 and 141:
To open a new SMPTE or Bar Display
- Page 142 and 143:
2 Choose one of the following setti
- Page 144 and 145:
Opening Marker Areas and Windows Th
- Page 146 and 147:
Creating Markers You can create mar
- Page 148 and 149:
Markers created in these ways are a
- Page 150 and 151:
• Select the markers, then choose
- Page 152 and 153:
2 Type the new marker name in the M
- Page 154 and 155:
3 Choose settings in the Font windo
- Page 156 and 157:
To adjust a marker to fit a cycle
- Page 158 and 159:
Switching Between Marker Alternativ
- Page 160 and 161:
When you create a new project (or u
- Page 162 and 163:
3 Browse to the location where you
- Page 164 and 165:
If a project is already loaded, you
- Page 166 and 167:
Opening and Creating Projects Autom
- Page 168 and 169:
You can also import the following s
- Page 170 and 171:
Tip: You can customize the column v
- Page 172 and 173:
The Browser tab updates to show a t
- Page 174 and 175:
• Click the Settings button in th
- Page 176 and 177:
µ Click the Sample Rate display in
- Page 178 and 179:
Time signatures do not affect the p
- Page 180 and 181:
µ Open the Signature track, and do
- Page 182 and 183:
Click the Dim Master Volume button
- Page 184 and 185:
The following should be taken into
- Page 186 and 187:
Saving Projects When you choose Fil
- Page 188 and 189:
Saving a Project as a Template You
- Page 191 and 192:
Basic Operations 8 There are a numb
- Page 193 and 194:
2 Type in 45, followed by the Retur
- Page 195 and 196:
µ Click the Preferences button in
- Page 197 and 198:
• Save a new key command set: Ent
- Page 199 and 200:
Assigning Key Commands to Computer
- Page 201 and 202:
The Assignments field displays the
- Page 203 and 204:
Tools are accessed in the Tool menu
- Page 205 and 206:
• Opens Tool Menu: Right-clicking
- Page 207 and 208:
• Marquee Tool Click Zones: When
- Page 209 and 210:
Flex Tool The Flex tool provides yo
- Page 211 and 212:
Using Selection Techniques Whenever
- Page 213 and 214:
To select all events (of a specifie
- Page 215 and 216:
• Edit > Select Equal Colored Reg
- Page 217 and 218:
Paste at Original Position This com
- Page 219:
To erase the Undo History µ Choose
- Page 222 and 223:
Understanding Tracks and Channel St
- Page 224 and 225:
Configuring the Track Header The tr
- Page 226 and 227:
• Buttons section: Select the che
- Page 228 and 229:
To create one or more new tracks (a
- Page 230 and 231:
Software Instrument Tracks You can
- Page 232 and 233:
Creating Tracks Only The commands a
- Page 234 and 235:
Creating Tracks for Selected Region
- Page 236 and 237:
Naming Tracks in the Arrange Area Y
- Page 238 and 239:
To create a track name Do one of th
- Page 240 and 241:
Assigning Tracks to Environment Obj
- Page 242 and 243:
Assigning Track Icons in the Track
- Page 244 and 245:
A bullet to the left of the track n
- Page 246 and 247:
Soloing When the Track Solo Buttons
- Page 248 and 249:
To freeze a track 1 Click the Freez
- Page 250 and 251:
You can now perform your edits, and
- Page 252 and 253:
Clicking a Track Protect button tog
- Page 254 and 255:
3 Set the following parameters, as
- Page 256 and 257:
To bounce regions in place 1 Select
- Page 258 and 259:
The Bounce Track in Place dialog ap
- Page 260 and 261:
• Include Volume/Pan Automation c
- Page 262 and 263:
The Arrange (and Mixer) channel str
- Page 264 and 265:
Setting Channel Strip Input Format
- Page 266 and 267:
To set the Pan or Balance position
- Page 268 and 269:
A menu appears, showing all availab
- Page 270 and 271:
To use the Hand tool in the Arrange
- Page 272 and 273:
µ On channel strips where Insert s
- Page 274 and 275:
The Library displays all channel st
- Page 276 and 277:
You can remotely switch between cha
- Page 278 and 279:
The plug-in window opens automatica
- Page 280 and 281:
To adjust a parameter slider Do one
- Page 282 and 283:
When the Link Button Is Switched Of
- Page 284 and 285:
• Choose the Load Setting command
- Page 286 and 287:
Replacing Setting-Compatible Plug-i
- Page 288 and 289:
Hiding and Showing Extended Paramet
- Page 290 and 291:
Learning About Effect Routings Ther
- Page 292 and 293:
Similarly, you can completely chang
- Page 294 and 295:
A post fader signal level, routed t
- Page 296 and 297:
Tip: Many of the setup and routing
- Page 298 and 299:
3 Click GM Device in the left colum
- Page 300 and 301:
To reassign tracks to channels usin
- Page 302 and 303:
• If you use the Track Parameter
- Page 304 and 305:
• Program, Volume, and Pan: Trans
- Page 306 and 307:
7 Insert the effects in the Insert
- Page 308 and 309:
Tuning Software Instruments The Fil
- Page 310 and 311:
Important: Start Logic Pro first, t
- Page 312 and 313:
2 Connect the output (or output pai
- Page 314 and 315:
You can see the results of the vali
- Page 316 and 317:
Disabling Plug-ins The Audio Units
- Page 318 and 319:
Logic Pro also supports Broadcast W
- Page 320 and 321:
Navigating in the Browser You can s
- Page 322 and 323:
Restricting the search to a particu
- Page 324 and 325:
To remove a single advanced conditi
- Page 326 and 327:
To access the Loop Browser in the A
- Page 328 and 329:
When you place Software Instrument
- Page 330 and 331:
Column view offers a standard Mac O
- Page 332 and 333:
As you can see from this example, t
- Page 334 and 335:
Creating a Collection of Your Favor
- Page 336 and 337:
4 Click the Play button to preview
- Page 338 and 339:
The dialog below opens. 2 Browse to
- Page 340 and 341:
Audio regions that point to compres
- Page 342 and 343:
2 Choose settings in the Import ReC
- Page 345 and 346:
Getting to Know Regions 12 When aud
- Page 347 and 348:
It is, of course, possible to direc
- Page 349 and 350:
Feature Quantize parameter availabl
- Page 351 and 352:
The Sample Editor opens, with the e
- Page 353 and 354:
To open the Audio Bin window µ Cho
- Page 355 and 356:
Warning: If any of the deleted regi
- Page 357 and 358:
Snapping Edits to Zero Crossings If
- Page 359:
Updating the Audio Region Arrangeme
- Page 362 and 363:
• Creating Multiple Copies of Reg
- Page 364 and 365:
4 In the Colors window that opens,
- Page 366 and 367:
To snap to an absolute, not relativ
- Page 368 and 369:
To change the drag mode µ Choose o
- Page 370 and 371:
Using Shortcut Menus Many selection
- Page 372 and 373:
2 Drag to select or Shift-select th
- Page 374 and 375:
To assign the same name to multiple
- Page 376 and 377:
c Click the OK button to replace th
- Page 378 and 379:
2 Drag the marquee rectangle to mak
- Page 380 and 381:
Using the Marquee Selection to Crea
- Page 382 and 383:
To restore a deleted audio region D
- Page 384 and 385:
µ Choose the View > Event Position
- Page 386 and 387:
• Nudge Region/Event Position Rig
- Page 388 and 389:
Note: If Hyper Draw or automation i
- Page 390 and 391:
Adjusting the Start or End Point of
- Page 392 and 393:
• Set the value in the Transport
- Page 394 and 395:
To copy a region (method 1) µ Opti
- Page 396 and 397:
To remove gaps between regions 1 Se
- Page 398 and 399: All selected regions are cut at the
- Page 400 and 401: The alias appears on the selected t
- Page 402 and 403: 2 In the dialog that appears, set t
- Page 404 and 405: Note: The EXS instrument is saved t
- Page 406 and 407: 2 Select (turn on) the Loop option
- Page 408 and 409: 2 Choose Region > Loops > Convert t
- Page 410 and 411: All selected regions located wholly
- Page 412 and 413: Merging Regions (General Tools and
- Page 414 and 415: No Mixdown Situation If there are s
- Page 416 and 417: When opened, folders look just like
- Page 418 and 419: You should ensure that the folder i
- Page 420 and 421: Creating Fades A fade in starts at
- Page 422 and 423: µ Select a region, then edit the F
- Page 424 and 425: To change the playback speed Do one
- Page 426 and 427: Editing Several Regions Simultaneou
- Page 428 and 429: • Advanced Quantization: Q-Flam:
- Page 431 and 432: Recording in Logic Pro 14 This chap
- Page 433 and 434: µ Click the Sample Rate display in
- Page 435 and 436: Setting Up the Metronome for Record
- Page 437 and 438: For details about the Metronome pro
- Page 439 and 440: Tip: You can leave the Input Monito
- Page 441 and 442: To choose the recording file type 1
- Page 443 and 444: Record-Enabling Tracks You can make
- Page 445 and 446: • Multitrack recording: You can r
- Page 447: Imagine a guitar solo being perform
- Page 451 and 452: Audio Multitrack Recording You can
- Page 453 and 454: The Autopunch feature can be used f
- Page 455 and 456: 5 Stop recording by clicking the St
- Page 457 and 458: The recording appears as a single M
- Page 459 and 460: 4 Set a cycle area by doing one of
- Page 461 and 462: Only the actual recording of MIDI e
- Page 463 and 464: To record several MIDI tracks in Cy
- Page 465 and 466: When you stop recording, you can wo
- Page 467 and 468: 2 Open the Overlapping Recordings p
- Page 469 and 470: 3 Select the checkboxes that corres
- Page 471 and 472: To color a take in an open or close
- Page 473 and 474: MIDI Step Input Recording The Step
- Page 475 and 476: 4 Click a key in the Step Input Key
- Page 477 and 478: Triplets, Dotted Note Groups The
- Page 479: The Space bar provides a Sustain fu
- Page 482 and 483: Getting to Know Take Folders You wi
- Page 484 and 485: The following key commands enable y
- Page 486 and 487: Creating Comps You can use quick sw
- Page 488 and 489: Extending a take region section (dr
- Page 490 and 491: To alternate selected comp areas be
- Page 492 and 493: Resizing Take Regions You can edit
- Page 494 and 495: To cut a take folder µ Click the t
- Page 496 and 497: The first cut occurs at the clicked
- Page 498 and 499:
To create a new take lane for a tak
- Page 500 and 501:
To create a new comp from the activ
- Page 502 and 503:
3 Type the new name in the dialog t
- Page 504 and 505:
To delete a take 1 Click the arrow
- Page 506 and 507:
2 Click the arrow in the top right
- Page 508 and 509:
To export an active take to a new t
- Page 510 and 511:
To export an active comp to a new t
- Page 512 and 513:
To move an active take to a new tra
- Page 514 and 515:
2 Click the arrow in the top right
- Page 516 and 517:
To flatten a take folder 1 Click th
- Page 518 and 519:
2 Click the arrow in the top right
- Page 520 and 521:
This command—Unpack Take Folder,
- Page 522 and 523:
This command—“Unpack Take Folde
- Page 525 and 526:
Flex Time Editing 16 Flex Time edit
- Page 527 and 528:
To assign a flex mode to an audio t
- Page 529 and 530:
Getting to Know the Flex Modes Flex
- Page 531 and 532:
• Crossfade: Adjusts the crossfad
- Page 533 and 534:
• If you click in the area where
- Page 535 and 536:
Moving Flex Markers and Time Stretc
- Page 537 and 538:
Note: Time compression or expansion
- Page 539 and 540:
2 Click in the upper half of the se
- Page 541 and 542:
A yellow guideline appears in the o
- Page 543 and 544:
µ Using the Flex tool, place the p
- Page 545 and 546:
To time stretch using region border
- Page 547 and 548:
Editing Audio in the Sample Editor
- Page 549 and 550:
µ Drag the Sample Editor button, w
- Page 551 and 552:
To control playback using the Preli
- Page 553 and 554:
Navigating Audio Files in the Sampl
- Page 555 and 556:
To select a particular section of a
- Page 557 and 558:
To select a section of an audio fil
- Page 559 and 560:
Using Transient Markers to Edit in
- Page 561 and 562:
• − button: Decreases the numbe
- Page 563 and 564:
This detects transients across the
- Page 565 and 566:
2 Choose the desired settings in th
- Page 567 and 568:
Tip: If you use the Silence functio
- Page 569 and 570:
Tip: You can also use the Invert fu
- Page 571 and 572:
2 Choose the desired settings in th
- Page 573 and 574:
To enter relative display mode Do o
- Page 575 and 576:
Note: You need to zoom the waveform
- Page 577 and 578:
The “Time and Pitch Machine” co
- Page 579 and 580:
Setting Tempo Parameters in the “
- Page 581 and 582:
Using the Sample Editor’s Groove
- Page 583 and 584:
Using the Sample Editor’s Audio E
- Page 585 and 586:
Setting Audio Energizer Parameters
- Page 587 and 588:
Applying Spike Reduction in the Sil
- Page 589 and 590:
Opening the Sample Editor’s “Au
- Page 591 and 592:
• Velocity Threshold: Sets the th
- Page 593 and 594:
• Quantize by: Open this pop-up m
- Page 595:
Using AudioSuite Plug-ins The Sampl
- Page 598 and 599:
Note: Bounced files can only follow
- Page 600 and 601:
The locator range should closely ma
- Page 602 and 603:
4 Choose Audio > Time Stretch Regio
- Page 604 and 605:
The selected regions are analyzed;
- Page 606 and 607:
To remove tempo information from an
- Page 608 and 609:
Getting to Know the Strip Silence W
- Page 610 and 611:
Automatic Anchor Creation When you
- Page 613 and 614:
Managing Audio Files 20 This chapte
- Page 615 and 616:
Grouping Files in the Audio Bin You
- Page 617 and 618:
To open or close one or more groups
- Page 619 and 620:
This expands or collapses all audio
- Page 621 and 622:
Logic Pro updates the path informat
- Page 623 and 624:
Note: If a file of the same name ex
- Page 625 and 626:
Note: If you want to simultaneously
- Page 627:
• Double-click the exclamation ma
- Page 630 and 631:
Understanding Region- and Event-bas
- Page 632 and 633:
The Q-Swing field is located just b
- Page 634 and 635:
You can also quantize sections of t
- Page 636 and 637:
3 In the Group Settings window, sel
- Page 638 and 639:
Quantizing MIDI Events Event-based
- Page 640 and 641:
2 Do one of the following, dependin
- Page 642 and 643:
Important: The source audio or MIDI
- Page 644 and 645:
• Granulation (ms): Determines th
- Page 647 and 648:
Introduction to MIDI Editing 22 Thi
- Page 649 and 650:
• Disabled: Double-clicking a MID
- Page 651 and 652:
2 Click the Editing tab, then choos
- Page 653 and 654:
• Deleting or moving portions of
- Page 655 and 656:
Editing MIDI Events in the Piano Ro
- Page 657 and 658:
• The vertical position of note e
- Page 659 and 660:
When the Link Button Is Turned Off
- Page 661 and 662:
The Snap menu setting applies to th
- Page 663 and 664:
• Click the original note with th
- Page 665 and 666:
Important: A Redo list is not displ
- Page 667 and 668:
• Nudge Region/Event Position Lef
- Page 669 and 670:
• Note Overlap Correction for Rep
- Page 671 and 672:
Using the Copy MIDI Events Settings
- Page 673 and 674:
You can override this behavior by h
- Page 675 and 676:
For more information on the Functio
- Page 677 and 678:
Customizing the Piano Roll Editor Y
- Page 679 and 680:
Editing MIDI in the Hyper Editor 24
- Page 681 and 682:
Getting to Know the Hyper Editor Th
- Page 683 and 684:
You can also alter the width and st
- Page 685 and 686:
To create multiple events in a line
- Page 687 and 688:
This is ideal when adding events wi
- Page 689 and 690:
To alter individual event values µ
- Page 691 and 692:
• Edit > Paste (or Command-V) pas
- Page 693 and 694:
2 Select the Auto Define checkbox i
- Page 695 and 696:
To rearrange the order of event def
- Page 697 and 698:
• C- Press (Channel Pressure): To
- Page 699 and 700:
Setting the MIDI Channel Number A c
- Page 701 and 702:
Creating a Hyper Set To create a ne
- Page 703:
µ Choose Delete Hyper Set from the
- Page 706 and 707:
Getting to Know the Event List All
- Page 708 and 709:
The Event List can also display a l
- Page 710 and 711:
This is particularly important for
- Page 712 and 713:
You can use these filter buttons al
- Page 714 and 715:
Protecting the Position of Events T
- Page 716 and 717:
µ Click-hold the specific position
- Page 718 and 719:
• Unselected Within Selection: Er
- Page 720 and 721:
Mapped Instrument Notes If the edit
- Page 722 and 723:
• Other manufacturers use various
- Page 724 and 725:
Meta Events Meta events are control
- Page 727 and 728:
Editing MIDI Events in the Transfor
- Page 729 and 730:
Depending on your needs, it may be
- Page 731 and 732:
Random Pitch, Velocity, Length Sets
- Page 733 and 734:
This preset is a great creative opt
- Page 735 and 736:
Reverse Pitch Inverts the pitch of
- Page 737 and 738:
Velocity Limiter Limits the velocit
- Page 739 and 740:
Quantize Note Length Quantizes the
- Page 741 and 742:
• Delete selected events: Choose
- Page 743 and 744:
• Fix: The event type is altered.
- Page 745 and 746:
Using the Map 128 vertical bars ref
- Page 747 and 748:
This transform set now appears at t
- Page 749 and 750:
To convert MIDI note events to MIDI
- Page 751:
2 Click Select And Operate. To dele
- Page 754 and 755:
754 Chapter 27 Mixing • Assigning
- Page 756 and 757:
756 Chapter 27 Mixing Getting to Kn
- Page 758 and 759:
• Master channel strip: A global
- Page 760 and 761:
760 Chapter 27 Mixing Understanding
- Page 762 and 763:
762 Chapter 27 Mixing The Group Set
- Page 764 and 765:
When you choose an inactive group,
- Page 766 and 767:
766 Chapter 27 Mixing Soloing Chann
- Page 768 and 769:
768 Chapter 27 Mixing When setting
- Page 770 and 771:
770 Chapter 27 Mixing To avoid clip
- Page 772 and 773:
772 Chapter 27 Mixing To change the
- Page 774 and 775:
The following sections explain how
- Page 776 and 777:
776 Chapter 27 Mixing You can creat
- Page 778 and 779:
778 Chapter 27 Mixing 4 Use the aux
- Page 780 and 781:
780 Chapter 27 Mixing 2 Within the
- Page 782 and 783:
782 Chapter 27 Mixing When using ou
- Page 784 and 785:
784 Chapter 27 Mixing To define a c
- Page 786 and 787:
786 Chapter 27 Mixing 2 Double-clic
- Page 788 and 789:
788 Chapter 27 Mixing • Doppler b
- Page 790 and 791:
790 Chapter 27 Mixing Using the Bin
- Page 792 and 793:
792 Chapter 27 Mixing Open the View
- Page 794 and 795:
To assign a controller to one of th
- Page 796 and 797:
• Output channel strips—used as
- Page 798 and 799:
798 Chapter 27 Mixing Note: To view
- Page 800 and 801:
800 Chapter 27 Mixing Using Link Mo
- Page 802 and 803:
To copy a mixer setup 1 Select the
- Page 804 and 805:
804 Chapter 27 Mixing The Record En
- Page 806 and 807:
To move to a specific channel strip
- Page 809 and 810:
Working with Automation 28 Logic Pr
- Page 811 and 812:
The gray automation area appears on
- Page 813 and 814:
2 Click the Arrange tab, then adjus
- Page 815 and 816:
To set the same automation mode for
- Page 817 and 818:
2 Select checkboxes in the “Write
- Page 819 and 820:
• Click outside of all track auto
- Page 821 and 822:
• Delete All Automation on Select
- Page 823 and 824:
A dialog asks if you want to conver
- Page 825 and 826:
To offset your automation when Snap
- Page 827 and 828:
Using Automation Quick Access The A
- Page 829 and 830:
To activate Hyper Draw for the curr
- Page 831 and 832:
To use the Note Velocity mode 1 Cho
- Page 833 and 834:
Bouncing Your Project 29 You can re
- Page 835 and 836:
Defining the Bounce Range Before bo
- Page 837 and 838:
Setting Global Parameters in the Bo
- Page 839 and 840:
• Normalize pop-up menu: You can
- Page 841 and 842:
If the PCM option is unselected in
- Page 843 and 844:
Select the “Use default values”
- Page 845 and 846:
Simulate Write Only The “Simulate
- Page 847:
You can choose between the followin
- Page 850 and 851:
Creating Apple Loops in Logic Pro W
- Page 852 and 853:
Because one-shots are handled like
- Page 854 and 855:
There are two possible reasons for
- Page 856 and 857:
As an alternative, you can use the
- Page 858 and 859:
The Change Display Only mode does n
- Page 860 and 861:
If you want to turn an Apple Loops
- Page 862 and 863:
• Selecting Multiple Regions in t
- Page 864 and 865:
Getting to Know the Score Editor Th
- Page 866 and 867:
Important: Score display parameters
- Page 868 and 869:
To switch between the default score
- Page 870 and 871:
• The Display Quantize setting sh
- Page 872 and 873:
To display the Insert Defaults sett
- Page 874 and 875:
To resize the Hyper Draw area µ Gr
- Page 876 and 877:
The palette windows can have differ
- Page 878 and 879:
Note Objects in the Part Box The Pa
- Page 880 and 881:
Dynamic Symbols in the Part Box Dyn
- Page 882 and 883:
Note: The symbols in this Part box
- Page 884 and 885:
Apart from 2/4, 3/4, 4/4, 6/8, and
- Page 886 and 887:
D.S., D.C., Segno, and Coda Signs i
- Page 888 and 889:
Page and Line Break Symbols in the
- Page 890 and 891:
• Absolute Change (all values set
- Page 892 and 893:
To paste the Clipboard contents int
- Page 894 and 895:
An alias can be assigned a staff st
- Page 896 and 897:
Resizing Notes and Symbols in the S
- Page 898 and 899:
Creating and Editing Tied Notes in
- Page 900 and 901:
• Tuplet note values: Choose from
- Page 902 and 903:
• Independent Grace: These are al
- Page 904 and 905:
Note: Church rests cannot be longer
- Page 906 and 907:
These commands place the correspond
- Page 908 and 909:
Editing Repeat Signs and Bar Lines
- Page 910 and 911:
To insert text in the score 1 Selec
- Page 912 and 913:
Setting Special Text Object Paramet
- Page 914 and 915:
• Tempo Symbols: Used for the dis
- Page 916 and 917:
When a global text object is select
- Page 918 and 919:
Setting All Words and Syllables to
- Page 920 and 921:
µ Double-click one of the extensio
- Page 922 and 923:
The Chord Grid Library window consi
- Page 924 and 925:
Getting to Know the Chord Grid Sele
- Page 926 and 927:
• Number of Strings field: Displa
- Page 928 and 929:
After inserting chord grid symbols
- Page 930 and 931:
To modify the chord of an existing
- Page 932 and 933:
To move an existing fingering dot D
- Page 934 and 935:
µ Option-click an existing dot to
- Page 936 and 937:
To create a barre Do one of the fol
- Page 938 and 939:
The string is muted. To unmute a st
- Page 940 and 941:
• Choose Layout > Chord Grid Libr
- Page 942 and 943:
Importing and Exporting Chord Grid
- Page 944 and 945:
• Up/Downstroke: Placement is at
- Page 946 and 947:
Note: If you perform this procedure
- Page 948 and 949:
Copying Signatures You can copy tim
- Page 950 and 951:
µ Choose a number from the Alterna
- Page 952 and 953:
When simultaneously changing the se
- Page 954 and 955:
Quantize setting 192 384 Correspond
- Page 956 and 957:
• Defeat Interpretation Syncopati
- Page 958 and 959:
Score This parameter is accessed vi
- Page 960 and 961:
Changing the Horizontal Position of
- Page 962 and 963:
Changing the Beaming of Notes By de
- Page 964 and 965:
• Independent Grace Changing the
- Page 966 and 967:
Note: Auto Style can only be chosen
- Page 968 and 969:
• Voice parameters: The parameter
- Page 970 and 971:
To copy a staff style and assign it
- Page 972 and 973:
5 Click the Import button. All staf
- Page 974 and 975:
Size Use this parameter to determin
- Page 976 and 977:
Head Controls the appearance of not
- Page 978 and 979:
2 Draw a line (between notes) where
- Page 980 and 981:
You can, of course, also insert not
- Page 982 and 983:
Note: As always, rests are displaye
- Page 984 and 985:
These options allow you to have two
- Page 986 and 987:
Getting to Know the Score Set Windo
- Page 988 and 989:
Brackets and bar lines can also be
- Page 990 and 991:
Scaling doesn’t take place on ins
- Page 992 and 993:
To switch to Page Score view Do one
- Page 994 and 995:
Editing Local Margins You can move
- Page 996 and 997:
3 Start printing by choosing File >
- Page 998 and 999:
Displaying Folders If the current d
- Page 1001 and 1002:
Project and File Interchange 32 Mov
- Page 1003 and 1004:
Sharing is essentially broken down
- Page 1005 and 1006:
By default, all items of the matchi
- Page 1007 and 1008:
2 Click the Create button in the di
- Page 1009 and 1010:
• Format 1 can contain multiple t
- Page 1011 and 1012:
3 Choose the destination directory,
- Page 1013 and 1014:
Importing and Opening OMF Files The
- Page 1015 and 1016:
Set the start time of first importe
- Page 1017 and 1018:
Working with Soundtrack Pro STAP Fi
- Page 1019 and 1020:
3 Define the following parameters,
- Page 1021 and 1022:
3 Define the following parameters,
- Page 1023 and 1024:
2 Define the following parameters,
- Page 1025 and 1026:
Advanced Tempo Operations 33 Logic
- Page 1027 and 1028:
The Tempo track displays tempo chan
- Page 1029 and 1030:
The display range (the scale shown
- Page 1031 and 1032:
Given this behavior, you should avo
- Page 1033 and 1034:
µ Drag the Tempo tab, which change
- Page 1035 and 1036:
• Try out different tempo variati
- Page 1037 and 1038:
Scaling Tempo Changes in the Tempo
- Page 1039 and 1040:
• Tempo Response: This parameter
- Page 1041 and 1042:
Beat Mapping Regions 34 You will ge
- Page 1043 and 1044:
Once selected, short horizontal lin
- Page 1045 and 1046:
There are a number of ways to impro
- Page 1047:
Tip: If using the “Tolerate missi
- Page 1050 and 1051:
• Creating and Editing Transposit
- Page 1052 and 1053:
Transposition events only affect MI
- Page 1054 and 1055:
µ Click the event with the Eraser
- Page 1057 and 1058:
Working in the Environment 36 It is
- Page 1059 and 1060:
You determine the MIDI signal flow
- Page 1061 and 1062:
2 Press Return to confirm the new n
- Page 1063 and 1064:
Moving Objects You can move objects
- Page 1065 and 1066:
• Object move up • Object move
- Page 1067 and 1068:
• Sequencer Input object: This re
- Page 1069 and 1070:
To make a direct output connection
- Page 1071 and 1072:
• No: Your cabling takes place, b
- Page 1073 and 1074:
To route the signal of special outp
- Page 1075 and 1076:
You can also move selections of Env
- Page 1077 and 1078:
Logic Pro maintains an internal lis
- Page 1079:
This creates the mini Environment w
- Page 1082 and 1083:
• Chord Memorizer Objects (p. 113
- Page 1084 and 1085:
If the checkbox is not selected, th
- Page 1086 and 1087:
• No Reset: If the No Reset param
- Page 1088 and 1089:
Program Names There are 128 program
- Page 1090 and 1091:
Cabling Directly to a Sub-Channel T
- Page 1092 and 1093:
• The names of GM Standard drum s
- Page 1094 and 1095:
Custom Bank Selects Logic Pro provi
- Page 1096 and 1097:
µ Choose New > Touch Tracks from t
- Page 1098 and 1099:
Transpos (Transposition) When you d
- Page 1100 and 1101:
Don’t worry about choosing the wr
- Page 1102 and 1103:
• The Options > Apply Buffer Temp
- Page 1104 and 1105:
• Behave as Menu: Select the Beha
- Page 1106 and 1107:
Value As This parameter determines
- Page 1108 and 1109:
4-Channel Vector Mode If you set a
- Page 1110 and 1111:
Data values of 126 and 127 have a s
- Page 1112 and 1113:
The positions of events in the list
- Page 1114 and 1115:
Although you can have any number of
- Page 1116 and 1117:
• Shift-Option-dragging any fader
- Page 1118 and 1119:
For faders, the Channel parameter c
- Page 1120 and 1121:
Bank The Bank parameter hides or sh
- Page 1122 and 1123:
Keyboard Objects You can use a keyb
- Page 1124 and 1125:
Logic Pro encloses all selected obj
- Page 1126 and 1127:
An arpeggiator features parameters
- Page 1128 and 1129:
Events that do not meet the conditi
- Page 1130 and 1131:
Copy Matching Events and Apply Oper
- Page 1132 and 1133:
Meta events 122 to 127 affect trans
- Page 1134 and 1135:
• Transposition pop-up menu: Defi
- Page 1136 and 1137:
To create a new chord memorizer µ
- Page 1138 and 1139:
2 Select the Listen checkbox in the
- Page 1140 and 1141:
By default, the Sequencer Input obj
- Page 1142 and 1143:
Internal Objects Internal objects i
- Page 1144 and 1145:
Channel Strip Objects The Environme
- Page 1146 and 1147:
• Aux: Auxilliary channel strip,
- Page 1149 and 1150:
Working with Video 38 Logic Pro all
- Page 1151 and 1152:
Using the Movie Window You can drag
- Page 1153 and 1154:
Video track settings can be adjuste
- Page 1155 and 1156:
Handling QuickTime Movie Audio Trac
- Page 1157 and 1158:
Working with Surround 39 Logic Pro
- Page 1159 and 1160:
LCRS Surround Format LCRS stands fo
- Page 1161 and 1162:
7.1 (SDDS-Sony Dynamic Digital Soun
- Page 1163 and 1164:
µ Click the Preferences button in
- Page 1165 and 1166:
2 Choose the surround format you wa
- Page 1167 and 1168:
µ Click one of the three Initializ
- Page 1169 and 1170:
To determine the project surround f
- Page 1171 and 1172:
To set a channel strip’s output f
- Page 1173 and 1174:
2 Click the Mixer tab, and choose a
- Page 1175 and 1176:
• A number of speaker icons surro
- Page 1177 and 1178:
Using the Surround Balancer If the
- Page 1179 and 1180:
Channel mapping, panning, and mixin
- Page 1181 and 1182:
When a multi-channel plug-in is fir
- Page 1183 and 1184:
Note: Use the Bounce Extensions pre
- Page 1185 and 1186:
Positioning the Surround Speakers T
- Page 1187 and 1188:
The center speaker is usually used
- Page 1189 and 1190:
Synchronizing Logic Pro 40 Logic Pr
- Page 1191 and 1192:
Using the Sync Button You can use t
- Page 1193 and 1194:
Note: When using Pickup Clock with
- Page 1195 and 1196:
Each arrange track can act as a tap
- Page 1197:
If MIDI and Audio Are Not Synchroni
- Page 1200 and 1201:
The audio interface input and outpu
- Page 1202 and 1203:
As an example: Imagine a simple son
- Page 1204 and 1205:
The last thing to do is to get arou
- Page 1206 and 1207:
Importing Split Channel Files Nothi
- Page 1208 and 1209:
Interleaved or Split Bounce File? I
- Page 1210 and 1211:
The Project Settings window feature
- Page 1212 and 1213:
To open the Synchronization project
- Page 1214 and 1215:
Logic Pro automatically interprets
- Page 1216 and 1217:
• Deviation slider: This display
- Page 1218 and 1219:
MIDI Synchronization Settings The M
- Page 1220 and 1221:
Logic Pro also obeys Full Frame Mes
- Page 1222 and 1223:
Metronome Settings The Metronome pr
- Page 1224 and 1225:
Recording Settings The Recording pr
- Page 1226 and 1227:
Core Audio Recording Settings • R
- Page 1228 and 1229:
• User: Root Key pop-up menu: All
- Page 1230 and 1231:
Detuned octaves are more noticeable
- Page 1232 and 1233:
Audio Settings The Audio project se
- Page 1234 and 1235:
MIDI Settings The MIDI project sett
- Page 1236 and 1237:
• Instrument Without MIDI Thru Fu
- Page 1238 and 1239:
• Control Changes, 0-15, 64-71, a
- Page 1240 and 1241:
The following describes the global
- Page 1242 and 1243:
• Hide Muted Regions checkbox: Ex
- Page 1244 and 1245:
• Page Offset field: This value i
- Page 1246 and 1247:
Logic Pro automatically converts no
- Page 1248 and 1249:
Pitch Logic Pro assigns each note t
- Page 1250 and 1251:
Chords & Grids Settings These are g
- Page 1252 and 1253:
Clefs & Signatures Settings These a
- Page 1254 and 1255:
Note: Only automatically displayed
- Page 1256 and 1257:
Note: If you have a high-resolution
- Page 1258 and 1259:
This makes playback sound much more
- Page 1260 and 1261:
• Chromatic: Allows you to use tw
- Page 1262 and 1263:
• FireWire: Choose this mode to o
- Page 1265 and 1266:
Preferences in Logic Pro 44 Prefere
- Page 1267 and 1268:
A separate preference file, also st
- Page 1269 and 1270:
• Create New Project using Defaul
- Page 1271 and 1272:
• Pointer Tool in Arrange Provide
- Page 1273 and 1274:
• Smooth Cycle Algorithm checkbox
- Page 1275 and 1276:
Audio Preferences in Logic Pro Audi
- Page 1277 and 1278:
Note: When setting an output device
- Page 1279 and 1280:
For full details about activating D
- Page 1281 and 1282:
• Low Latency Mode checkbox and L
- Page 1283 and 1284:
Bounce Extensions Pane The Bounce E
- Page 1285 and 1286:
Audio Sample Editor Preferences The
- Page 1287 and 1288:
Audio MP3 Preferences The MP3 pane
- Page 1289 and 1290:
Audio Nodes Preferences The Nodes p
- Page 1291 and 1292:
All selected checkboxes will send a
- Page 1293 and 1294:
MIDI Sync Preferences The Sync pane
- Page 1295 and 1296:
Display Preferences in Logic Pro Di
- Page 1297 and 1298:
• Display SMPTE, Display Tempo As
- Page 1299 and 1300:
Piano Roll Display Preferences Thes
- Page 1301 and 1302:
• Floating Palette View pop-up me
- Page 1303 and 1304:
Automation Preferences in Logic Pro
- Page 1305 and 1306:
Control Surface Preferences in Logi
- Page 1307:
Sharing Preferences in Logic Pro Sh
- Page 1310 and 1311:
1310 Glossary ALAC Abbreviation for
- Page 1312 and 1313:
1312 Glossary Auto Track Zoom Funct
- Page 1314 and 1315:
1314 Glossary Browser A tab in the
- Page 1316 and 1317:
1316 Glossary comping A process whe
- Page 1318 and 1319:
1318 Glossary DFS An abbreviation f
- Page 1320 and 1321:
1320 Glossary Event List A list tha
- Page 1322 and 1323:
1322 Glossary grid The Logic Pro gr
- Page 1324 and 1325:
1324 Glossary key The scale used in
- Page 1326 and 1327:
1326 Glossary master channel strip
- Page 1328 and 1329:
1328 Glossary mono Short for monoph
- Page 1330 and 1331:
1330 Glossary pan, pan position The
- Page 1332 and 1333:
1332 Glossary Q factor A term gener
- Page 1334 and 1335:
1334 Glossary sample rate When an a
- Page 1336 and 1337:
1336 Glossary Signature track Globa
- Page 1338 and 1339:
1338 Glossary Surround Panner Repla
- Page 1340 and 1341:
1340 Glossary Transform window Logi
- Page 1342:
1342 Glossary zoom An action that e
Inappropriate
Loading...
Inappropriate
You have already flagged this document.
Thank you, for helping us keep this platform clean.
The editors will have a look at it as soon as possible.
Mail this publication
Loading...
Embed
Loading...
Delete template?
Are you sure you want to delete your template?
DOWNLOAD ePAPER
This ePaper is currently not available for download.
You can find similar magazines on this topic below under ‘Recommendations’.
