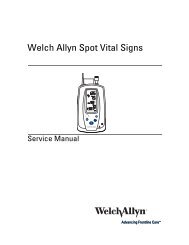
Service Manual, Micropaq Monitor - Welch Allyn
Service Manual, Micropaq Monitor - Welch Allyn
Service Manual, Micropaq Monitor - Welch Allyn

Create successful ePaper yourself
Turn your PDF publications into a flip-book with our unique Google optimized e-Paper software.
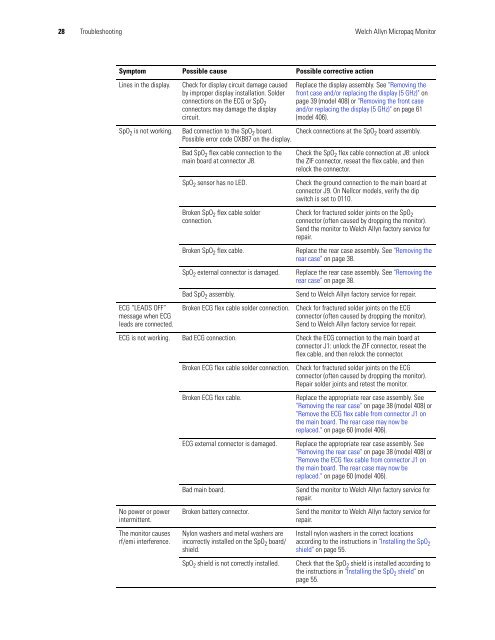
28 Troubleshooting <strong>Welch</strong> <strong>Allyn</strong> <strong>Micropaq</strong> <strong>Monitor</strong><br />
Symptom Possible cause Possible corrective action<br />
Lines in the display. Check for display circuit damage caused<br />
by improper display installation. Solder<br />
connections on the ECG or SpO 2<br />
connectors may damage the display<br />
circuit.<br />
SpO 2 is not working. Bad connection to the SpO 2 board.<br />
Possible error code OXB87 on the display.<br />
ECG “LEADS OFF”<br />
message when ECG<br />
leads are connected.<br />
Bad SpO 2 flex cable connection to the<br />
main board at connector J8.<br />
Replace the display assembly. See "Removing the<br />
front case and/or replacing the display (5 GHz)" on<br />
page 39 (model 408) or "Removing the front case<br />
and/or replacing the display (5 GHz)" on page 61<br />
(model 406).<br />
Check connections at the SpO 2 board assembly.<br />
Check the SpO 2 flex cable connection at J8: unlock<br />
the ZIF connector, reseat the flex cable, and then<br />
relock the connector.<br />
SpO 2 sensor has no LED. Check the ground connection to the main board at<br />
connector J9. On Nellcor models, verify the dip<br />
switch is set to 0110.<br />
Broken SpO 2 flex cable solder<br />
connection.<br />
Check for fractured solder joints on the SpO 2<br />
connector (often caused by dropping the monitor).<br />
Send the monitor to <strong>Welch</strong> <strong>Allyn</strong> factory service for<br />
repair.<br />
Broken SpO 2 flex cable. Replace the rear case assembly. See "Removing the<br />
rear case" on page 38.<br />
SpO 2 external connector is damaged. Replace the rear case assembly. See "Removing the<br />
rear case" on page 38.<br />
Bad SpO 2 assembly. Send to <strong>Welch</strong> <strong>Allyn</strong> factory service for repair.<br />
Broken ECG flex cable solder connection. Check for fractured solder joints on the ECG<br />
connector (often caused by dropping the monitor).<br />
Send to <strong>Welch</strong> <strong>Allyn</strong> factory service for repair.<br />
ECG is not working. Bad ECG connection. Check the ECG connection to the main board at<br />
connector J1: unlock the ZIF connector, reseat the<br />
flex cable, and then relock the connector.<br />
No power or power<br />
intermittent.<br />
The monitor causes<br />
rf/emi interference.<br />
Broken ECG flex cable solder connection. Check for fractured solder joints on the ECG<br />
connector (often caused by dropping the monitor).<br />
Repair solder joints and retest the monitor.<br />
Broken ECG flex cable. Replace the appropriate rear case assembly. See<br />
"Removing the rear case" on page 38 (model 408) or<br />
"Remove the ECG flex cable from connector J1 on<br />
the main board. The rear case may now be<br />
replaced." on page 60 (model 406).<br />
ECG external connector is damaged. Replace the appropriate rear case assembly. See<br />
"Removing the rear case" on page 38 (model 408) or<br />
"Remove the ECG flex cable from connector J1 on<br />
the main board. The rear case may now be<br />
replaced." on page 60 (model 406).<br />
Bad main board. Send the monitor to <strong>Welch</strong> <strong>Allyn</strong> factory service for<br />
repair.<br />
Broken battery connector. Send the monitor to <strong>Welch</strong> <strong>Allyn</strong> factory service for<br />
repair.<br />
Nylon washers and metal washers are<br />
incorrectly installed on the SpO 2 board/<br />
shield.<br />
Install nylon washers in the correct locations<br />
according to the instructions in "Installing the SpO 2<br />
shield" on page 55.<br />
SpO 2 shield is not correctly installed. Check that the SpO 2 shield is installed according to<br />
the instructions in "Installing the SpO 2 shield" on<br />
page 55.