Service Manual, Micropaq Monitor - Welch Allyn
Service Manual, Micropaq Monitor - Welch Allyn
Service Manual, Micropaq Monitor - Welch Allyn

You also want an ePaper? Increase the reach of your titles
YUMPU automatically turns print PDFs into web optimized ePapers that Google loves.
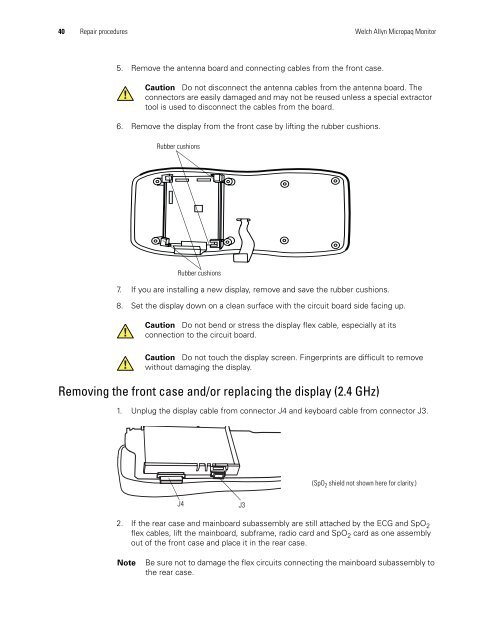
40 Repair procedures <strong>Welch</strong> <strong>Allyn</strong> <strong>Micropaq</strong> <strong>Monitor</strong><br />
5. Remove the antenna board and connecting cables from the front case.<br />
Caution Do not disconnect the antenna cables from the antenna board. The<br />
connectors are easily damaged and may not be reused unless a special extractor<br />
tool is used to disconnect the cables from the board.<br />
6. Remove the display from the front case by lifting the rubber cushions.<br />
Rubber cushions<br />
Rubber cushions<br />
7. If you are installing a new display, remove and save the rubber cushions.<br />
8. Set the display down on a clean surface with the circuit board side facing up.<br />
Caution Do not bend or stress the display flex cable, especially at its<br />
connection to the circuit board.<br />
Caution Do not touch the display screen. Fingerprints are difficult to remove<br />
without damaging the display.<br />
Removing the front case and/or replacing the display (2.4 GHz)<br />
1. Unplug the display cable from connector J4 and keyboard cable from connector J3.<br />
J4 J3<br />
(SpO 2 shield not shown here for clarity.)<br />
2. If the rear case and mainboard subassembly are still attached by the ECG and SpO 2<br />
flex cables, lift the mainboard, subframe, radio card and SpO 2 card as one assembly<br />
out of the front case and place it in the rear case.<br />
Note Be sure not to damage the flex circuits connecting the mainboard subassembly to<br />
the rear case.