Service Manual, Micropaq Monitor - Welch Allyn
Service Manual, Micropaq Monitor - Welch Allyn
Service Manual, Micropaq Monitor - Welch Allyn

Create successful ePaper yourself
Turn your PDF publications into a flip-book with our unique Google optimized e-Paper software.
42 Repair procedures <strong>Welch</strong> <strong>Allyn</strong> <strong>Micropaq</strong> <strong>Monitor</strong><br />
Reassembly - Model 408<br />
Installing the display<br />
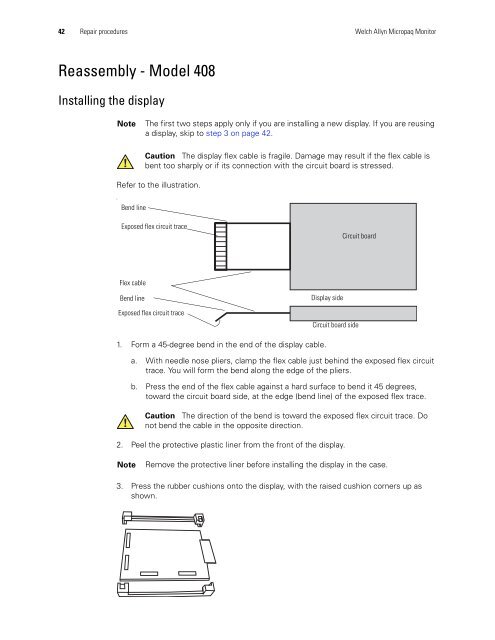
Refer to the illustration.<br />
s<br />
Note The first two steps apply only if you are installing a new display. If you are reusing<br />
a display, skip to step 3 on page 42.<br />
Bend line<br />
Caution The display flex cable is fragile. Damage may result if the flex cable is<br />
bent too sharply or if its connection with the circuit board is stressed.<br />
Exposed flex circuit trace<br />
Flex cable<br />
Bend line<br />
Exposed flex circuit trace<br />
1. Form a 45-degree bend in the end of the display cable.<br />
Display side<br />
Circuit board side<br />
a. With needle nose pliers, clamp the flex cable just behind the exposed flex circuit<br />
trace. You will form the bend along the edge of the pliers.<br />
b. Press the end of the flex cable against a hard surface to bend it 45 degrees,<br />
toward the circuit board side, at the edge (bend line) of the exposed flex trace.<br />
Caution The direction of the bend is toward the exposed flex circuit trace. Do<br />
not bend the cable in the opposite direction.<br />
2. Peel the protective plastic liner from the front of the display.<br />
Circuit board<br />
Note Remove the protective liner before installing the display in the case.<br />
3. Press the rubber cushions onto the display, with the raised cushion corners up as<br />
shown.