
Create successful ePaper yourself
Turn your PDF publications into a flip-book with our unique Google optimized e-Paper software.
PB<br />
PR<br />
PB<br />
PR<br />
Connections & Setup<br />
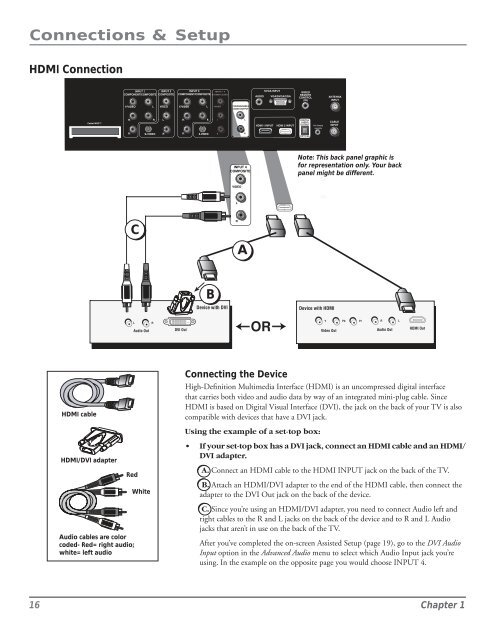
HDMI Connection<br />
INPUT 1<br />
INPUT 2<br />
COMPONENT/COMPOSITE COMPOSITE<br />
INPUT 3<br />
COMPONENT/COMPOSITE<br />
AUDIO<br />
SVGA INPUT<br />
VGA/SVGA/XGA<br />
WIRED<br />
REMOTE<br />
CONTROL<br />
(IR)<br />
ANTENNA<br />
INPUT<br />
Y/VIDEO<br />
L<br />
VIDEO<br />
Y/VIDEO<br />
L<br />
FIXED/VARIABLE<br />
AUDIO OUTPUT<br />
R<br />
L<br />
R<br />
L<br />
DIGITAL<br />
AUDIO<br />
For Factory<br />
use only<br />
CABLE<br />
HDMI 1 INPUT<br />
HDMI 2 INPUT<br />
OUTPUT<br />
INPUT<br />
S-VIDEO<br />
R<br />
S-VIDEO<br />
R<br />
(OPTICAL)<br />
INPUT 4<br />
COMPOSITE<br />
Note: This back panel graphic is<br />
for representation only. Your back<br />
panel might be different.<br />
VIDEO<br />
L<br />
C<br />
R<br />
A<br />
B<br />
Device with DVI<br />
Device with HDMI<br />
L<br />
Audio Out<br />
R<br />
DVI Out<br />
OR<br />
Y<br />
Video Out<br />
Pb<br />
Pr<br />
R<br />
Audio Out<br />
L<br />
HDMI Out<br />
HDMI cable<br />
Connecting the Device<br />
High-Definition Multimedia Interface (HDMI) is an un<strong>com</strong>pressed digital interface<br />
that carries both video and audio data by way of an integrated mini-plug cable. Since<br />
HDMI is based on Digital Visual Interface (DVI), the jack on the back of your TV is also<br />
<strong>com</strong>patible with devices that have a DVI jack.<br />
HDMI/DVI adapter<br />
Red<br />
White<br />
Using the example of a set-top box:<br />
• If your set-top box has a DVI jack, connect an HDMI cable and an HDMI/<br />
DVI adapter.<br />
A. Connect an HDMI cable to the HDMI INPUT jack on the back of the TV.<br />
B. Attach an HDMI/DVI adapter to the end of the HDMI cable, then connect the<br />
adapter to the DVI Out jack on the back of the device.<br />
Audio cables are color<br />
coded- Red= right audio;<br />
white= left audio<br />
C. Since you’re using an HDMI/DVI adapter, you need to connect Audio left and<br />
right cables to the R and L jacks on the back of the device and to R and L Audio<br />
jacks that aren’t in use on the back of the TV.<br />
After you’ve <strong>com</strong>pleted the on-screen Assisted Setup (page 19), go to the DVI Audio<br />
Input option in the Advanced Audio menu to select which Audio Input jack you’re<br />
using. In the example on the opposite page you would choose INPUT 4.<br />
16 Chapter 1