TM/TMC/RM/RMC-2040GE Progressive Scan Cameras - JAI Pulnix
TM/TMC/RM/RMC-2040GE Progressive Scan Cameras - JAI Pulnix
TM/TMC/RM/RMC-2040GE Progressive Scan Cameras - JAI Pulnix
You also want an ePaper? Increase the reach of your titles
YUMPU automatically turns print PDFs into web optimized ePapers that Google loves.
Page ix<br />
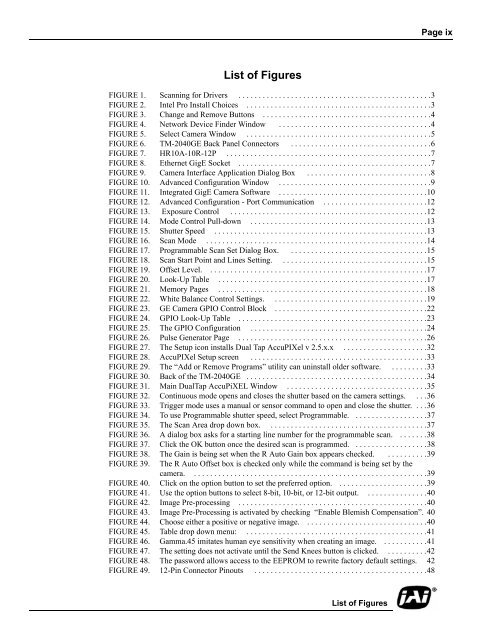
List of Figures<br />
FIGURE 1. <strong>Scan</strong>ning for Drivers . . . . . . . . . . . . . . . . . . . . . . . . . . . . . . . . . . . . . . . . . . . . . . . .3<br />
FIGURE 2. Intel Pro Install Choices . . . . . . . . . . . . . . . . . . . . . . . . . . . . . . . . . . . . . . . . . . . . . .3<br />
FIGURE 3. Change and Remove Buttons . . . . . . . . . . . . . . . . . . . . . . . . . . . . . . . . . . . . . . . . . .4<br />
FIGURE 4. Network Device Finder Window . . . . . . . . . . . . . . . . . . . . . . . . . . . . . . . . . . . . . .4<br />
FIGURE 5. Select Camera Window . . . . . . . . . . . . . . . . . . . . . . . . . . . . . . . . . . . . . . . . . . . . . .5<br />
FIGURE 6. <strong>TM</strong>-<strong>2040GE</strong> Back Panel Connectors . . . . . . . . . . . . . . . . . . . . . . . . . . . . . . . . . . .6<br />
FIGURE 7. HR10A-10R-12P . . . . . . . . . . . . . . . . . . . . . . . . . . . . . . . . . . . . . . . . . . . . . . . . . . .7<br />
FIGURE 8. Ethernet GigE Socket . . . . . . . . . . . . . . . . . . . . . . . . . . . . . . . . . . . . . . . . . . . . . . . .7<br />
FIGURE 9. Camera Interface Application Dialog Box . . . . . . . . . . . . . . . . . . . . . . . . . . . . . . .8<br />
FIGURE 10. Advanced Configuration Window . . . . . . . . . . . . . . . . . . . . . . . . . . . . . . . . . . . . . .9<br />
FIGURE 11. Integrated GigE Camera Software . . . . . . . . . . . . . . . . . . . . . . . . . . . . . . . . . . . . .10<br />
FIGURE 12. Advanced Configuration - Port Communication . . . . . . . . . . . . . . . . . . . . . . . . . .12<br />
FIGURE 13. Exposure Control . . . . . . . . . . . . . . . . . . . . . . . . . . . . . . . . . . . . . . . . . . . . . . . . .12<br />
FIGURE 14. Mode Control Pull-down . . . . . . . . . . . . . . . . . . . . . . . . . . . . . . . . . . . . . . . . . . . .13<br />
FIGURE 15. Shutter Speed . . . . . . . . . . . . . . . . . . . . . . . . . . . . . . . . . . . . . . . . . . . . . . . . . . . . .13<br />
FIGURE 16. <strong>Scan</strong> Mode . . . . . . . . . . . . . . . . . . . . . . . . . . . . . . . . . . . . . . . . . . . . . . . . . . . . . . .14<br />
FIGURE 17. Programmable <strong>Scan</strong> Set Dialog Box. . . . . . . . . . . . . . . . . . . . . . . . . . . . . . . . . . .15<br />
FIGURE 18. <strong>Scan</strong> Start Point and Lines Setting. . . . . . . . . . . . . . . . . . . . . . . . . . . . . . . . . . . . .15<br />
FIGURE 19. Offset Level. . . . . . . . . . . . . . . . . . . . . . . . . . . . . . . . . . . . . . . . . . . . . . . . . . . . . . .17<br />
FIGURE 20. Look-Up Table . . . . . . . . . . . . . . . . . . . . . . . . . . . . . . . . . . . . . . . . . . . . . . . . . . . .17<br />
FIGURE 21. Memory Pages . . . . . . . . . . . . . . . . . . . . . . . . . . . . . . . . . . . . . . . . . . . . . . . . . . . .18<br />
FIGURE 22. White Balance Control Settings. . . . . . . . . . . . . . . . . . . . . . . . . . . . . . . . . . . . . . .19<br />
FIGURE 23. GE Camera GPIO Control Block . . . . . . . . . . . . . . . . . . . . . . . . . . . . . . . . . . . . . .22<br />
FIGURE 24. GPIO Look-Up Table . . . . . . . . . . . . . . . . . . . . . . . . . . . . . . . . . . . . . . . . . . . . . . .23<br />
FIGURE 25. The GPIO Configuration . . . . . . . . . . . . . . . . . . . . . . . . . . . . . . . . . . . . . . . . . . . .24<br />
FIGURE 26. Pulse Generator Page . . . . . . . . . . . . . . . . . . . . . . . . . . . . . . . . . . . . . . . . . . . . . . .26<br />
FIGURE 27. The Setup icon installs Dual Tap AccuPIXel v 2.5.x.x . . . . . . . . . . . . . . . . . . . . .32<br />
FIGURE 28. AccuPIXel Setup screen . . . . . . . . . . . . . . . . . . . . . . . . . . . . . . . . . . . . . . . . . . . .33<br />
FIGURE 29. The “Add or Remove Programs” utility can uninstall older software. . . . . . . . . .33<br />
FIGURE 30. Back of the <strong>TM</strong>-<strong>2040GE</strong> . . . . . . . . . . . . . . . . . . . . . . . . . . . . . . . . . . . . . . . . . . . . .34<br />
FIGURE 31. Main DualTap AccuPiXEL Window . . . . . . . . . . . . . . . . . . . . . . . . . . . . . . . . . . .35<br />
FIGURE 32. Continuous mode opens and closes the shutter based on the camera settings. . . .36<br />
FIGURE 33. Trigger mode uses a manual or sensor command to open and close the shutter. . . .36<br />
FIGURE 34. To use Programmable shutter speed, select Programmable. . . . . . . . . . . . . . . . . . .37<br />
FIGURE 35. The <strong>Scan</strong> Area drop down box. . . . . . . . . . . . . . . . . . . . . . . . . . . . . . . . . . . . . . . .37<br />
FIGURE 36. A dialog box asks for a starting line number for the programmable scan. . . . . . . .38<br />
FIGURE 37. Click the OK button once the desired scan is programmed. . . . . . . . . . . . . . . . . . .38<br />
FIGURE 38. The Gain is being set when the R Auto Gain box appears checked. . . . . . . . . . .39<br />
FIGURE 39.<br />
The R Auto Offset box is checked only while the command is being set by the<br />
camera. . . . . . . . . . . . . . . . . . . . . . . . . . . . . . . . . . . . . . . . . . . . . . . . . . . . . . . . . . .39<br />
FIGURE 40. Click on the option button to set the preferred option. . . . . . . . . . . . . . . . . . . . . . .39<br />
FIGURE 41. Use the option buttons to select 8-bit, 10-bit, or 12-bit output. . . . . . . . . . . . . . . .40<br />
FIGURE 42. Image Pre-processing . . . . . . . . . . . . . . . . . . . . . . . . . . . . . . . . . . . . . . . . . . . . . . .40<br />
FIGURE 43. Image Pre-Processing is activated by checking “Enable Blemish Compensation”. 40<br />
FIGURE 44. Choose either a positive or negative image. . . . . . . . . . . . . . . . . . . . . . . . . . . . . . .40<br />
FIGURE 45. Table drop down menu: . . . . . . . . . . . . . . . . . . . . . . . . . . . . . . . . . . . . . . . . . . . . .41<br />
FIGURE 46. Gamma.45 imitates human eye sensitivity when creating an image. . . . . . . . . . . .41<br />
FIGURE 47. The setting does not activate until the Send Knees button is clicked. . . . . . . . . . .42<br />
FIGURE 48. The password allows access to the EEPROM to rewrite factory default settings. 42<br />
FIGURE 49. 12-Pin Connector Pinouts . . . . . . . . . . . . . . . . . . . . . . . . . . . . . . . . . . . . . . . . . . .48<br />
List of Figures


