TM/TMC/RM/RMC-2040GE Progressive Scan Cameras - JAI Pulnix
TM/TMC/RM/RMC-2040GE Progressive Scan Cameras - JAI Pulnix
TM/TMC/RM/RMC-2040GE Progressive Scan Cameras - JAI Pulnix

You also want an ePaper? Increase the reach of your titles
YUMPU automatically turns print PDFs into web optimized ePapers that Google loves.
Page 5<br />
<strong>TM</strong>/<strong>RM</strong>-<strong>2040GE</strong> Software<br />
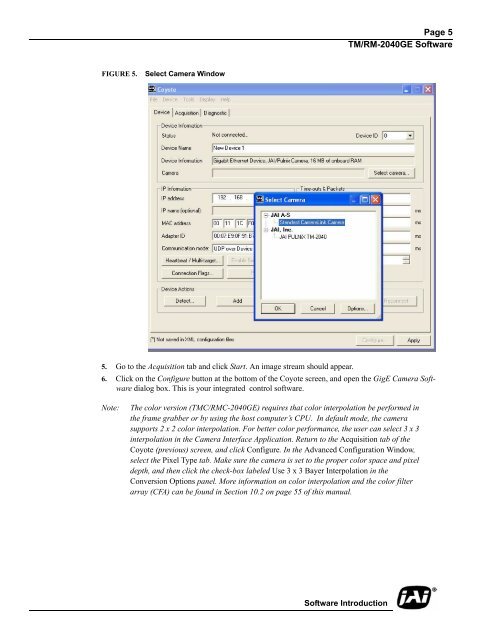
FIGURE 5.<br />
Select Camera Window<br />
5. Go to the Acquisition tab and click Start. An image stream should appear.<br />
6. Click on the Configure button at the bottom of the Coyote screen, and open the GigE Camera Software<br />
dialog box. This is your integrated control software.<br />
Note:<br />
The color version (<strong>TM</strong>C/<strong>RM</strong>C-<strong>2040GE</strong>) requires that color interpolation be performed in<br />
the frame grabber or by using the host computer’s CPU. In default mode, the camera<br />
supports 2 x 2 color interpolation. For better color performance, the user can select 3 x 3<br />
interpolation in the Camera Interface Application. Return to the Acquisition tab of the<br />
Coyote (previous) screen, and click Configure. In the Advanced Configuration Window,<br />
select the Pixel Type tab. Make sure the camera is set to the proper color space and pixel<br />
depth, and then click the check-box labeled Use 3 x 3 Bayer Interpolation in the<br />
Conversion Options panel. More information on color interpolation and the color filter<br />
array (CFA) can be found in Section 10.2 on page 55 of this manual.<br />
Software Introduction