TM 3-4240-334-20&P
TM 3-4240-334-20&P
TM 3-4240-334-20&P

You also want an ePaper? Increase the reach of your titles
YUMPU automatically turns print PDFs into web optimized ePapers that Google loves.
<strong>TM</strong> 3-<strong>4240</strong>-<strong>334</strong>-20&P<br />
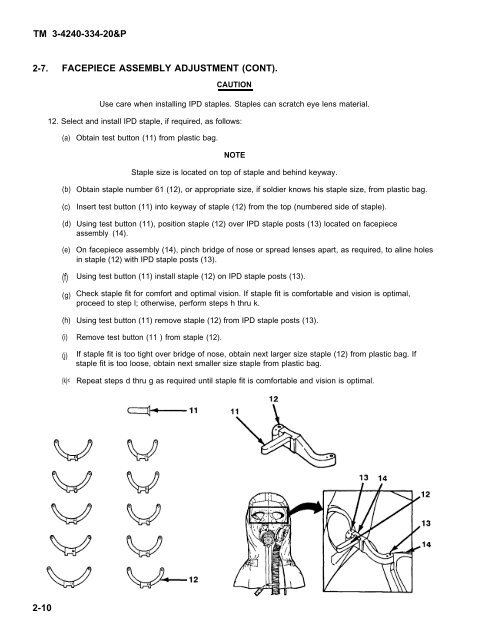
2-7. FACEPIECE ASSEMBLY ADJUS<strong>TM</strong>ENT (CONT).<br />
CAUTION<br />
Use care when installing IPD staples. Staples can scratch eye lens material.<br />
12. Select and install IPD staple, if required, as follows:<br />
(a)<br />
Obtain test button (11) from plastic bag.<br />
NOTE<br />
Staple size is located on top of staple and behind keyway.<br />
(b)<br />
(c)<br />
(d)<br />
(e)<br />
(f)<br />
(g)<br />
(h)<br />
(i)<br />
(j)<br />
(k)<<br />
Obtain staple number 61 (12), or appropriate size, if soldier knows his staple size, from plastic bag.<br />
Insert test button (11) into keyway of staple (12) from the top (numbered side of staple).<br />
Using test button (11), position staple (12) over IPD staple posts (13) located on facepiece<br />
assembly (14).<br />
On facepiece assembly (14), pinch bridge of nose or spread lenses apart, as required, to aline holes<br />
in staple (12) with IPD staple posts (13).<br />
Using test button (11) install staple (12) on IPD staple posts (13).<br />
Check staple fit for comfort and optimal vision. If staple fit is comfortable and vision is optimal,<br />
proceed to step l; otherwise, perform steps h thru k.<br />
Using test button (11) remove staple (12) from IPD staple posts (13).<br />
Remove test button (11 ) from staple (12).<br />
If staple fit is too tight over bridge of nose, obtain next larger size staple (12) from plastic bag. If<br />
staple fit is too loose, obtain next smaller size staple from plastic bag.<br />
Repeat steps d thru g as required until staple fit is comfortable and vision is optimal.<br />
2-10