F-1⢠Installation Manual - Viking Access
F-1⢠Installation Manual - Viking Access
F-1⢠Installation Manual - Viking Access

You also want an ePaper? Increase the reach of your titles
YUMPU automatically turns print PDFs into web optimized ePapers that Google loves.
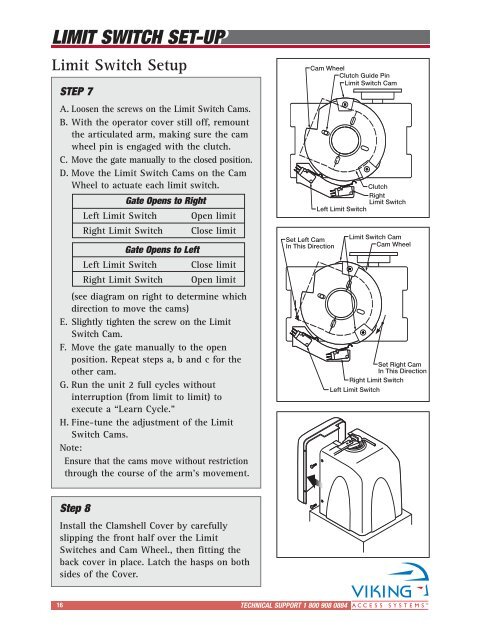
LIMIT SWITCH SET-UP<br />
Limit Switch Setup<br />
STEP 7<br />
A. Loosen the screws on the Limit Switch Cams.<br />
B. With the operator cover still off, remount<br />
the articulated arm, making sure the cam<br />
wheel pin is engaged with the clutch.<br />
C. Move the gate manually to the closed position.<br />
D. Move the Limit Switch Cams on the Cam<br />
Wheel to actuate each limit switch.<br />
Left Limit Switch<br />
Right Limit Switch<br />
Gate Opens to Right<br />
Gate Opens to Left<br />
Left Limit Switch<br />
Right Limit Switch<br />
Open limit<br />
Close limit<br />
Close limit<br />
Open limit<br />
(see diagram on right to determine which<br />
direction to move the cams)<br />
E. Slightly tighten the screw on the Limit<br />
Switch Cam.<br />
F. Move the gate manually to the open<br />
position. Repeat steps a, b and c for the<br />
other cam.<br />
G. Run the unit 2 full cycles without<br />
interruption (from limit to limit) to<br />
execute a “Learn Cycle.”<br />
H. Fine-tune the adjustment of the Limit<br />
Switch Cams.<br />
Note:<br />
Ensure that the cams move without restriction<br />
through the course of the arm’s movement.<br />
Cam Wheel<br />
Clutch Guide Pin<br />
Limit Switch Cam<br />
Set Left Cam<br />
In This Direction<br />
Clutch<br />
Right<br />
Limit Switch<br />
Left Limit Switch<br />
Limit Switch Cam<br />
Cam Wheel<br />
Adjust the<br />
Set Opposite Right CamBolt<br />
In This Direction<br />
Right Limit Switch<br />
Left Limit Switch<br />
Step 8<br />
Install the Clamshell Cover by carefully<br />
slipping the front half over the Limit<br />
Switches and Cam Wheel., then fitting the<br />
back cover in place. Latch the hasps on both<br />
sides of the Cover.<br />
16<br />
TECHNICAL SUPPORT 1 800 908 0884 15