BMC12H-installation-manual.pdf - Servo2Go
BMC12H-installation-manual.pdf - Servo2Go
BMC12H-installation-manual.pdf - Servo2Go

Create successful ePaper yourself
Turn your PDF publications into a flip-book with our unique Google optimized e-Paper software.
7. Check the AC voltage source before connecting it to the drive and make sure that it is<br />
within the 70 - 270 Vdc limits OR that the DC bus voltage (1.414 * AC input voltage)<br />
does not exceed the motor maximum voltage terminal.<br />
8. Connect the AC power to the drive (DO NOT APPLY POWER YET).<br />
9. Check the unit wiring per figure (4), “Wiring and Connection Diagram.”<br />
10. Ensure that the COMMAND (P1-12, 13) input voltage signal is ZERO.<br />
11. Apply power to the drive and verify that the LED is RED.<br />
12. ENABLE the drive. The LED should be GREEN by now. The motor may rotate at this<br />
point. Be prepared to disable the controller or remove the AC power if excessive<br />
motion occurs. If the motor runs away, set SW7 in the opposite setting of what you set<br />
before and if the motor rotates, adjust POT 4 until the motor stops rotating.<br />
13. Command a small velocity command through the COMMAND input voltage signal.<br />
14. The motor should rotate in a smooth manner. If motor rotates in the opposite direction<br />
of that desired for a given COMMAND input polarity, check the connection on the<br />
motor leads and the COMM or the polarity connection to the COMMAND input.<br />
15. If the direction of motor rotation is not the desired one, reverse the polarity on the<br />
COMMAND input or interchange COMM A & COMM C; then motor leads R & S.<br />
You should also reverse the connection of the encoder channels A and B or simply set<br />
SW7 to the OFF position to avoid run-away conditions.<br />
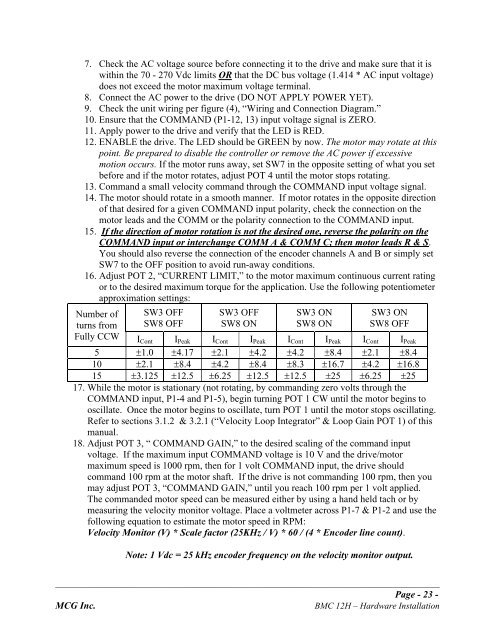
16. Adjust POT 2, “CURRENT LIMIT,” to the motor maximum continuous current rating<br />
or to the desired maximum torque for the application. Use the following potentiometer<br />
approximation settings:<br />
Number of<br />
turns from<br />
SW3 OFF<br />
SW8 OFF<br />
SW3 OFF<br />
SW8 ON<br />
SW3 ON<br />
SW8 ON<br />
SW3 ON<br />
SW8 OFF<br />
Fully CCW ICont I Peak I Cont I Peak I Cont I Peak I Cont I Peak<br />
5 !1.0 !4.17 !2.1 !4.2 !4.2 !8.4 !2.1 !8.4<br />
10 !2.1 !8.4 !4.2 !8.4 !8.3 !16.7 !4.2 !16.8<br />
15 !3.125 !12.5 !6.25 !12.5 !12.5 !25 !6.25 !25<br />
17. While the motor is stationary (not rotating, by commanding zero volts through the<br />
COMMAND input, P1-4 and P1-5), begin turning POT 1 CW until the motor begins to<br />
oscillate. Once the motor begins to oscillate, turn POT 1 until the motor stops oscillating.<br />
Refer to sections 3.1.2 & 3.2.1 (“Velocity Loop Integrator” & Loop Gain POT 1) of this<br />
<strong>manual</strong>.<br />
18. Adjust POT 3, “ COMMAND GAIN,” to the desired scaling of the command input<br />
voltage. If the maximum input COMMAND voltage is 10 V and the drive/motor<br />
maximum speed is 1000 rpm, then for 1 volt COMMAND input, the drive should<br />
command 100 rpm at the motor shaft. If the drive is not commanding 100 rpm, then you<br />
may adjust POT 3, “COMMAND GAIN,” until you reach 100 rpm per 1 volt applied.<br />
The commanded motor speed can be measured either by using a hand held tach or by<br />
measuring the velocity monitor voltage. Place a voltmeter across P1-7 & P1-2 and use the<br />
following equation to estimate the motor speed in RPM:<br />
Velocity Monitor (V) * Scale factor (25KHz / V) * 60 / (4 * Encoder line count).<br />
Note: 1 Vdc = 25 kHz encoder frequency on the velocity monitor output.<br />
_______________________________________________________________________________________________<br />
Page - 23 -<br />
MCG Inc. BMC 12H – Hardware Installation