BMC12H-installation-manual.pdf - Servo2Go
BMC12H-installation-manual.pdf - Servo2Go
BMC12H-installation-manual.pdf - Servo2Go

You also want an ePaper? Increase the reach of your titles
YUMPU automatically turns print PDFs into web optimized ePapers that Google loves.
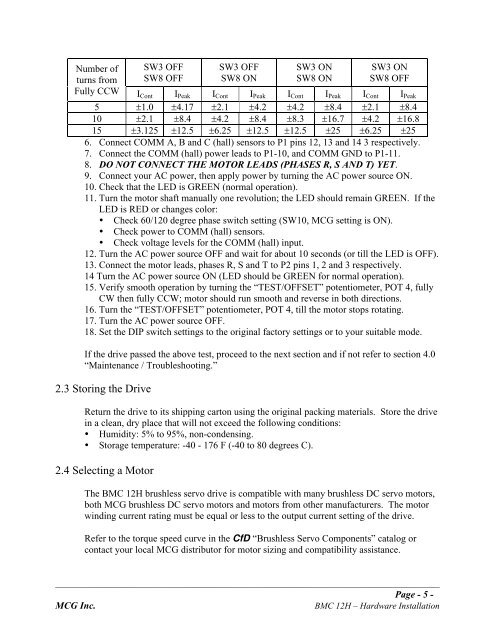
Number of<br />
turns from<br />
Fully CCW ICont I Peak I Cont I Peak I Cont I Peak I Cont I Peak<br />
5 !1.0 !4.17 !2.1 !4.2 !4.2 !8.4 !2.1 !8.4<br />
10 !2.1 !8.4 !4.2 !8.4 !8.3 !16.7 !4.2 !16.8<br />
15 !3.125 !12.5 !6.25 !12.5 !12.5 !25 !6.25 !25<br />
6. Connect COMM A, B and C (hall) sensors to P1 pins 12, 13 and 14 3 respectively.<br />
7. Connect the COMM (hall) power leads to P1-10, and COMM GND to P1-11.<br />
8. DO NOT CONNECT THE MOTOR LEADS (PHASES R, S AND T) YET.<br />
9. Connect your AC power, then apply power by turning the AC power source ON.<br />
10. Check that the LED is GREEN (normal operation).<br />
11. Turn the motor shaft <strong>manual</strong>ly one revolution; the LED should remain GREEN. If the<br />
LED is RED or changes color:<br />
• Check 60/120 degree phase switch setting (SW10, MCG setting is ON).<br />
• Check power to COMM (hall) sensors.<br />
• Check voltage levels for the COMM (hall) input.<br />
12. Turn the AC power source OFF and wait for about 10 seconds (or till the LED is OFF).<br />
13. Connect the motor leads, phases R, S and T to P2 pins 1, 2 and 3 respectively.<br />
14 Turn the AC power source ON (LED should be GREEN for normal operation).<br />
15. Verify smooth operation by turning the “TEST/OFFSET” potentiometer, POT 4, fully<br />
CW then fully CCW; motor should run smooth and reverse in both directions.<br />
16. Turn the “TEST/OFFSET” potentiometer, POT 4, till the motor stops rotating.<br />
17. Turn the AC power source OFF.<br />
18. Set the DIP switch settings to the original factory settings or to your suitable mode.<br />
SW3 OFF<br />
SW8 OFF<br />
SW3 OFF<br />
SW8 ON<br />
SW3 ON<br />
SW8 ON<br />
SW3 ON<br />
SW8 OFF<br />
If the drive passed the above test, proceed to the next section and if not refer to section 4.0<br />
“Maintenance / Troubleshooting.”<br />
2.3 Storing the Drive<br />
Return the drive to its shipping carton using the original packing materials. Store the drive<br />
in a clean, dry place that will not exceed the following conditions:<br />
• Humidity: 5% to 95%, non-condensing.<br />
• Storage temperature: -40 - 176 F (-40 to 80 degrees C).<br />
2.4 Selecting a Motor<br />
The BMC 12H brushless servo drive is compatible with many brushless DC servo motors,<br />
both MCG brushless DC servo motors and motors from other manufacturers. The motor<br />
winding current rating must be equal or less to the output current setting of the drive.<br />
Refer to the torque speed curve in the CfD “Brushless Servo Components” catalog or<br />
contact your local MCG distributor for motor sizing and compatibility assistance.<br />
_______________________________________________________________________________________________<br />
Page - 5 -<br />
MCG Inc. BMC 12H – Hardware Installation