- Page 1 and 2: CURLIN MEDICAL User’s Manual for
- Page 3 and 4: TABLE OF CONTENTS Entering or Chang
- Page 5 and 6: TABLE OF CONTENTS Reviewing or Chan
- Page 7 and 8: Introduction Chapter 1 Introduction
- Page 9 and 10: it left off when it is interrupted
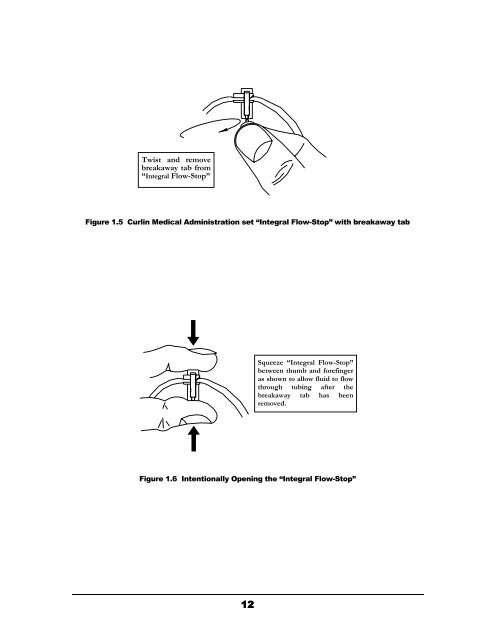
- Page 11 and 12: WARNINGS • Use only Curlin Medica
- Page 13 and 14: • The soft carry packs are intend
- Page 15 and 16: Introduction Figure 1.2 Curlin Medi
- Page 17: Preparing Medication for Infusion/C
- Page 21 and 22: Air Detector Note: Open the slide c
- Page 23 and 24: Installing the Batteries and Using
- Page 25 and 26: External Power Sources Battery Pack
- Page 27: Attaching and Removing the Bolus Co
- Page 30 and 31: Keypad Function 1 ON/OFF: Used to t
- Page 32 and 33: The screen also has a cursor or hig
- Page 34 and 35: 3 “Data entry screens” are used
- Page 36 and 37: When the Curlin Medical pump succes
- Page 38 and 39: IMPORTANT INFORMATION You may skip
- Page 40 and 41: Pt. Hx” option. Selecting the “
- Page 42 and 43: 11 CLEAR Pt. DATA: Selecting this f
- Page 44 and 45: Resume/Repeat Rx/New Program Menu T
- Page 46 and 47: Entering or Changing Data Fields Wh
- Page 48 and 49: e delayed until a later time, press
- Page 50 and 51: Continuous Prescription Menu 1 BAG
- Page 52 and 53: 4 Release any clamps on the adminis
- Page 54 and 55: . ACCEPT? YES/NO: Use the up/down a
- Page 56 and 57: Continuous Run Screen This screen d
- Page 58 and 59: When the program is accepted, the d
- Page 60 and 61: programmed, a “Select Therapy Scr
- Page 62 and 63: 3 ADMIN Rt (Administration Route):
- Page 64 and 65: PCA Prescription Menu Note: The PCA
- Page 66 and 67: IMPORTANT INFORMATION Priming with
- Page 68 and 69:
Clinician Dose Run Screen The graph
- Page 70 and 71:
This message alerts you to the Air-
- Page 72 and 73:
PCA Information Screens Interruptin
- Page 74 and 75:
a. This screen is a reminder that t
- Page 77 and 78:
Chapter 6 TPN Therapy with Automati
- Page 79 and 80:
At the following screen, the prescr
- Page 81 and 82:
efore they are connected to the acc
- Page 83 and 84:
2 DN Ramp (Early Down Ramp): During
- Page 85 and 86:
Screen. It will appear only for rev
- Page 87 and 88:
. Press the “NO” key to go back
- Page 89:
Stopping the Infusion To halt the i
- Page 92 and 93:
screen will appear: Intermittent De
- Page 94 and 95:
Note: You may elect to skip the dos
- Page 96 and 97:
4 Release any clamps on the adminis
- Page 98 and 99:
When the Air-In-Line Sensor is set
- Page 100 and 101:
(downstream) pressure in the admini
- Page 102 and 103:
screen will appear: a. This screen
- Page 104 and 105:
IMPORTANT INFORMATION If it is nece
- Page 106 and 107:
100
- Page 108 and 109:
“ON.” Now, when you press the
- Page 110 and 111:
“YES/ENTER’ to accept the new d
- Page 112 and 113:
Prime The IV bag and administration
- Page 114 and 115:
1 LOCK: When the lock is set to “
- Page 116 and 117:
Variable Run Screen 1 This informat
- Page 118 and 119:
Run Options Screen a. Press the “
- Page 120 and 121:
4 KVO Rate: The preset KVO rate dis
- Page 122 and 123:
If no air-eliminating filter is bei
- Page 124 and 125:
LCD Display: Alert: Cause: Resoluti
- Page 126 and 127:
Alert: Cause: Resolution: LCD Displ
- Page 128 and 129:
LCD Display: Alert: Cause: Resoluti
- Page 130 and 131:
Resolution: LCD Display: Alert: Cau
- Page 132 and 133:
figures 1.9 and 1.10 of the User’
- Page 134 and 135:
ALARMS Alarms are conditions that r
- Page 136 and 137:
LCD Display: Alarm: Cause: Resoluti
- Page 138 and 139:
ERROR CODES If a pump goes into an
- Page 140 and 141:
Error Code LCD Displayed Message 16
- Page 142 and 143:
136
- Page 144 and 145:
Note: The pump should always have t
- Page 146 and 147:
• Soft Shoulder Pack - The soft s
- Page 148 and 149:
Lockable Safety Shells These access
- Page 150 and 151:
Data Interface Cable (340-2011) The
- Page 152 and 153:
Transport and Storage During transp
- Page 154 and 155:
a. No agent, representative, or emp
- Page 156 and 157:
d Program the following CONTINUOUS
- Page 158 and 159:
152
- Page 160 and 161:
Operating Time with Full Charge Bat
- Page 162 and 163:
156
- Page 164:
Lock Setting Table The following ta