Hep20 Technical Handbook
Hep20 Technical Handbook
Hep20 Technical Handbook

Create successful ePaper yourself
Turn your PDF publications into a flip-book with our unique Google optimized e-Paper software.
Hep 2<br />
O ® System Modification & Maintenance<br />
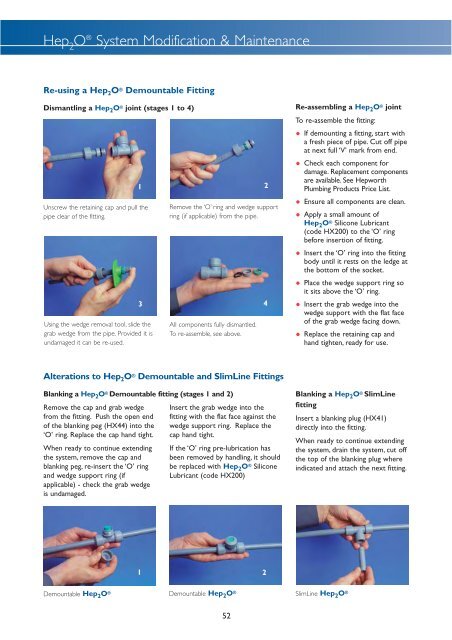
Re-using a Hep 2 O ® Demountable Fitting<br />
Dismantling a Hep 2 O ® joint (stages 1 to 4)<br />
Unscrew the retaining cap and pull the<br />
pipe clear of the fitting.<br />
Using the wedge removal tool, slide the<br />
grab wedge from the pipe. Provided it is<br />
undamaged it can be re-used.<br />
1 2<br />
3<br />
Remove the ‘O’ ring and wedge support<br />
ring (if applicable) from the pipe.<br />
All components fully dismantled.<br />
To re-assemble, see above.<br />
4<br />
Re-assembling a Hep 2 O ® joint<br />
To re-assemble the fitting:<br />
• If demounting a fitting, start with<br />
a fresh piece of pipe. Cut off pipe<br />
at next full ‘V’ mark from end.<br />
•<br />
Check each component for<br />
damage. Replacement components<br />
are available. See Hepworth<br />
Plumbing Products Price List.<br />
• Ensure all components are clean.<br />
•<br />
Apply a small amount of<br />
Hep 2 O ® Silicone Lubricant<br />
(code HX200) to the ‘O’ ring<br />
before insertion of fitting.<br />
•<br />
Insert the ‘O’ ring into the fitting<br />
body until it rests on the ledge at<br />
the bottom of the socket.<br />
•<br />
Place the wedge support ring so<br />
it sits above the ‘O’ ring.<br />
•<br />
Insert the grab wedge into the<br />
wedge support with the flat face<br />
of the grab wedge facing down.<br />
•<br />
Replace the retaining cap and<br />
hand tighten, ready for use.<br />
Alterations to Hep 2 O ® Demountable and SlimLine Fittings<br />
Blanking a Hep 2 O ® Demountable fitting (stages 1 and 2)<br />
Remove the cap and grab wedge<br />
from the fitting. Push the open end<br />
of the blanking peg (HX44) into the<br />
‘O’ ring. Replace the cap hand tight.<br />
When ready to continue extending<br />
the system, remove the cap and<br />
blanking peg, re-insert the ‘O’ ring<br />
and wedge support ring (if<br />
applicable) - check the grab wedge<br />
is undamaged.<br />
Insert the grab wedge into the<br />
fitting with the flat face against the<br />
wedge support ring. Replace the<br />
cap hand tight.<br />
If the ‘O’ ring pre-lubrication has<br />
been removed by handling, it should<br />
be replaced with Hep 2 O ® Silicone<br />
Lubricant (code HX200)<br />
Blanking a Hep 2 O ® SlimLine<br />
fitting<br />
Insert a blanking plug (HX41)<br />
directly into the fitting.<br />
When ready to continue extending<br />
the system, drain the system, cut off<br />
the top of the blanking plug where<br />
indicated and attach the next fitting.<br />
1<br />
2<br />
Demountable Hep 2 O ®<br />
Demountable Hep 2 O ®<br />
SlimLine Hep 2 O ®<br />
52