Hep20 Technical Handbook
Hep20 Technical Handbook
Hep20 Technical Handbook

Create successful ePaper yourself
Turn your PDF publications into a flip-book with our unique Google optimized e-Paper software.
Hep 2<br />
O ® Design Considerations<br />
Construction & Water Distribution<br />
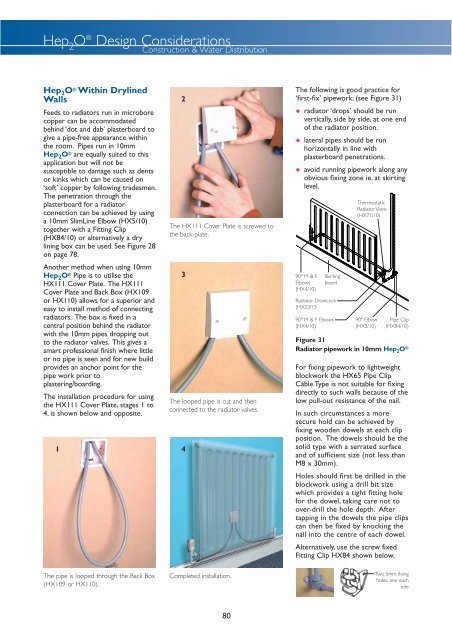
Hep 2 O ® Within Drylined<br />
Walls<br />
Feeds to radiators run in microbore<br />
copper can be accommodated<br />
behind ‘dot and dab’ plasterboard to<br />
give a pipe-free appearance within<br />
the room. Pipes run in 10mm<br />
Hep 2 O ® are equally suited to this<br />
application but will not be<br />
susceptible to damage such as dents<br />
or kinks which can be caused on<br />
‘soft’ copper by following tradesmen.<br />
The penetration through the<br />
plasterboard for a radiator<br />
connection can be achieved by using<br />
a 10mm SlimLine Elbow (HX5/10)<br />
together with a Fitting Clip<br />
(HX84/10) or alternatively a dry<br />
lining box can be used. See Figure 28<br />
on page 78.<br />
Another method when using 10mm<br />
Hep 2 O ® Pipe is to utilise the<br />
HX111 Cover Plate. The HX111<br />
Cover Plate and Back Box (HX109<br />
or HX110) allows for a superior and<br />
easy to install method of connecting<br />
radiators. The box is fixed in a<br />
central position behind the radiator<br />
with the 10mm pipes dropping out<br />
to the radiator valves. This gives a<br />
smart professional finish where little<br />
or no pipe is seen and for new build<br />
provides an anchor point for the<br />
pipe work prior to<br />
plastering/boarding.<br />
The installation procedure for using<br />
the HX111 Cover Plate, stages 1 to<br />
4, is shown below and opposite.<br />
1<br />
2<br />
The HX111 Cover Plate is screwed to<br />
the back-plate.<br />
3<br />
The looped pipe is cut and then<br />
connected to the radiator valves.<br />
4<br />
The following is good practice for<br />
‘first-fix’ pipework: (see Figure 31)<br />
• radiator ‘drops’ should be run<br />
vertically, side by side, at one end<br />
of the radiator position.<br />
• lateral pipes should be run<br />
horizontally in line with<br />
plasterboard penetrations.<br />
• avoid running pipework along any<br />
obvious fixing zone ie. at skirting<br />
level.<br />
90º M & F<br />
Elbows<br />
(HX4/10)<br />
Skirting<br />
board<br />
Radiator Draincock<br />
(HX23/15<br />
90º M & F Elbows<br />
(HX4/10)<br />
Thermostatic<br />
Radiator Valve<br />
(HX71/10)<br />
90º Elbow<br />
(HX5/10)<br />
Pipe Clip<br />
(HX84/10)<br />
Figure 31<br />
Radiator pipework in 10mm Hep 2 O ®<br />
For fixing pipework to lightweight<br />
blockwork the HX65 Pipe Clip<br />
Cable Type is not suitable for fixing<br />
directly to such walls because of the<br />
low pull-out resistance of the nail.<br />
In such circumstances a more<br />
secure hold can be achieved by<br />
fixing wooden dowels at each clip<br />
position. The dowels should be the<br />
solid type with a serrated surface<br />
and of sufficient size (not less than<br />
M8 x 30mm).<br />
Holes should first be drilled in the<br />
blockwork using a drill bit size<br />
which provides a tight fitting hole<br />
for the dowel, taking care not to<br />
over-drill the hole depth. After<br />
tapping in the dowels the pipe clips<br />
can then be fixed by knocking the<br />
nail into the centre of each dowel.<br />
Alternatively, use the screw fixed<br />
Fitting Clip HX84 shown below.<br />
The pipe is looped through the Back Box<br />
(HX109 or HX110).<br />
Completed installation.<br />
Two 5mm fixing<br />
holes, one each<br />
side<br />
80