iSTAR Pro 4U Rack Mount Quick Start Installation Guide
iSTAR Pro 4U Rack Mount Quick Start Installation Guide
iSTAR Pro 4U Rack Mount Quick Start Installation Guide

Create successful ePaper yourself
Turn your PDF publications into a flip-book with our unique Google optimized e-Paper software.
ACM - Access Control Module(s)<br />
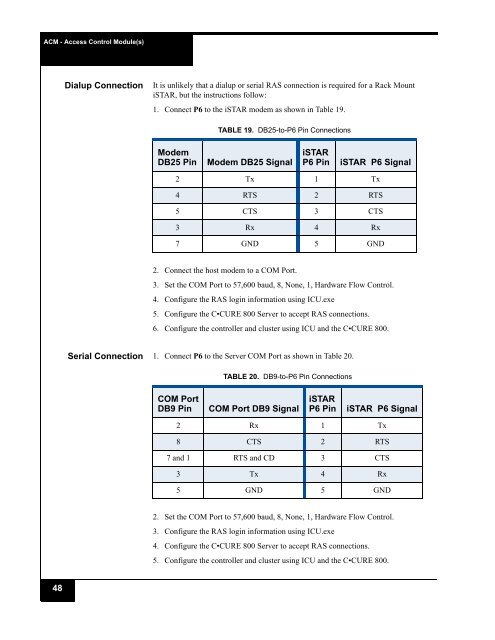
Dialup Connection<br />
It is unlikely that a dialup or serial RAS connection is required for a <strong>Rack</strong> <strong>Mount</strong><br />
<strong>iSTAR</strong>, but the instructions follow:<br />
1. Connect P6 to the <strong>iSTAR</strong> modem as shown in Table 19.<br />
TABLE 19. DB25-to-P6 Pin Connections<br />
Modem<br />
DB25 Pin<br />
Modem DB25 Signal<br />
<strong>iSTAR</strong><br />
P6 Pin<br />
<strong>iSTAR</strong> P6 Signal<br />
2 Tx 1 Tx<br />
4 RTS 2 RTS<br />
5 CTS 3 CTS<br />
3 Rx 4 Rx<br />
7 GND 5 GND<br />
2. Connect the host modem to a COM Port.<br />
3. Set the COM Port to 57,600 baud, 8, None, 1, Hardware Flow Control.<br />
4. Configure the RAS login information using ICU.exe<br />
5. Configure the C•CURE 800 Server to accept RAS connections.<br />
6. Configure the controller and cluster using ICU and the C•CURE 800.<br />
Serial Connection 1. Connect P6 to the Server COM Port as shown in Table 20.<br />
TABLE 20. DB9-to-P6 Pin Connections<br />
COM Port<br />
DB9 Pin<br />
COM Port DB9 Signal<br />
<strong>iSTAR</strong><br />
P6 Pin<br />
<strong>iSTAR</strong> P6 Signal<br />
2 Rx 1 Tx<br />
8 CTS 2 RTS<br />
7 and 1 RTS and CD 3 CTS<br />
3 Tx 4 Rx<br />
5 GND 5 GND<br />
2. Set the COM Port to 57,600 baud, 8, None, 1, Hardware Flow Control.<br />
3. Configure the RAS login information using ICU.exe<br />
4. Configure the C•CURE 800 Server to accept RAS connections.<br />
5. Configure the controller and cluster using ICU and the C•CURE 800.<br />
48