

Stylistic 1200 Tech Reference Manual (PDF) - The Labs
Stylistic 1200 Tech Reference Manual (PDF) - The Labs
Stylistic 1200 Tech Reference Manual (PDF) - The Labs

You also want an ePaper? Increase the reach of your titles
YUMPU automatically turns print PDFs into web optimized ePapers that Google loves.
5. Gently remove the hard disk drive from the pen tablet.<br />
Caution<br />
Do not damage the hard disk drive’s printed circuit board when removing the drive. Handle<br />
the drive by the edges and avoid touching the printed circuit board with your hands or tools.<br />
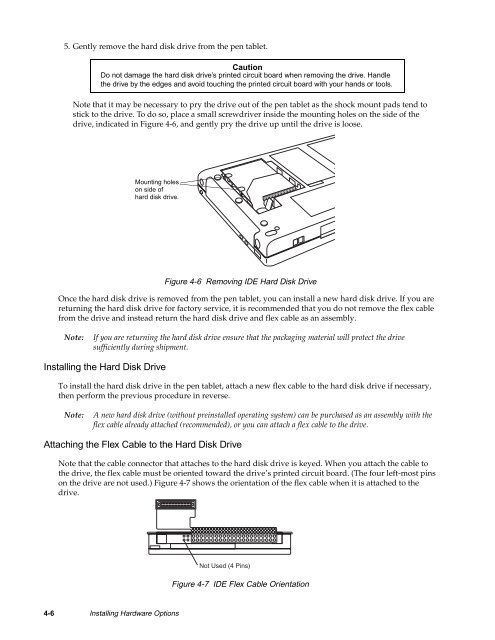
Note that it may be necessary to pry the drive out of the pen tablet as the shock mount pads tend to<br />
stick to the drive. To do so, place a small screwdriver inside the mounting holes on the side of the<br />
drive, indicated in Figure 4-6, and gently pry the drive up until the drive is loose.<br />
Mounting holes<br />
on side of<br />
hard disk drive.<br />
Figure 4-6 Removing IDE Hard Disk Drive<br />
Once the hard disk drive is removed from the pen tablet, you can install a new hard disk drive. If you are<br />
returning the hard disk drive for factory service, it is recommended that you do not remove the flex cable<br />
from the drive and instead return the hard disk drive and flex cable as an assembly.<br />
Note:<br />
If you are returning the hard disk drive ensure that the packaging material will protect the drive<br />
sufficiently during shipment.<br />
Installing the Hard Disk Drive 4<br />
To install the hard disk drive in the pen tablet, attach a new flex cable to the hard disk drive if necessary,<br />
then perform the previous procedure in reverse.<br />
Note:<br />
A new hard disk drive (without preinstalled operating system) can be purchased as an assembly with the<br />
flex cable already attached (recommended), or you can attach a flex cable to the drive.<br />
Attaching the Flex Cable to the Hard Disk Drive 4<br />
Note that the cable connector that attaches to the hard disk drive is keyed. When you attach the cable to<br />
the drive, the flex cable must be oriented toward the drive’s printed circuit board. (<strong>The</strong> four left-most pins<br />
on the drive are not used.) Figure 4-7 shows the orientation of the flex cable when it is attached to the<br />
drive.<br />
Not Used (4 Pins)<br />
Figure 4-7 IDE Flex Cable Orientation<br />
4-6 Installing Hardware Options