- Page 1 and 2:
Red Hat Enterprise Linux 5.2 Red Ha
- Page 3 and 4:
Red Hat Enterprise Linux 5.2: Red H
- Page 5 and 6:
Introduction ......................
- Page 7 and 8:
4.3. Problems with the X Window Sys
- Page 9 and 10:
Message ...........................
- Page 11 and 12:
2. Upgrading Your System ..........
- Page 13 and 14:
Introduction Welcome to the Red Hat
- Page 15 and 16:
Document Conventions example: Go to
- Page 17 and 18:
Where to Find Other Manuals If you
- Page 19:
Part I. x86, AMD64, Intel® 64 and
- Page 22 and 23:
Chapter 1. Itanium System Specific
- Page 24 and 25:
Chapter 2. Steps to Get You Started
- Page 26 and 27:
Chapter 2. Steps to Get You Started
- Page 28 and 29:
Chapter 2. Steps to Get You Started
- Page 31:
Chapter 3. System Specifications Li
- Page 34 and 35:
Chapter 4. Installing on Intel® an
- Page 36 and 37:
Chapter 4. Installing on Intel® an
- Page 38 and 39:
Chapter 4. Installing on Intel® an
- Page 40 and 41:
Chapter 4. Installing on Intel® an
- Page 42 and 43:
Chapter 4. Installing on Intel® an
- Page 44 and 45:
Chapter 4. Installing on Intel® an
- Page 46 and 47:
Chapter 4. Installing on Intel® an
- Page 48 and 49:
Chapter 4. Installing on Intel® an
- Page 50 and 51:
Chapter 4. Installing on Intel® an
- Page 52 and 53:
Chapter 4. Installing on Intel® an
- Page 54 and 55:
Chapter 4. Installing on Intel® an
- Page 56 and 57:
Chapter 4. Installing on Intel® an
- Page 58 and 59:
Chapter 4. Installing on Intel® an
- Page 60 and 61:
Chapter 4. Installing on Intel® an
- Page 62 and 63:
Chapter 4. Installing on Intel® an
- Page 64 and 65:
Chapter 4. Installing on Intel® an
- Page 66 and 67:
Chapter 4. Installing on Intel® an
- Page 68 and 69:
Chapter 4. Installing on Intel® an
- Page 70 and 71:
Chapter 4. Installing on Intel® an
- Page 72 and 73:
Chapter 4. Installing on Intel® an
- Page 74 and 75:
Chapter 4. Installing on Intel® an
- Page 76 and 77:
Chapter 4. Installing on Intel® an
- Page 78 and 79:
Chapter 4. Installing on Intel® an
- Page 80 and 81:
Chapter 4. Installing on Intel® an
- Page 82 and 83:
Chapter 4. Installing on Intel® an
- Page 84 and 85:
Chapter 4. Installing on Intel® an
- Page 87 and 88:
Chapter 5. Removing Red Hat Enterpr
- Page 89 and 90:
Chapter 6. Troubleshooting Installa
- Page 91 and 92:
Saving Traceback Messages Without a
- Page 93 and 94:
Diskette Drive in run rc = self.tod
- Page 95 and 96:
Problems with the X Window System (
- Page 97 and 98:
Your Printer Does Not Work In /boot
- Page 99 and 100:
Chapter 7. Driver Media for Intel a
- Page 101:
Using a Driver Image During Install
- Page 104 and 105:
Chapter 8. Additional Boot Options
- Page 106 and 107:
Chapter 8. Additional Boot Options
- Page 108 and 109:
Chapter 9. The GRUB Boot Loader cap
- Page 110 and 111:
Chapter 9. The GRUB Boot Loader 4.
- Page 112 and 113:
Chapter 9. The GRUB Boot Loader The
- Page 114 and 115:
Chapter 9. The GRUB Boot Loader •
- Page 116 and 117:
Chapter 9. The GRUB Boot Loader # s
- Page 118 and 119:
Chapter 9. The GRUB Boot Loader For
- Page 120 and 121:
102
- Page 123 and 124:
Chapter 11. Steps to Get You Starte
- Page 125 and 126:
Preparing for FTP and HTTP installa
- Page 127 and 128:
Preparing for a Hard Drive Installa
- Page 129 and 130:
Chapter 12. Installing on IBM Syste
- Page 131 and 132:
A Note about Linux Virtual Consoles
- Page 133 and 134:
The Text Mode Installation Program
- Page 135 and 136:
Interface display a summary of avai
- Page 137 and 138:
Installing via NFS 8. Performing a
- Page 139 and 140:
Installing via HTTP Figure 12.7. FT
- Page 141 and 142:
Welcome to Red Hat Enterprise Linux
- Page 143 and 144:
Enter the Installation Number Figur
- Page 145 and 146:
Disk Partitioning Setup Warning The
- Page 147 and 148:
Create Default Layout Figure 12.14.
- Page 149 and 150:
Partitioning Your System Tip [This
- Page 151 and 152:
Disk Druid's Buttons to edit an exi
- Page 153 and 154:
Recommended Partitioning Scheme •
- Page 155 and 156:
Adding Partitions • Mount Point:
- Page 157 and 158:
Network Configuration Figure 12.18.
- Page 159 and 160:
Time Zone Configuration password to
- Page 161 and 162:
Set Root Password Figure 12.21. Roo
- Page 163 and 164:
Package Group Selection Note Users
- Page 165 and 166:
Installing Packages To cancel this
- Page 167 and 168:
Chapter 13. Driver Media for IBM PO
- Page 169 and 170:
Chapter 14. Troubleshooting Install
- Page 171 and 172:
Trouble with Partition Tables This
- Page 173 and 174:
Unable to IPL from *NWSSTG 4. Probl
- Page 175 and 176:
Your Printer Does Not Work If you c
- Page 177 and 178:
Chapter 15. Additional Boot Options
- Page 179 and 180:
vnc this command allows you to inst
- Page 181:
Part III. IBM System z Architecture
- Page 184 and 185:
Chapter 16. Steps to Get You Starte
- Page 186 and 187:
Chapter 16. Steps to Get You Starte
- Page 188 and 189:
Chapter 16. Steps to Get You Starte
- Page 190 and 191:
Chapter 16. Steps to Get You Starte
- Page 192 and 193:
Chapter 16. Steps to Get You Starte
- Page 194 and 195:
Chapter 16. Steps to Get You Starte
- Page 196 and 197:
Chapter 17. Installing on IBM Syste
- Page 198 and 199:
Chapter 17. Installing on IBM Syste
- Page 200 and 201:
Chapter 17. Installing on IBM Syste
- Page 202 and 203:
Chapter 17. Installing on IBM Syste
- Page 204 and 205:
Chapter 17. Installing on IBM Syste
- Page 206 and 207:
Chapter 17. Installing on IBM Syste
- Page 208 and 209:
Chapter 17. Installing on IBM Syste
- Page 210 and 211:
Chapter 17. Installing on IBM Syste
- Page 212 and 213:
Chapter 17. Installing on IBM Syste
- Page 214 and 215:
Chapter 17. Installing on IBM Syste
- Page 216 and 217:
Chapter 17. Installing on IBM Syste
- Page 218 and 219:
Chapter 17. Installing on IBM Syste
- Page 220 and 221:
Chapter 17. Installing on IBM Syste
- Page 222 and 223:
Chapter 17. Installing on IBM Syste
- Page 224 and 225:
Chapter 17. Installing on IBM Syste
- Page 226 and 227:
Chapter 17. Installing on IBM Syste
- Page 228 and 229:
210
- Page 230 and 231: Chapter 19. Sample Parameter Files
- Page 232 and 233: Chapter 19. Sample Parameter Files
- Page 234 and 235: Chapter 20. Additional Boot Options
- Page 236 and 237: Chapter 21. Troubleshooting Install
- Page 238 and 239: Chapter 21. Troubleshooting Install
- Page 240 and 241: Chapter 22. Additional Information
- Page 242 and 243: Chapter 22. Additional Information
- Page 244 and 245: Chapter 22. Additional Information
- Page 246 and 247: Chapter 22. Additional Information
- Page 248 and 249: Chapter 22. Additional Information
- Page 250 and 251: Chapter 22. Additional Information
- Page 252 and 253: Chapter 22. Additional Information
- Page 254 and 255: Chapter 22. Additional Information
- Page 256 and 257: Chapter 22. Additional Information
- Page 258 and 259: Chapter 22. Additional Information
- Page 260 and 261: Chapter 22. Additional Information
- Page 262 and 263: Chapter 22. Additional Information
- Page 265 and 266: Chapter 23. Upgrading Your Current
- Page 267 and 268: Upgrading Your System Installing on
- Page 269 and 270: Chapter 24. Activate Your Subscript
- Page 271 and 272: Chapter 25. An Introduction to Disk
- Page 273 and 274: Partitions: Turning One Drive Into
- Page 275 and 276: Partitions within Partitions — An
- Page 277 and 278: of Extended Partitions Let us look
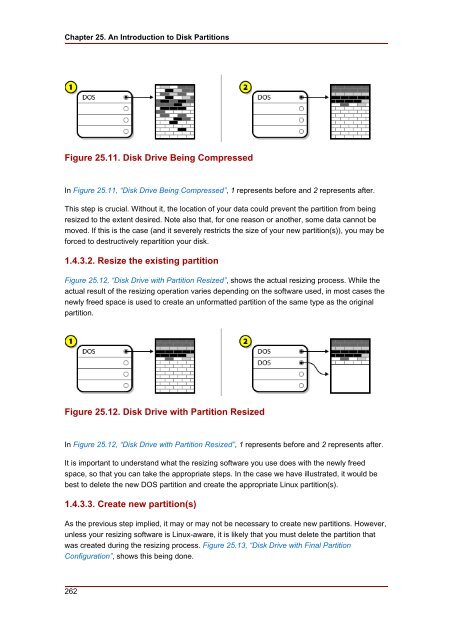
- Page 279: Making Room For Red Hat Enterprise
- Page 283 and 284: How Many Partitions 1.7. Disk Parti
- Page 285: Part V. Basic System Recovery When
- Page 288 and 289: Chapter 26. Basic System Recovery W
- Page 290 and 291: Chapter 26. Basic System Recovery I
- Page 292 and 293: 274
- Page 294 and 295: Chapter 27. Rescue Mode on POWER Sy
- Page 297 and 298: Chapter 28. Kickstart Installations
- Page 299 and 300: Kickstart Options autopart (optiona
- Page 301 and 302: Kickstart Options Tip To look up us
- Page 303 and 304: Kickstart Options the proper device
- Page 305 and 306: Kickstart Options • cdrom — Ins
- Page 307 and 308: Kickstart Options The file /usr/sha
- Page 309 and 310: Kickstart Options networking (in ot
- Page 311 and 312: Kickstart Options For a detailed ex
- Page 313 and 314: Kickstart Options more information
- Page 315 and 316: Kickstart Options that may be used
- Page 317 and 318: Kickstart Options Allows the graphi
- Page 319 and 320: Package Selection raid swap raid /u
- Page 321 and 322: Example %pre #!/bin/sh hds="" mymed
- Page 323 and 324: Making the Kickstart File Available
- Page 325 and 326: Making the Installation Tree Availa
- Page 327 and 328: Starting a Kickstart Installation T
- Page 329 and 330: Starting a Kickstart Installation m
- Page 331 and 332:
Starting a Kickstart Installation u
- Page 333 and 334:
Chapter 29. Kickstart Configurator
- Page 335 and 336:
Boot Loader Options Figure 29.2. In
- Page 337 and 338:
Partition Information preserving th
- Page 339 and 340:
Creating Partitions Figure 29.5. Cr
- Page 341 and 342:
Network Configuration After creatin
- Page 343 and 344:
Firewall Configuration Figure 29.9.
- Page 345 and 346:
SELinux Configuration on port 1234
- Page 347 and 348:
Package Selection After configuring
- Page 349 and 350:
Pre-Installation Script Figure 29.1
- Page 351 and 352:
Chroot Environment Figure 29.16. Po
- Page 353 and 354:
Saving the File Figure 29.17. Previ
- Page 355 and 356:
Chapter 30. Boot Process, Init, and
- Page 357 and 358:
The Kernel following format — /bo
- Page 359 and 360:
The /sbin/init Program K45named ->
- Page 361 and 362:
Running Additional Programs at Boot
- Page 363 and 364:
Shutting Down 4.2. Runlevel Utiliti
- Page 365 and 366:
Chapter 31. PXE Network Installatio
- Page 367 and 368:
Command Line Configuration The next
- Page 369 and 370:
Performing the PXE Installation Aft


