command link multifunction meter (square) - Yamaha Outboards
command link multifunction meter (square) - Yamaha Outboards
command link multifunction meter (square) - Yamaha Outboards

Create successful ePaper yourself
Turn your PDF publications into a flip-book with our unique Google optimized e-Paper software.
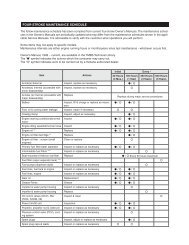
Setting the initial settings<br />
Before operating the <strong>meter</strong>, be sure to<br />
change the default settings as described<br />
below. For the setting procedures, see the<br />
corresponding setting procedure for each<br />
<strong>meter</strong>.<br />
Tacho<strong>meter</strong> unit<br />
ENGINE NUMBER (setting corresponding<br />
engine)<br />
Select the engine compatible to this <strong>meter</strong>.<br />
(See page 19.)<br />
TRIM 0SET (setting trim angle)<br />
Adjust the trim angle to zero. (See page 13.)<br />
DISPLAY (setting displays)<br />
When the optional cooling water pressure<br />
sensor is connected, change the display<br />
configuration number so that it can be displayed<br />
in the cooling water pressure display.<br />
When the oil pressure display function is not<br />
available on your model, change the display<br />
configuration number so that the oil pressure<br />
display is not included. (See page 13.)<br />
Speedo<strong>meter</strong> unit<br />
FUEL SENSOR (setting fuel sensor)<br />
Set the fuel sensor according to the fuel<br />
tank type. (See page 33.)<br />
DISPLAY (setting displays)<br />
When the optional Triducer-Multi sensor and<br />
GPS are connected, change the display<br />
configuration number to display the ambient<br />
water temperature, depth, and clock displays.<br />
(See page 30.)<br />
Fuel management <strong>meter</strong> unit<br />
TANK CAPA. (setting fuel tank capacity)<br />
Set the capacity of the connected fuel tank.<br />
(See page 44.)<br />
64<br />
Setting the initial settings<br />
DISPLAY (setting displays)<br />
Change the display configuration number as<br />
necessary so that the AVAL display can be<br />
displayed. (See page 42.)<br />
Speed & Fuel <strong>meter</strong> unit<br />
FUEL SENSOR (setting fuel sensor)<br />
Set the fuel sensor according to the fuel<br />
tank type. (See page 61.)<br />
DISPLAY (setting displays)<br />
When the optional Triducer-Multi sensor and<br />
GPS are connected, change the display<br />
configuration number to display the ambient<br />
water temperature, depth, and clock displays.<br />
(See page 57.)<br />
Setting up the<br />
<strong>meter</strong>s