- Page 1 and 2:
HUMAX DVD Recorder Viewer’s Guide
- Page 3 and 4:
Welcome!
- Page 5 and 6:
Welcome to the TiVolution ® !It’
- Page 7 and 8:
Using the Guide to Find Programs .
- Page 9 and 10:
CHAPTER 1Connecting Your RecorderGe
- Page 11 and 12:
T VT VI n p utD V DT o pP o w erVol
- Page 13 and 14:
Cables and AccessoriesChoosing a Ch
- Page 15 and 16:
Cables and AccessoriesBuilding an I
- Page 17 and 18:
Choosing a Setup ExampleChoosing a
- Page 19 and 20:
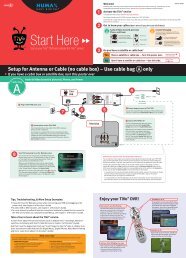
Setup 1: Antenna or Cable (No Cable
- Page 21 and 22:
®Setup 2: Cable or Satellite Box M
- Page 23 and 24:
®Setup 3: Satellite Box & RF Progr
- Page 25 and 26:
®®Setup 4: Cable Box and Satellit
- Page 27 and 28:
®Watching One Channel & Recording
- Page 29 and 30:
CHAPTER 2Guided SetupActivating the
- Page 31 and 32:
Completing Guided SetupCompleting G
- Page 33 and 34:
Completing Guided SetupDialing Form
- Page 35 and 36:
Completing Guided SetupIR Code List
- Page 37 and 38:
CHAPTER 3The Basics in 5 Short Tour
- Page 39 and 40:
Tour One: Play with Live TVStatus B
- Page 41 and 42:
Tour Two: Find and Record ProgramsA
- Page 43 and 44:
Tour Three: Now Playing and Save To
- Page 45 and 46:
Tour Four: Playing a DVD or CDContr
- Page 47 and 48:
Tour Five: Finding New ProgramsAuto
- Page 49 and 50:
CHAPTER 4Recording Programsand DVDs
- Page 51 and 52:
Season Pass, Recording Options, To
- Page 53 and 54:
Season Pass, Recording Options, To
- Page 55 and 56:
Using the Guide to Find ProgramsUsi
- Page 57 and 58:
Find Your Favorite ProgramsFind You
- Page 59 and 60:
Find Your Favorite ProgramsBrowse b
- Page 61 and 62:
Find Your Favorite ProgramsUsing On
- Page 63 and 64:
Find Programs That Match Your Inter
- Page 65 and 66:
Find Programs That Match Your Inter
- Page 67 and 68:
Record from a Video Camera or VCRRe
- Page 69 and 70:
Recording a DVDRecording a DVDYour
- Page 71 and 72:
Recording a DVD6. Confirm your sele
- Page 73 and 74:
CHAPTER 5Watching Programs andPlayi
- Page 75 and 76:
The Status BarThe Status BarWhen yo
- Page 77 and 78:
Watching Live TVWatching Live TVWhe
- Page 79 and 80:
Watching Programs from Now PlayingW
- Page 81 and 82: Playing a DVD or CDPlaying a DVD or
- Page 83 and 84: Playing a DVD or CDControl ButtonsT
- Page 85 and 86: Playing a DVD or CDAudio CD Informa
- Page 87 and 88: Playing a DVD or CDSlide Show Optio
- Page 89 and 90: Disc CompatibilityDVD Regions. DVDs
- Page 91 and 92: CHAPTER 6Messages & SetupMessages 8
- Page 93 and 94: SettingsSettingsWith the options in
- Page 95 and 96: SettingsChannel Changing. Use this
- Page 97 and 98: SettingsParental ControlsParental C
- Page 99 and 100: SettingsUse the UP and DOWN arrows
- Page 101 and 102: SettingsRecording SettingsRecording
- Page 103 and 104: SettingsTV Aspect Ratio. You can se
- Page 105 and 106: Remote Control & Recorder FrontProg
- Page 107 and 108: Remote Control & Recorder Front2. E
- Page 109 and 110: Remote Control & Recorder FrontRese
- Page 111 and 112: Phone & Network Setup• Connect to
- Page 113 and 114: Phone & Network Setupcompletes, you
- Page 115 and 116: System InformationSystem Informatio
- Page 117 and 118: Restart or Reset SystemRestart or R
- Page 119 and 120: CHAPTER 7Connecting to a HomeNetwor
- Page 121 and 122: Multi-Room ViewingMulti-Room Viewin
- Page 123 and 124: Digital Music & PhotosPlaying Your
- Page 125 and 126: Connecting to a Home Network Using
- Page 127 and 128: Connecting to a Home Network Using
- Page 129 and 130: Completing the Recorder’s Network
- Page 131: Completing the Recorder’s Network
- Page 135 and 136: Completing the Recorder’s Network
- Page 137 and 138: CHAPTER8TroubleshootingCustomer Sup
- Page 139 and 140: Questions About Getting StartedQues
- Page 141 and 142: Questions About Connecting to the T
- Page 143 and 144: Questions About DVDs and CDs• Che
- Page 145 and 146: Questions About Channels• Refer t
- Page 147 and 148: Questions About Recording ProgramsT
- Page 149 and 150: Questions About Recording Programs
- Page 151 and 152: Questions About Now Playing• You
- Page 153 and 154: Questions About Audio and Video•
- Page 155 and 156: Questions About the TiVo ®Service
- Page 157 and 158: Questions About Networking• Confi
- Page 159 and 160: Questions About Networking7. Update
- Page 161 and 162: CHAPTER9Privacy, Service, Warranty,
- Page 163 and 164: TiVo Privacy Policyrequest(s). Use
- Page 165 and 166: TiVo Privacy Policywould be informe
- Page 167 and 168: TiVo Privacy Policy3.2 Manufacturin
- Page 169 and 170: TiVo Privacy Policyinvolved in the
- Page 171 and 172: TiVo Service Agreementsatellite pro
- Page 173 and 174: TiVo Service Agreementthat supplies
- Page 175 and 176: TiVo Service Agreementmanufacturer'
- Page 177 and 178: TiVo Service AgreementSUPPLIERS’
- Page 179 and 180: HUMAX DVR Limited Warrantyby non-au
- Page 181 and 182: Safety InstructionsSafety Instructi
- Page 183 and 184:
GNU General Public LicenseGNU Gener
- Page 185 and 186:
GNU General Public Licensec) Accomp
- Page 187 and 188:
GNU General Public LicenseTo do so,
- Page 189 and 190:
APPENDIXAFront and Back PanelRefere
- Page 191 and 192:
Front Panel Reference OPEN/CLOSE (
- Page 193 and 194:
Back Panel Referenceother end of th
- Page 195 and 196:
Index
- Page 197 and 198:
front panel lightsturning on and of
- Page 199 and 200:
Serial Control cable, when to conne
- Page 201 and 202:
Now Playing(Green) This program wil