Full-Custom Layout of an SRAM-Based FPGA - University of Toronto
Full-Custom Layout of an SRAM-Based FPGA - University of Toronto
Full-Custom Layout of an SRAM-Based FPGA - University of Toronto

Create successful ePaper yourself
Turn your PDF publications into a flip-book with our unique Google optimized e-Paper software.
UNIVERSITY OF TORONTO<br />
ECE1388<br />
VLSI Design Methodology<br />
<strong>Full</strong> <strong>Custom</strong> <strong>Layout</strong> <strong>of</strong> <strong>an</strong> <strong>SRAM</strong>-<strong>Based</strong><br />
<strong>FPGA</strong><br />
Final Report<br />
Students:<br />
Blair Fort<br />
D<strong>an</strong>iele Paladino<br />
Fr<strong>an</strong>jo Plavec<br />
<strong>Toronto</strong>, December 2004.
1. Introduction<br />
The goal <strong>of</strong> this project was to design <strong>an</strong> <strong>SRAM</strong>-based Field Programmable Gate Array (<strong>FPGA</strong>), <strong>an</strong>d<br />
implement it by laying it out as a full-custom design in 0.35μ TSMC process. The design was limited by<br />
maximal area <strong>of</strong> 4 mm 2 <strong>an</strong>d by the time available for the design process (6 weeks).<br />
The tasks necessary to build <strong>an</strong>d verify <strong>an</strong> <strong>FPGA</strong> include system level pl<strong>an</strong>ning, schematic design, cell<br />
layout, <strong>an</strong>d final chip layout. These steps are described in more detail in the following sections.<br />
2. System Outline<br />
On the highest level, <strong>an</strong> <strong>FPGA</strong> consists <strong>of</strong> programmable logic elements <strong>an</strong>d programmable routing<br />
resources used to interconnect the logic elements. The logic elements implement the combinational <strong>an</strong>d<br />
sequential logic functions the user w<strong>an</strong>ts to implement in the <strong>FPGA</strong>, <strong>an</strong>d the routing resources interconnect<br />
logic elements to implement the desired system. <strong>FPGA</strong> design usually consists <strong>of</strong> <strong>an</strong> array <strong>of</strong> identical<br />
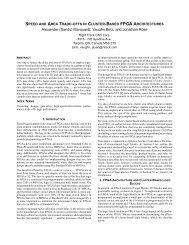
blocks <strong>of</strong> logic <strong>an</strong>d routing resources called tiles. The structure <strong>of</strong> the tile with the corresponding<br />
programming logic used in this work is shown in Figure 1.<br />
Figure 1. The tile structure with programming<br />
Logic element (LE) is connected to two connection boxes: connection box right (CBR) <strong>an</strong>d connection box<br />
bottom (CBB). The CBR connects the vertical routing tracks to the inputs <strong>of</strong> the LEs on its left <strong>an</strong>d right,<br />
while the CBB connects the horizontal routing tracks to the inputs <strong>of</strong> the LEs above <strong>an</strong>d bellow it, <strong>an</strong>d<br />
connects the output <strong>of</strong> the LE above it to the routing tracks. Finally, the switch box (SB) interconnects the<br />
horizontal <strong>an</strong>d vertical routing tracks. Our <strong>FPGA</strong> contains 4 vertical <strong>an</strong>d 4 horizontal routing tracks. The<br />
LE, connection boxes, <strong>an</strong>d the switch box contain <strong>SRAM</strong> cells that c<strong>an</strong> be programmed to implement<br />
desired functionality.<br />
3. Design Decisions<br />
The following design decisions were made in our design <strong>of</strong> <strong>an</strong> <strong>SRAM</strong> based <strong>FPGA</strong>.<br />
In our <strong>FPGA</strong> design, we use nMOS pass tr<strong>an</strong>sistors (as opposed to tr<strong>an</strong>smission gates) controlled by <strong>SRAM</strong><br />
cells to implement programmable routing <strong>an</strong>d logic. Only nMOS pass tr<strong>an</strong>sistors are used to reduce the area<br />
since there are m<strong>an</strong>y programmable switches in the design. Since nMOS pass tr<strong>an</strong>sistors cause a<br />
degradation <strong>of</strong> the signal when passing a high value, a weak pMOS feedback tr<strong>an</strong>sistor was added to<br />
restore the strong logical ‘1’ signal being passed.
There has been a great deal <strong>of</strong> study on how routing tracks should be designed in <strong>an</strong> <strong>FPGA</strong>. Higher<br />
flexibility <strong>of</strong> the routing tracks requires the greater size <strong>of</strong> the switch boxes. Since our design has area<br />
restrictions, we decided to use a method that provides reasonable flexibility <strong>an</strong>d keeps the size <strong>of</strong> the switch<br />
box relatively small. This is done using segmented routing. The routing consists <strong>of</strong> 4 routing wires<br />
(segments) <strong>of</strong> various lengths. The wire length is defined in terms <strong>of</strong> the number <strong>of</strong> the tiles the routing<br />
segment sp<strong>an</strong>s between two switch boxes. In our design, these segments are <strong>of</strong> lengths 1, 2, 4, <strong>an</strong>d 4<br />
respectively. At every switch box, there are 2 wires that c<strong>an</strong> be programmed to be connected in <strong>an</strong>y<br />
direction. This requires 12 pass tr<strong>an</strong>sistors <strong>an</strong>d associated <strong>SRAM</strong> cells to configure the switch box. The<br />
remaining two routing tracks pass through the switch box. Since not all the segments are <strong>of</strong> the unit length,<br />
this is enough to route all the segments.<br />
To save the area, the programming is performed using shift registers placed on the top <strong>an</strong>d left <strong>of</strong> the chip,<br />
<strong>an</strong>d are common for all the tiles on the chip. The programming bits are shifted into the top programming<br />
registers (through inputs prog_data_col <strong>an</strong>d col_clk), while the bits in the left programming registers<br />
(shifted in through inputs prog_data_row <strong>an</strong>d row_clk) determine which part <strong>of</strong> the logic is being<br />
programmed by the bits currently in the top programming registers. The programming is only performed<br />
when the program input is high.<br />
4. Schematic Design <strong>an</strong>d Simulation<br />
To verify the functionality <strong>of</strong> our design, we have drawn the schematics <strong>of</strong> our system in a hierarchical<br />
m<strong>an</strong>ner. The top-level schematic is shown in Figure 2.<br />
Figure 2. The top-level schematic <strong>of</strong> the design
Our design contains 240 tiles org<strong>an</strong>ized in <strong>an</strong> array <strong>of</strong> 16x15 tiles, <strong>an</strong>d contains 10,800 programmable<br />
elements. To test the whole device, we would need to determine the state <strong>of</strong> each <strong>of</strong> those programming<br />
bits, which is normally performed by <strong>an</strong> <strong>FPGA</strong> synthesis tool, <strong>an</strong>d then run the simulation with input<br />
sequence <strong>of</strong> the programming bits <strong>an</strong>d test vectors. Since such a simulation overcomes the capacities <strong>of</strong> the<br />
available tools (HSpice), <strong>an</strong>d requires excessive amount <strong>of</strong> time, we have simulated the functionality <strong>of</strong> a<br />
single tile with the corresponding routing <strong>an</strong>d programming resources. All the simulation results produced<br />
the expected behaviour, <strong>an</strong>d since we have tested all the components in our system in a configuration they<br />
are used in the system, we consider this a sufficient pro<strong>of</strong> <strong>of</strong> the correct functionality <strong>of</strong> our design.<br />
5. <strong>Layout</strong><br />
We designed all our basic cells to have the same height. This was necessary to match the power <strong>an</strong>d ground<br />
lines when the cells abut. The cell with the largest height in our design was <strong>an</strong> inverter <strong>of</strong> size 2. The<br />
<strong>SRAM</strong> was the most used cell in our design <strong>an</strong>d its height was only slightly increased to match the height<br />
<strong>of</strong> the inverter cell. This allowed us to decrease the width <strong>of</strong> the <strong>SRAM</strong> cell thus minimizing the area<br />
consumed by the <strong>SRAM</strong> cell.<br />
The top level view <strong>of</strong> the <strong>FPGA</strong> layout is shown in Figure 3.<br />
Figure 3. Top-level view <strong>of</strong> the chip layout
The final design contains 48 pins. The number <strong>of</strong> pins was limited by the number <strong>of</strong> pads that c<strong>an</strong> fit on a<br />
die <strong>of</strong> size 2x2 mm. 38 pins are dedicated for general purpose input <strong>an</strong>d output, while the remaining 10 pins<br />
are used for power supply (2 pins), ground (2 pins), programming (5 pins), <strong>an</strong>d global clock, which is<br />
distributed to the flip-flops in all LEs in the device. The global clock is distributed by <strong>an</strong> H-tree structure<br />
inside the device to provide the low-skew clock.<br />
6. Conclusions <strong>an</strong>d Future Work<br />
Our final design passes all DRC checks, <strong>an</strong>d LVS shows that the netlist matches our schematic. Currently,<br />
this project fully implements <strong>an</strong> <strong>FPGA</strong>, but some future work may be beneficial. The areas that should be<br />
covered by future work include simulation, power distribution network, <strong>an</strong>d I/O pads.<br />
Firstly, we were able to simulate the full tile with programming using HSpice, but no larger designs. To<br />
simulate the whole design, we would like to use <strong>an</strong>other tool, such as N<strong>an</strong>oSim, that is known to have been<br />
used for simulation by other researchers that have fabricated <strong>FPGA</strong>s. Another choice is to use a hybrid<br />
VHDL/Verilog <strong>an</strong>d schematic simulation in Cadence, which could also reduce simulation time <strong>an</strong>d<br />
complexity.<br />
Secondly, the power distribution grid, could be improved. Although our power distribution lines are<br />
comparable to other <strong>FPGA</strong> designs used in research, there is some concern that the metal lines are too<br />
narrow. Since the design is very regular, the cells could be spaced further apart to allow for wider metal<br />
lines, which should be done before the tapeout.<br />
Another area for improvement is the use <strong>of</strong> I/O pads. In the current implementation, all general pins are set<br />
to be either inputs or outputs. Generally, most <strong>FPGA</strong>s allow all general purpose pins to be programmed to<br />
be either inputs or outputs, which requires <strong>an</strong> extra <strong>SRAM</strong> cell. This was not done in the current<br />
implementation, because the provided pad library does not contain I/O pads.<br />
Finally, more adv<strong>an</strong>ced features, such as memory resources, PLL blocks, DSP blocks, carry-chains, could<br />
be added to the design. This would make the design usable in a wide variety <strong>of</strong> applications.<br />
7. Division <strong>of</strong> Tasks<br />
Blair Fort: LUT (pl<strong>an</strong>ning, schematic, simulation, layout, DRC, LVS), Logic element (pl<strong>an</strong>ning,<br />
schematic, simulation, layout, DRC, LVS), connection boxes (layout, DRC, LVS), parts <strong>of</strong> reports <strong>an</strong>d<br />
presentations<br />
D<strong>an</strong>iele Paladino: Area estimation for the whole design, <strong>SRAM</strong> (pl<strong>an</strong>ning, schematic, simulation, layout,<br />
DRC, LVS), shift registers (pl<strong>an</strong>ning, schematic, simulation, layout, DRC, LVS), programming logic<br />
(pl<strong>an</strong>ning, schematic, simulation, layout, DRC, LVS), parts <strong>of</strong> reports <strong>an</strong>d presentations<br />
Fr<strong>an</strong>jo Plavec: connection boxes (pl<strong>an</strong>ning, schematic, simulation), switch box (pl<strong>an</strong>ning, schematic,<br />
simulation, layout, DRC, LVS), top-level (schematic, simulation, layout, DRC, LVS), parts <strong>of</strong> reports <strong>an</strong>d<br />
presentations
Appendix A<br />
List <strong>of</strong> References
[1] V. Betz, J. Rose, <strong>an</strong>d A. Marquardt, Architecture <strong>an</strong>d CAD for Deep-Submicron <strong>FPGA</strong>s,<br />
Kluwer Academic Publishers: Norwell, MA, 1999.<br />
[2] N. H. E. Weste, D. Harris. CMOS VLSI Design: A Circuits <strong>an</strong>d Systems Perspective, 3 rd<br />
ed., Pearson Addison Wesley, Boston MA, 2005<br />
[3] Chow, P., S. Seo, J. Rose, K. Chung, G. Pez-Monzn <strong>an</strong>d I. Rahardja. "The Design <strong>of</strong> <strong>an</strong><br />
<strong>SRAM</strong>-<strong>Based</strong> Field-Programmable Gate Array, Part I: Architecture", IEEE Tr<strong>an</strong>sactions<br />
on Very Large Scale Integration (VLSI) Systems, Vol. 7 No. 2, June. 1999, pp. 191-197<br />
[4] Chow, P., S. Seo, J. Rose, K. Chung, G. Pez-Monzn <strong>an</strong>d I. Rahardja. "The Design <strong>of</strong> <strong>an</strong><br />
<strong>SRAM</strong>-<strong>Based</strong> Field-Programmable Gate Array, Part II: Circuit Design <strong>an</strong>d <strong>Layout</strong>",<br />
IEEE Tr<strong>an</strong>sactions on Very Large Scale Integration (VLSI) Systems, Vol. 7 No. 3, Sept.<br />
1999, pp. 321-330<br />
[5] V. Betz <strong>an</strong>d J. Rose, Segmentation <strong>an</strong>d Buffering to Optimize Speed <strong>an</strong>d Density, In<br />
Proceedings <strong>of</strong> <strong>FPGA</strong> ‘99, Monterey, CA, 1999, pp 59 – 68
Appendix B<br />
System Outline Report
1. <strong>FPGA</strong> Design<br />
The purpose <strong>of</strong> this project is to implement a full custom layout <strong>of</strong> a simple <strong>FPGA</strong><br />
device. The basic building block <strong>of</strong> <strong>an</strong> <strong>FPGA</strong> is logic element (LE), which consists <strong>of</strong> a<br />
lookup table (LUT), a flip-flop, <strong>an</strong>d a multiplexer that chooses whether to forward the<br />
output <strong>of</strong> the LUT or the flip-flop outside the LE. A k-LUT consist <strong>of</strong> a set <strong>of</strong><br />
multiplexers that implement <strong>an</strong>y function <strong>of</strong> k inputs by forwarding one <strong>of</strong> the 2 k<br />
configuration bits to the output <strong>of</strong> the LUT. LEs are interconnected with routing<br />
resources which are also configurable. Configuration <strong>of</strong> routing resources is achieved<br />
using pass gates controlled by a routing configuration bits. The desired configuration is<br />
stored in the <strong>SRAM</strong> cells. One <strong>SRAM</strong> cell is required per pass gate, while a k-LUT<br />
requires 2 k <strong>SRAM</strong> cells.<br />
Since <strong>FPGA</strong> structure is regular, the design is divided into tiles. Each tile consists <strong>of</strong><br />
<strong>an</strong> LE <strong>an</strong>d routing resources, as shown in the figure below [1]. LEs are labeled with L in<br />
the figure. Routing wires run horizontally <strong>an</strong>d vertically, <strong>an</strong>d may be interconnected<br />
inside switch boxes (S). Logic blocks connect to the routing tracks in the connection<br />
boxes (C). The design proposed in this work was based on the techniques described in [1]<br />
<strong>an</strong>d [2].<br />
The following figure shows the top view <strong>of</strong> the <strong>FPGA</strong> that will be implemented. As<br />
c<strong>an</strong> be seen in the figure, the proposed <strong>FPGA</strong> design has 10 pins for control signals<br />
<strong>an</strong>d 14 pins for general purpose I/O signals. Control signals are clock, which controls<br />
all the flip-flops inside LEs, VDD <strong>an</strong>d GND pins, <strong>an</strong>d programming signals. The<br />
function <strong>of</strong> these signals will be described in more detail in the following sections.
2. Tile Block Diagram<br />
The following figure shows the block diagram <strong>of</strong> one tile with interfaces <strong>of</strong> basic<br />
building blocks in our design. The logic element (LE) evaluates a logic function <strong>of</strong> its<br />
inputs, <strong>an</strong>d produces the result on its output. Both inputs <strong>an</strong>d outputs are connected to the<br />
routing tracks through the programmable switches in connection boxes. There are two<br />
connection boxes in a tile. Connection_box_bottom connects the inputs <strong>of</strong> the LEs above<br />
<strong>an</strong>d below it, as well as the output <strong>of</strong> the LE above it, to the routing tracks. Similarly,<br />
connection_box_right connects the inputs <strong>of</strong> the LEs left <strong>an</strong>d right from it to the routing<br />
tracks. The horizontal <strong>an</strong>d vertical routing tracks are interconnected inside a switch box.<br />
Although the programming logic is not a part <strong>of</strong> the tile, it is shown here for<br />
completeness. The programming logic is used to program <strong>SRAM</strong> cells in the tile.
3. Logic Element<br />
The logic element is the computational block <strong>of</strong> the <strong>FPGA</strong>. This is where <strong>an</strong><br />
arbitrary function c<strong>an</strong> be applied to the input signals to produce a specific result. Figure<br />
1 is the top level view <strong>of</strong> the logic element. The logic element consists <strong>of</strong> three subblocks:<br />
a LUT, a register <strong>an</strong>d a 2 to 1 mux, as seen in Figure 2.<br />
Figure 1: Top level view <strong>of</strong> the logic element.<br />
Figure 2: Internal view <strong>of</strong> Logic Element<br />
The lookup-table (LUT), as seen in Figure 3, is used to create the result <strong>of</strong> the<br />
desired arbitrary function. LUTs are choosen because at the time <strong>of</strong> fabrication <strong>of</strong> the<br />
<strong>FPGA</strong> it is unknown what functions the ended user <strong>of</strong> the <strong>FPGA</strong> will w<strong>an</strong>t, <strong>an</strong>d LUTs are<br />
the simplest <strong>an</strong>d smallest way to provide the functional for allowing arbitrary function to<br />
be programmed. Since we will be using 4 inputs LUTs, each LUT will need 16 (2 4 ) sram<br />
cells (it’s 2 4 because each input c<strong>an</strong> have two values [0 or 1] <strong>an</strong>d there are 4 inputs. The<br />
sram cells are to be programmed will the 16 possible results <strong>of</strong> the arbitrary functions.
Figure 3: Lockup-Table (LUT)<br />
The register, as seen in figure 4, allows the output <strong>of</strong> the logic to be used as <strong>an</strong><br />
input to that logic or a previous logic block without causing a combination loop. A<br />
combination loop is when the output affects the inputs, which in turn causes the output to<br />
ch<strong>an</strong>ge, which affects the input, <strong>an</strong>d so on, never reaching a steady state, which me<strong>an</strong>s<br />
the output is unpredictable. Another use <strong>of</strong> the register is to allow for pipelined designs,<br />
which c<strong>an</strong> increase the throughput <strong>of</strong> the function programmed to the <strong>FPGA</strong>.<br />
Figure 4: Register<br />
The final element in the logic block is a multiplexer. This multiplexer, as seen in<br />
figure 5, allows the user to select for the output <strong>of</strong> the logic element either the LUT result<br />
directly or the register result.<br />
Figure 5: Logic Elements Output Mux
4. Routing<br />
Routing consists <strong>of</strong> the 4 wiring tracks running horizontally <strong>an</strong>d 4 running vertically.<br />
They c<strong>an</strong> be interconnected inside the switch boxes using programmable switches. For<br />
this purpose, we pl<strong>an</strong> to use pass gates using only nMOS tr<strong>an</strong>sistors, as shown in the<br />
following figure.<br />
The figure shows that <strong>an</strong>y track c<strong>an</strong> connect to <strong>an</strong>y <strong>of</strong> the three possible directions<br />
(continue the same way, or turn left or right), or more th<strong>an</strong> one direction, thus providing<br />
the f<strong>an</strong>out. Since there are 4 tracks coming in from each side, <strong>an</strong>d 6 tr<strong>an</strong>sistors (<strong>an</strong>d<br />
corresponding <strong>SRAM</strong> cells) are required to be able to route each <strong>of</strong> them in <strong>an</strong>y direction,<br />
we will use segmented routing. Segmented routing me<strong>an</strong>s that not all <strong>of</strong> the wiring tracks<br />
are <strong>of</strong> the same length, but there are segments <strong>of</strong> various lengths. In our case the chosen<br />
lengths are 1, 2, 4, 4, as shown in the following figure.<br />
As c<strong>an</strong> be seen from the figure, if the segments are distributed in a proper way, there<br />
are only 8 wires (2 from each side) coming into the switch box, which reduces the<br />
number <strong>of</strong> tr<strong>an</strong>sistors (<strong>an</strong>d <strong>SRAM</strong> cells) needed to implement routing to 12.<br />
Since our routing uses pass tr<strong>an</strong>sistors, we will use feedback tr<strong>an</strong>sistors on all the<br />
inputs coming from the wiring tracks <strong>an</strong>d other pass tr<strong>an</strong>sistors, to pull the signal back to<br />
VDD, as shown in the following figure.
The next component in the routing architecture are connection boxes, which provide<br />
connections between logic blocks <strong>an</strong>d routing tracks. The connection box establishes two<br />
types <strong>of</strong> connections; connecting wire tracks to LE inputs, <strong>an</strong>d connecting LE outputs to<br />
wiring tracks. Since only one track c<strong>an</strong> connect to <strong>an</strong>y one input, we use multiplexers for<br />
this purpose, as shown in the following figure:<br />
Outputs, on the other h<strong>an</strong>d c<strong>an</strong> connect to <strong>an</strong>y number <strong>of</strong> tracks, therefore, we use<br />
pass tr<strong>an</strong>sistors to connect the output to <strong>an</strong>y <strong>of</strong> the tracks, as shown in the following<br />
figure.
5. Programming Circuitry<br />
We are going to program the <strong>SRAM</strong>S by dividing up the tile in a set <strong>of</strong> rows <strong>an</strong>d<br />
columns, <strong>an</strong>d program each row one at a time. Since, we have 45 <strong>SRAM</strong>s, we decided to<br />
have 4 columns per tile <strong>an</strong>d 12 rows per tile to program the tile block. This arr<strong>an</strong>gement<br />
was chosen due to the area estimations <strong>of</strong> the program cells <strong>an</strong>d the tile area. The circuit<br />
diagrams are shown below for the program circuitry.<br />
Program Column Circuit Diagram:<br />
Shift in<br />
Clock<br />
Program Row Circuit Diagram:<br />
D Q<br />
Shift in Shift out<br />
Clock<br />
Program<br />
Enable<br />
D Q<br />
Qbar<br />
Program<br />
data bar<br />
Program<br />
data<br />
Shift out<br />
program
6. Area Estimation<br />
a. Need to calculate total <strong>SRAM</strong>S for each Tile<br />
Tile Diagram:<br />
Logic<br />
Block<br />
C2<br />
Connection<br />
Block<br />
C1<br />
Connection<br />
Block<br />
Switch<br />
Block<br />
Caculate <strong>SRAM</strong>s in C1 Connection Block:<br />
There will be 2 inputs going into logic block on the left<br />
- one input for the 4 LUT<br />
- one input for set reset<br />
There will be 1 input going into logic block on the right<br />
- one input for the 4 LUT<br />
Each input will require 2 <strong>SRAM</strong>S since it c<strong>an</strong> be connected from <strong>an</strong>y <strong>of</strong> the 4 tracks<br />
(using a 2-1 multiplexer)<br />
Thus, total <strong>SRAM</strong>s in C1 = 3 inputs x 2 <strong>SRAM</strong>S/input<br />
= 6 <strong>SRAM</strong>S<br />
Caculate <strong>SRAM</strong>s in C2 Connection Block:<br />
There will be 1 inputs going into logic block above<br />
- one input for the 4 LUT<br />
There will be 1 output coming from logic block above<br />
- output <strong>of</strong> Logic Block<br />
There will be 1 input going into logic block below<br />
- one input for the 4 LUT<br />
Each input will require 2 <strong>SRAM</strong>S since it c<strong>an</strong> be connected from <strong>an</strong>y <strong>of</strong> the 4 tracks<br />
(using a 2-1 multiplexer)<br />
Each output will require 4 <strong>SRAM</strong>S since there will be a switch connection to all 4 tracks<br />
Thus, total <strong>SRAM</strong>s in C2 = 2 inputs x 2 <strong>SRAM</strong>S/input + 1 output x 4 <strong>SRAM</strong>S/output<br />
= 8 <strong>SRAM</strong>S<br />
Caculate <strong>SRAM</strong>s in Switch Block:<br />
There will be 2 wires that c<strong>an</strong> go in <strong>an</strong>y <strong>of</strong> the 3 direction in the switch block due to the<br />
length <strong>of</strong> our wires.<br />
Each wire will require 6 <strong>SRAM</strong>S to be able to connect 4 wires from each direction.<br />
Thus, total <strong>SRAM</strong>S in S = 2 X 6 <strong>SRAM</strong>s<br />
= 12 <strong>SRAM</strong>S
Caculate <strong>SRAM</strong>s in logic Block:<br />
Logic Block contains 19 total <strong>SRAM</strong>s as seen below:<br />
4 LUT<br />
16 <strong>SRAM</strong>S<br />
D Flip<br />
Flop<br />
Set<br />
Reset<br />
Logic<br />
1 <strong>SRAM</strong><br />
2 <strong>SRAM</strong><br />
Total <strong>SRAM</strong>s for each tile = 19 (from Logic) + 6 (from C1) + 8 (from C2) + 12 (from S)<br />
= 45 <strong>SRAM</strong>s<br />
b. Area Calculations:<br />
Area estimations <strong>of</strong> <strong>SRAM</strong> cells<br />
From stick diagram, there are 9 vertical lines <strong>an</strong>d 7 horizontal lines<br />
Thus:<br />
A = W x H<br />
= (9 x 4) λ x (7 x 4) λ<br />
= 36 λ x 28 λ<br />
= 7.2 um x 5.6 um<br />
= 40.32 um 2<br />
Area estimations <strong>of</strong> DFlipFlop<br />
From stick diagram, there are 24 vertical lines <strong>an</strong>d 6 horizontal lines<br />
Thus<br />
A = W x H<br />
= (24 x 4) λ x (6 x 4) λ<br />
= 96 λ x 24 λ<br />
= 19.2 um x 4.8 um<br />
= 92.16 um 2<br />
S Block approx area: 12 <strong>SRAM</strong>s x 40.32 um 2 = 483.84 um 2<br />
Logic Block area: (not estimates for devices below were obtained from Appendix B <strong>of</strong><br />
“Architecture <strong>an</strong>d CAD for Deep-Submicron <strong>FPGA</strong>s)<br />
A = 1 Dreg + 1 2-1Multiplexer + 1 4 Lut + 1 Set/Rest logic
= 92.16 um 2 + (8 x unit size tr<strong>an</strong>s) +(30 x unit size tr<strong>an</strong>s) +(48.5 x unit size tr<strong>an</strong>s)<br />
= 92.16 + (8 + 30 + 48.5)3.75<br />
=1182.62um 2<br />
The C Blocks c<strong>an</strong> fit into the measurement sizes the result from the S Block <strong>an</strong>d Logic<br />
Block.<br />
Determining The Tile Area Size<br />
Thus:<br />
The Logic block c<strong>an</strong> be fit into 35um x 35 um block<br />
The Switch block c<strong>an</strong> be fit into 22um x 22um block<br />
Thus the tile size required is approx 60um x 60 um.<br />
Since we need to program 45 <strong>SRAM</strong>S, we choose to make the tile size:<br />
W x H = 80 um x 60 um<br />
This is necessary to fit the program circuitry required for each tile as described in the<br />
section “Programming Circuitry”. Since each DFlipFlop requires a width <strong>of</strong> 20 um, <strong>an</strong>d<br />
we need 4 per tile width, we need the tile width to be at least 80 um.<br />
According to these estimations, we estimate that we will be able to fit 11 rows X 9<br />
columns <strong>of</strong> tiles into the area available after the area consumed by I/O pads is taken into<br />
account.
Appendix C<br />
Cell Circuit Design Report
<strong>SRAM</strong><br />
The programmable elements in our architecture are <strong>SRAM</strong> cells. An <strong>SRAM</strong> cell is shown<br />
in the following figure.<br />
The <strong>SRAM</strong> cell basically consists <strong>of</strong> 2 coupled NOT gates, <strong>an</strong>d 2 pass gates for<br />
programming. To program the cell, both data <strong>an</strong>d its complement have to be applied.<br />
This enables us to use all tr<strong>an</strong>sistors <strong>of</strong> unit size, which is import<strong>an</strong>t, because the number<br />
<strong>of</strong> <strong>SRAM</strong> cells in the design is large, <strong>an</strong>d thus the savings in the <strong>SRAM</strong> cell area are<br />
import<strong>an</strong>t.<br />
Routing Architecture<br />
The routing architecture consists <strong>of</strong> two basic components: switch boxes, <strong>an</strong>d<br />
connection boxes. The schematic <strong>of</strong> a switch box is shown in the following figure
Each wire is connected to <strong>an</strong>other through <strong>an</strong> nMOS pass gate controlled by <strong>an</strong><br />
<strong>SRAM</strong> cell, as shown in the following figure<br />
Finally, we simulate the switch box, <strong>an</strong>d obtain the results shown in the following<br />
figure
Wiring track L is connected to the pulse source, <strong>an</strong>d initially all the pass<br />
tr<strong>an</strong>sistors are on, so all other tracks follow the input from L. Then, we program one<br />
by one pass tr<strong>an</strong>sistor not to pass values, <strong>an</strong>d by 30 ns none <strong>of</strong> the other tracks follow the<br />
input signal. We then program the tr<strong>an</strong>sistors back to pass values, <strong>an</strong>d one by one, the<br />
tracks again start following the input.<br />
The next component in routing architecture are connection boxes. There are two types<br />
<strong>of</strong> connection boxes: BOTTOM <strong>an</strong>d RIGHT, named after their position in the tile.<br />
The following figure shows the bottom connection box in the tile.
There are two new components in this figure. One <strong>of</strong> them is a 4-to-1 multiplexer,<br />
which consists <strong>of</strong> 3 2-to-1 multiplexers, as shown in the following figure
Each 2-to-1 mux consists <strong>of</strong> 3 pass tr<strong>an</strong>sistors, as shown in the following figure
Pass tr<strong>an</strong>sistors that connect outputs <strong>of</strong> the LE to the wiring tracks has a powerup<br />
protection, as show in the following figure<br />
During the power-up powerupb signal has to be kept low to avoid conflicts when two<br />
different outputs drive the same wiring tracks.<br />
Finally, we simulate the connection box, as shown in the following figures
The first figure shows that the input to the top LE follows various track inputs (not all<br />
<strong>of</strong> them are shown for clarity.<br />
The second figure shows how power-up protection functions. All <strong>of</strong> the pass<br />
tr<strong>an</strong>sistors were set to pass the values, but when the power-up protection is activated, all<br />
<strong>of</strong> them cut-<strong>of</strong>f, <strong>an</strong>d do not pass values <strong>an</strong>y more.<br />
The next figure shows the schematic for RIGHT connection box
Since this connection box only controls inputs, there are no pass tr<strong>an</strong>sistors, nor<br />
power-up protection, only multiplexers. The simulation results are shown in the<br />
following figure:
The figure shows, similarly to the BOTTOM connection box, how the input that is<br />
forwarded to the left LE follows one <strong>of</strong> the tracks, depending on the programming bits.<br />
Not all <strong>of</strong> the signals are shown, again, for clarity.
Feedback Buffer:<br />
The feedback buffer, as shown in the figure below, is used to rectify the signals coming<br />
from pass tr<strong>an</strong>sistors. We choose a pmos tr<strong>an</strong>sistor that has double the unit length so that<br />
it is weak enough that the pass tr<strong>an</strong>sistor c<strong>an</strong> still pull the input signal back down to zero.<br />
The following figure shows the output <strong>of</strong> the LUT without the feedback buffer.<br />
Notice in the pervious simulation that the output signal is not pulled all the way up to<br />
one. The follow figure shows the same simulation, except this time a feedback buffer is<br />
used.
Buffer <strong>an</strong>d Inverter:<br />
This circuit is used to create a buffered version <strong>an</strong>d buffered inverter version <strong>of</strong> a signal.<br />
This will be used for the clock, set <strong>an</strong>d reset signals.<br />
D-Flip-Flop:
The following two circuits are the Dflip-flops to be used. The second Dflip-flop has set<br />
<strong>an</strong>d reset signal need for the register inside the LE. The other Dflip-flop is to be used in<br />
the shift registers <strong>of</strong> the programming logic.<br />
The following two figures are the simulations <strong>of</strong> the Dflip-flop <strong>an</strong>d Dflip-flop with set<br />
<strong>an</strong>d reset, respectively.
Set <strong>an</strong>d Reset Selection:<br />
The following figure is the set <strong>an</strong>d reset logic. The simulations show the set <strong>an</strong>d reset<br />
logic working. The second simulations show the reset being selected.
NAND:
XOR:<br />
LUT:
The following two figures the circuit schematics <strong>of</strong> the LUT <strong>an</strong>d the LUT with 4 4-by-1<br />
sram cells. The figure after that is the simulation <strong>of</strong> the LUT that is programmed with the<br />
function XOR.
LE:
Schematic Description <strong>of</strong> program_row <strong>an</strong>d program_row_tile:<br />
The <strong>SRAM</strong>s in our <strong>FPGA</strong> are programmed one row at a time. The program_row<br />
schematic designs the circuit to set the row bit high when the DFlipFlop for the<br />
respective row contains a 1 <strong>an</strong>d when programEnable input for the <strong>FPGA</strong> is set to high to<br />
initiate programming <strong>of</strong> the <strong>FPGA</strong>. The circuit design <strong>of</strong> the program_row c<strong>an</strong> be seen in<br />
Figure 1.<br />
The DFlipFlop also has the capability to shift bits to the subsequent program_row cells in<br />
order to program each row one at a time. Thus, each row c<strong>an</strong> be programmed one at a<br />
time by passing in 1 high bit to the first program_row cell <strong>an</strong>d then allow it to shift it<br />
along to each program_row circuit for each respective row <strong>of</strong> the <strong>FPGA</strong>. This c<strong>an</strong> be seen<br />
in the circuit design <strong>of</strong> the program_row_tile as seen in Figure 3. The program_row_tile<br />
contains 12 rows connected serially. Thus, each tile in the <strong>FPGA</strong> requires 12<br />
programming rows to program the entire tile.<br />
Schematic Description <strong>of</strong> program_col <strong>an</strong>d program_column_tile:<br />
The <strong>SRAM</strong>s in our <strong>FPGA</strong> are programmed one row at a time. To program the entire row<br />
<strong>of</strong> <strong>FPGA</strong>’s at once, bits are shifted into a program_col circuit which stores the data bit<br />
that the <strong>SRAM</strong> will be programmed. The DFlipFlop stores the data bit for the <strong>SRAM</strong> <strong>an</strong>d<br />
the output <strong>an</strong>d its complement is buffered as is required by the <strong>SRAM</strong>. The circuit design<br />
<strong>of</strong> the column_row c<strong>an</strong> be seen in Figure 2.<br />
The DFlipFlop also has the capability to shift bits to the subsequent program_col cells in<br />
order to serially input the data bits for the entire column. This c<strong>an</strong> be seen in the circuit<br />
design <strong>of</strong> the program_col_tile as seen in Figure 4. The design contains the number <strong>of</strong><br />
column data bits required for each tile <strong>of</strong> the <strong>FPGA</strong>. Thus, each tile will program 4<br />
<strong>SRAM</strong>s per programming row.<br />
Simulation<br />
Simulation <strong>of</strong> program_row_tile<br />
The inputs <strong>of</strong> program_row_tile were connected to the following vpulse circuits:<br />
Input to shiftIn: vpulse – 20ns pulse width, 260ns period<br />
Input to clock: vpulse – 10ns pulse width <strong>an</strong>d 20ns period<br />
Input to programEnable: vds – 3.3V (set high)<br />
The waveforms <strong>of</strong> shiftIn <strong>an</strong>d clock c<strong>an</strong> be seen in Figures 5 <strong>an</strong>d 6 respectively in<br />
Appendix A. The shiftIn pulse sends 1 bit high every 13 clock cycles. This ensures only 1<br />
program row output will be set to high at <strong>an</strong>y given time.<br />
The outputs <strong>of</strong> program_row_tile were then monitored to ensure correct functionality.<br />
The first period <strong>of</strong> the shiftIn pulse resets all the DFlipFlops in the program_row_tile.<br />
The waveform <strong>of</strong> each output c<strong>an</strong> be seen to reset in the first 260ns <strong>of</strong> operation. The<br />
second 260ns <strong>of</strong> operation shows the 1 bit sent in by the shiftIn pulse shifted to each<br />
output. Thus the following behavior is expected:
For 260 – 280ns, the shiftIn bit is set high to be clocked into the device.<br />
For 280 – 300ns, program output is high <strong>an</strong>d low for the remaining time.<br />
For 300 – 320ns, program output is high <strong>an</strong>d low for the remaining time<br />
For 320 – 340ns, program output is high <strong>an</strong>d low for the remaining time<br />
This cycle pattern continues for the remaining output wires <strong>an</strong>d is repeated every<br />
260 ns.<br />
This behavior c<strong>an</strong> be seen in Figures 7 through 18 in Appendix A which displays the<br />
waveform for each output wire <strong>of</strong> the program_row_tile.<br />
Simulation <strong>of</strong> program_col_tile<br />
The inputs <strong>of</strong> program_col_tile were connected to the following vpulse circuits:<br />
Input to shiftIn: vpulse – 20ns pulse width, 60ns period<br />
Input to clock: vpulse – 10ns pulse width <strong>an</strong>d 20ns period<br />
The waveforms <strong>of</strong> shiftIn <strong>an</strong>d clock c<strong>an</strong> be seen in Figures 19 <strong>an</strong>d 20 respectively in<br />
Appendix A. The shiftIn pulse sends the bit sequence 1 bit high every 3 clock cycles.<br />
This sends the bit sequence 100 repeatedly into the program_col_tile.<br />
The outputs <strong>of</strong> program_col_tile were then monitored to ensure correct functionality. The<br />
first period <strong>of</strong> the shiftIn pulse resets all the DFlipFlops in the program_col_tile. The<br />
waveform <strong>of</strong> each output c<strong>an</strong> be seen to reset in the first 60ns <strong>of</strong> operation. The<br />
subsequent second 60ns <strong>of</strong> operation shows the 1 bit sent in by the shiftIn pulse shifted to<br />
each output. Thus the following behavior is expected:<br />
For 0 – 20ns, the shiftIn bit is set high to be clocked into the device.<br />
For 20 – 40ns, prog_data output is high<br />
For 40 – 60ns, prog_data output is high<br />
For 60 – 80ns, prog_data output is high<br />
For 80 – 100ns, prog_data output is high<br />
prog_data output is set high again by shiftIn next cycle.<br />
The process is continued as the values from Prog_data is shifted through the<br />
DFlipFlops in prog_col_tile.<br />
This behavior c<strong>an</strong> be seen in Figures 21 through 24 in Appendix A which displays the<br />
waveform for each output wire <strong>of</strong> the program_col_tile.<br />
Appendix:<br />
Figure 1: program_row Schematic
Figure 2: program_col Schematic<br />
Figure 3: program_row_tile Schematic
Figure 4: program_col_tile Schematic
Figure 5: Clock Input to program_row_tile<br />
Figure 6: ShiftIn Input to program_row_tile
Figure 7: Output <strong>of</strong> Program<br />
Figure 8: Output <strong>of</strong> Program
Figure 9: Output <strong>of</strong> Program<br />
Figure 10: Output <strong>of</strong> Program
Figure 11: Output <strong>of</strong> Program<br />
Figure 12: Output <strong>of</strong> Program
Figure 13: Output <strong>of</strong> Program<br />
Figure 14: Output <strong>of</strong> Program
Figure 15: Output <strong>of</strong> Program<br />
Figure 16: Output <strong>of</strong> Program
Figure 17: Output <strong>of</strong> Program<br />
Figure 18: Output <strong>of</strong> Program
Figure 19: Clock Input to program_col_tile<br />
Figure 20: ShiftIn Input to program_col_tile
Figure 21: Output <strong>of</strong> Program_data<br />
Figure 22: Output <strong>of</strong> Program_data
Figure 23: Output <strong>of</strong> Program_data<br />
Figure 24: Output <strong>of</strong> Program_data
Appendix D<br />
<strong>Full</strong> Schematic Design Report
1. Tile<br />
In the previous part <strong>of</strong> this project, we have designed schematics for all the basic<br />
components <strong>of</strong> <strong>an</strong> <strong>FPGA</strong>. In this part <strong>of</strong> the project we use those components to build a<br />
full schematic design <strong>of</strong> our <strong>FPGA</strong> in a hierarchical m<strong>an</strong>ner. We start by combining the<br />
logic element, switch box, <strong>an</strong>d two connection boxes into the tile. The tile schematic is<br />
shown in the following figure:
To test the individual tile, <strong>an</strong>d the programming resources we combine the tile with<br />
the programming shift-registers, as shown in the following schematic:<br />
To program the tile, the state <strong>of</strong> 45 different switches has to be determined, <strong>an</strong>d a<br />
sequence <strong>of</strong> bits corresponding to the desired states <strong>of</strong> these bits has to be fed to the col<br />
programming registers (at the top). The bits are fed four by four, twelve times, for a total<br />
<strong>of</strong> 48 bits (3 <strong>of</strong> which do not affect the operation <strong>of</strong> the tile). Row programming registers<br />
(on the left) have to be fed with one positive pulse initially, <strong>an</strong>d after each four cycles <strong>of</strong><br />
the col_clk (at the top), row_clk has to be activated (positive edge), to shift that pulse into<br />
the new position. By doing that, only one <strong>of</strong> the program bits is going to be high<br />
at the time, which will determine which portion <strong>of</strong> the tile is being programmed by the<br />
four bits in the col programming registers.
The me<strong>an</strong>ing <strong>of</strong> each <strong>of</strong> the consecutive 48 bits is fixed by the circuit structure, <strong>an</strong>d is<br />
presented in the following table<br />
Bits Function<br />
1-4<br />
LUT<br />
f (In3=0, In2=0, In1=0, In0=0) - f (In3=0, In2=0, In1=1, In0=1)<br />
5-8 f (In3=0, In2=1, In1=0, In0=0) - f (In3=0, In2=1, In1=1, In0=1)<br />
9-12 f (In3=1, In2=0, In1=0, In0=0) - f (In3=1, In2=0, In1=1, In0=1)<br />
13-16 f (In3=1, In2=1, In1=0, In0=0) - f (In3=1, In2=1, In1=1, In0=1)<br />
Set/Reset<br />
Bit 17 = 1 S/R active low, active high otherwise;<br />
Bit 18 = 1 Set, otherwise Reset;<br />
17-20<br />
Select Output Mux<br />
Bit 19 = 1 Out = Register out, else Out = LUT out,<br />
Bit 20 = DC (Don’t Care)<br />
Connection Box Bottom<br />
21-24 LE output to tracks 0, 1, 2, 3 (whichever one is high will be<br />
connected)<br />
Top connection determined by 26,25<br />
00 = track 0, 01= track 1, 10 = track 2, 11 = track 3;<br />
25-28<br />
Bottom connection determined by 28,27<br />
00 = track 0, 01= track 1, 10 = track 2, 11 = track 3;<br />
29-32<br />
33-36<br />
37-40<br />
41-44<br />
45-48<br />
Switch Box<br />
29 – L, T; 30 – T, R<br />
31 – L, T; 32 – T, R<br />
33 – L, R; 34 – T, B<br />
35 – L, R; 36 – T, B<br />
37 – L, B; 38 – B, R<br />
39 – L, B; 40 – B, R<br />
Connection Box Right<br />
S/R connection determined by bits 42, 41<br />
00 = track 0, 01= track 1, 10 = track 2, 11 = track 3;<br />
Bits 43,44 = DC (Don’t Care)<br />
Left input connection determined by bits 46,45<br />
00 = track 0, 01= track 1, 10 = track 2, 11 = track 3;<br />
Right input connection determined by bits 48,47<br />
00 = track 0, 01= track 1, 10 = track 2, 11 = track 3;<br />
As c<strong>an</strong> be seen from the table, first 16 bits determine the function <strong>of</strong> the LUT, <strong>an</strong>d<br />
correspond directly to the bits from the truth table <strong>of</strong> the desired function. Other bits are<br />
used to determine the functionality <strong>of</strong> the register <strong>an</strong>d the multiplexer in the logic<br />
element, <strong>an</strong>d the functionalities <strong>of</strong> the switch <strong>an</strong>d connection boxes.
To test the tile, we implement the following logic function<br />
f = x3<br />
( x2<br />
⊕ x1<br />
⊕ x0<br />
) + x3x<br />
2 x1x<br />
0 . We also use the register to delay the result for one<br />
clock cycle, <strong>an</strong>d use connection <strong>an</strong>d switch boxes to route the signal. The sequence <strong>of</strong><br />
bits that was generated for this purpose is shown in the following table:<br />
Bit Value Me<strong>an</strong>ing Time<br />
1 0 10<br />
2 1 20<br />
3 1 30<br />
4 0 40<br />
5 1 50<br />
6 0 60<br />
7 0 70<br />
8 1 80<br />
9 0 90<br />
10 0 100<br />
11 0 110<br />
12 0 120<br />
13 0 130<br />
14 0 140<br />
15 0 150<br />
16 1 160<br />
17 0 S/R active high 170<br />
18 0 Reset 180<br />
19 1 Out = Register out 190<br />
20 0 200<br />
21 1 LE output to track 0 210<br />
22 0 220<br />
23 0 230<br />
24 0 240<br />
25 1 input 3 will be fed from track 1 250<br />
26 0 260<br />
27 0 270<br />
28 0 280<br />
29 0 290<br />
30 1 T,R - R will be source for in2 300<br />
31 0 310<br />
32 0 320<br />
33 0 330<br />
34 0 340<br />
35 0 350<br />
36 0 360<br />
37 1 L,B - LE output to bottom 0 370<br />
38 0 380<br />
39 0 390<br />
40 0 400<br />
41 0 410<br />
42 1 S/R coming from vertical track 2 420<br />
43 0 430
44 0 440<br />
45 0 450<br />
46 0 in2 will be fed from vertical track 0 460<br />
47 0 470<br />
48 0 480<br />
The last column in the table corresponds to the time when that pulse has to be fed to<br />
the programming bits (assuming we feed one pulse each 10 seconds). The above<br />
sequence <strong>of</strong> bits was generated using a series <strong>of</strong> vpulse elements available in cmosp35<br />
library, as shown in the following schematic:<br />
The row <strong>of</strong> vpulse sources on the left generates the programming sequence, while<br />
other sources provide necessary clock signals <strong>an</strong>d inputs to the function to be<br />
implemented. The output is attached to the buffer with feedback to pull the voltage to<br />
VDD since it passes through the routing tr<strong>an</strong>sistors. In the final design this will be done<br />
before forwarding the data to the output pads. The simulation results are shown in the<br />
following figures.
The first figure shows the programming bits fed into the col programming registers,<br />
which correspond to the programming bits determined in the table above.<br />
After all the programming bits have been inputted, we verify the functionality <strong>of</strong> our<br />
design, starting at time 500 ns, as shown in the following figures:
The above figure shows that the tile performs the desired function. The output is<br />
delayed for one clock cycle, because it passes through the register in the logic element.<br />
From the time 640 ns to 670 ns reset signal is activated, <strong>an</strong>d we see that the output stays 0<br />
during that time, which confirms that the reset also functions properly.<br />
2. 3 X 3 Test<br />
Since the full schematic <strong>of</strong> 11 rows <strong>an</strong>d 9 columns is too complex to simulate, we<br />
simulate <strong>an</strong> array with three rows <strong>an</strong>d three columns <strong>of</strong> tiles, with the surrounding<br />
programming <strong>an</strong>d routing tracks, as shown in the following schematic:
The three by three array <strong>of</strong> tiles c<strong>an</strong> be seen in the bottom right corner <strong>of</strong> the figure.<br />
The array is surrounded by routing resources (connection <strong>an</strong>d switch boxes) from left <strong>an</strong>d<br />
top. This is not necessary on the right <strong>an</strong>d at the bottom, because each tile already<br />
contains routing resources on the right <strong>an</strong>d at the bottom. Finally, programming resources<br />
were added from the left <strong>an</strong>d top.<br />
To test the design, we have decided to implement a portion <strong>of</strong> the register decoder<br />
implemented in Project 2 <strong>of</strong> this course that c<strong>an</strong> fit into 9 LEs. This gives us something to<br />
compare against in terms <strong>of</strong> timing. Since each output <strong>of</strong> the register decoder is a function<br />
<strong>of</strong> five variables, with logic sharing we c<strong>an</strong> implement 7 bits <strong>of</strong> the register decoder,<br />
which fully utilizes our logic resources.<br />
To implement this functionality, it is necessary to determine the state <strong>of</strong> over 700<br />
hundred switches in the design. The desired functionality was mapped into the array<br />
m<strong>an</strong>ually. The rough sketch that was used, <strong>an</strong>d a table with all the bits generated are<br />
attached at the end <strong>of</strong> this report.<br />
Similarly to the test for the tile, the programming bits were generated using a series <strong>of</strong><br />
vpulse sources, as shown in the following figure:
At this time, we still do not have the results <strong>of</strong> the simulation, because HSPICE<br />
would not simulate the design, but rather results with the error message:<br />
**error**: no convergence in operating point<br />
We have spent days trying to find the problem in our design, but none was found. We<br />
have also initialized all the bi-stable elements in our design (ABOUT 800 OF THEM!!!),<br />
but that did not help either. We have also tried to find the solution to the problem on the<br />
Internet, as well as asking more experienced SPICE users to help us resolve the problem.<br />
They have suggested ch<strong>an</strong>ging some parameters, but that did not help. We are currently<br />
experimenting with <strong>an</strong>other set <strong>of</strong> parameters suggested by a student in the class.<br />
3. Top Level Schematic<br />
Finally, we build our top level schematic, which contains <strong>an</strong> array <strong>of</strong> 11 times 9 tiles,<br />
<strong>an</strong>d the corresponding routing <strong>an</strong>d programming resources. We first build a row <strong>of</strong> four
tiles, <strong>an</strong>d then <strong>an</strong> array <strong>of</strong> four by four tiles to make our design more hierarchical, as<br />
shown in the following figures:<br />
Finally, our top level schematic is shown in the following figure:
The figure shows four blocks with four by four tiles, which gives us 8 by 8, which is<br />
augmented by additional three rows <strong>an</strong>d one column for total <strong>of</strong> 11 by 9 tiles. On the left<br />
<strong>an</strong>d top there are routing <strong>an</strong>d programming resources. All the output pins are connected<br />
through the I/O pads.<br />
As stated earlier, we have not simulated this design, due to its complexity.
Appendix E<br />
<strong>Layout</strong> <strong>of</strong> the Cells Report
<strong>Layout</strong><br />
Figure 1: NAND Gate<br />
The n<strong>an</strong>d gate is one our base cells. It is used by modules higher up in the hierarchy. The<br />
inputs to our n<strong>an</strong>d gate are labeled A <strong>an</strong>d B <strong>an</strong>d output is labeled out as seen in the figure.<br />
The height <strong>of</strong> our n<strong>an</strong>d gate has been increased to match the pitch <strong>of</strong> our largest cell.<br />
Figure 2: XOR Cell<br />
The XOR cell was designed using 4 n<strong>an</strong>d gates as seen in the figure. We designed the<br />
XOR with n<strong>an</strong>d gates instead <strong>of</strong> designing it from tr<strong>an</strong>sistors to reduce the pitch <strong>of</strong> the<br />
XOR gate. It is designed in a hierarchal m<strong>an</strong>ner as 4 inst<strong>an</strong>ces <strong>of</strong> n<strong>an</strong>d gates are<br />
inst<strong>an</strong>tiated <strong>an</strong>d then connected. The XOR cell has 2inputs labeled A <strong>an</strong>d B <strong>an</strong>d one<br />
output labeled out as seen in the figure.<br />
Figure 3: <strong>SRAM</strong> Cell
The <strong>SRAM</strong> cell is one our base cells. It is used by modules higher up in the hierarchy.<br />
The inputs to our <strong>SRAM</strong> cell are labeled prog_data, prog_datab, <strong>an</strong>d program <strong>an</strong>d the<br />
outputs are labeled data <strong>an</strong>d datab as seen in the figure. The height <strong>of</strong> our <strong>SRAM</strong> cell has<br />
been increased to match the pitch <strong>of</strong> our largest cell.<br />
Figure 4: DFlipFlop Cell<br />
The DFlipFlop cell was designed using a hierarchal m<strong>an</strong>ner. It consists <strong>of</strong> a<br />
buffer<strong>an</strong>dinverter cell, <strong>an</strong>d two DFFhalf cells. The DFFhalf cell was created since the<br />
DFlipFlop repeated 2 tr<strong>an</strong>sistors connected in a cycle. The buffer<strong>an</strong>dinverter cell is the<br />
first module <strong>of</strong> the DFlipFlop. The inputs to our DFlipFlop cell are labeled D <strong>an</strong>d clock<br />
<strong>an</strong>d the outputs are labeled Q as seen in the figure.<br />
Figure 5: DFlipFlop_wSetReset Cell
The DFlipFlop_wSetReset cell was designed using a hierarchal m<strong>an</strong>ner. It is designed<br />
similar to the DFlipFLop cell as it consists <strong>of</strong> a buffer<strong>an</strong>dinverter cell, <strong>an</strong>d two DFFhalf<br />
cells. The only difference is it contains two DFF_SetReset cells which allows the user to<br />
be able to set <strong>an</strong>d reset the cell. The inputs to our DFlipFlop_SetReset cell are labeled D,<br />
setb, set, reset, resetb, <strong>an</strong>d clock <strong>an</strong>d the outputs are labeled Q as seen in the figure.<br />
Figure 6: Program_col Cell<br />
The Program_col cell was designed using a hierarchal m<strong>an</strong>ner. It consists <strong>of</strong> a DFlipFlop<br />
<strong>an</strong>d a buffer<strong>an</strong>dinverter cell. The inputs to our program_col cell are labeled shiftIn, <strong>an</strong>d<br />
clock <strong>an</strong>d the outputs are labeled shiftOut, prog_data, <strong>an</strong>d prog_datab as seen in the<br />
figure.<br />
Figure 7: Program_row Cell<br />
The Program_row cell was designed using a hierarchal m<strong>an</strong>ner. It consists <strong>of</strong> a DFlipFlop<br />
cell, a n<strong>an</strong>d cell, <strong>an</strong>d a inverterx4 cell. The inputs to our program_row cell are labeled<br />
shiftIn, clock, <strong>an</strong>d programEnable <strong>an</strong>d the outputs are labeled shiftOut, <strong>an</strong>d program as<br />
seen in the figure.<br />
Switch box
Switch box interconnects the wiring tracks coming into it. It consists <strong>of</strong> 12 large<br />
tr<strong>an</strong>sistors (size 10) <strong>an</strong>d 12 <strong>SRAM</strong> cells controlling these tr<strong>an</strong>sistors. Since the design is<br />
symmetric, a half <strong>of</strong> the switch box with 6 tr<strong>an</strong>sistors was created first, <strong>an</strong>d then they<br />
were paired, <strong>an</strong>d connections <strong>an</strong>d pins were added, as shown in the following figure:
Inverter size 1 <strong>an</strong>d 2
Inverters are st<strong>an</strong>dard design, as we learned in class.<br />
Buffer with feedback<br />
Buffer with feedback consists <strong>of</strong> a unit size inverter feeding the inverter <strong>of</strong> size 2. At the<br />
input there is a pMOS tr<strong>an</strong>sistor that pulls the value passed through <strong>an</strong>y pass tr<strong>an</strong>sistors<br />
back to VDD. The tr<strong>an</strong>sistor is half the unit size (double gate length) so that the value c<strong>an</strong><br />
be pulled back to GND.<br />
Buffer <strong>an</strong>d Inverter
Buffer <strong>an</strong>d inverter buffers the input value, <strong>an</strong>d generates that value buffered, <strong>an</strong>d its<br />
complement. This is done by one unit size inverter, <strong>an</strong>d two inverters <strong>of</strong> size 2.<br />
4-to-1 MUX
4-to-1 multiplexer is made out <strong>of</strong> 3 2-to-1 multiplexers. Since each multiplexer consists<br />
<strong>of</strong> 2 tr<strong>an</strong>sistors, there are 6 tr<strong>an</strong>sistors in the 4-to-1 multiplexers org<strong>an</strong>ized in a tree, that<br />
pass one <strong>of</strong> the four input values to the output depending on the values <strong>of</strong> the control bits<br />
(on the right).
4-LUT with <strong>SRAM</strong><br />
This figure shows 4-LUT with <strong>SRAM</strong>. 4-LUT consists <strong>of</strong> a 16-to-1 mux, which was<br />
implemented as four 4-to-1 muxes (centre <strong>of</strong> the second row) that feed <strong>an</strong>other 4-to-1<br />
mux (centre <strong>of</strong> the last row). The 16 <strong>SRAM</strong> cells that feed inputs to the multiplexers are<br />
visible in rows 1 <strong>an</strong>d 3. Edges <strong>of</strong> rows 2 <strong>an</strong>d 4 show buffers <strong>an</strong>d inverters that feed the<br />
select inputs <strong>of</strong> the multiplexers. Finally, a buffer with feedback that feeds the output c<strong>an</strong><br />
be seen in the last row, to the right <strong>of</strong> the 4-to-1 mux. An empty area in the last row was<br />
left there on purpose, <strong>an</strong>d will be filled in later when this cell abuts with other cells in the<br />
Logic Element.
Connection Box Bottom<br />
Connection box bottom connects the output <strong>of</strong> the LE above it to the wiring tracks, <strong>an</strong>d<br />
connects the wiring tracks to the inputs <strong>of</strong> the LEs above <strong>an</strong>d below it. It consists <strong>of</strong> 4 big<br />
(size 10) pass tr<strong>an</strong>sistors that feed the output <strong>of</strong> the LE above it to the tracks, <strong>an</strong>d two<br />
cells <strong>of</strong> type “input to LE”, with the corresponding <strong>SRAM</strong> cells<br />
Figure: SetResetLogic Cell<br />
The SetResetLogic cell was designed using a hierarchal m<strong>an</strong>ner. It consists <strong>of</strong> a XOR<br />
cell, two n<strong>an</strong>d cells, two sram cells <strong>an</strong>d two buffer&inverter cell. The inputs to our<br />
SetResetLogic cell are labeled set_reset, program, data_prog <strong>an</strong>d<br />
data_progb <strong>an</strong>d the outputs are labeled set, setb, reset, <strong>an</strong>d resetb as seen in the<br />
figure.<br />
Figure: LogicElement Cell
The LogicElement cell was designed using a hierarchal m<strong>an</strong>ner. It consists <strong>of</strong> a 4-<br />
Lut_w_sram cell, SetResetLogic cell, DFlipFlop_w_SetReset cell, sram cell, 2-1 mux<br />
cell <strong>an</strong>d a feedback buffer cell. The inputs to our LogicElement cell are labeled in,<br />
set_reset, program, data_prog <strong>an</strong>d data_progb <strong>an</strong>d the output is labeled<br />
out as seen in the figure.<br />
Figure: Input to LE cell
The Input_to_LE cell was designed using a hierarchal m<strong>an</strong>ner. It consists <strong>of</strong> a 4-1 mux,<br />
two sram cells, <strong>an</strong>d a feedback buffer cell. The inputs to our Input_to_LE cell are labeled<br />
in, program, data_prog <strong>an</strong>d data_progb <strong>an</strong>d the output is labeled<br />
out as seen in the figure.<br />
Figure: Connection_box_right cell
The Connection_box_right cell was designed using a hierarchal m<strong>an</strong>ner. It consists <strong>of</strong> 3<br />
input_to_LE cells, <strong>an</strong>d 4 track_buffer cells. The inputs to our Connection_box_right cell<br />
are labeled track, program, data_prog <strong>an</strong>d data_progb <strong>an</strong>d the<br />
outputs are labeled left_lb_input, right_lb_input <strong>an</strong>d set_reset as seen in the figure.
All the cells passed DRC <strong>an</strong>d LVS. Here is the LVS for the major blocks.<br />
LogicElement<br />
@(#)$CDS: LVS version 4.4.5 04/20/2000 16:37 (cds11182) $<br />
Like matching is enabled.<br />
Net swapping is enabled.<br />
Using terminal names as correspondence points.<br />
Net-list summary for /zvonko/r/r0/fort/cmosp35/LVS/layout/netlist<br />
count<br />
116 nets<br />
22 terminals<br />
153 nfet<br />
83 pfet<br />
Net-list summary for<br />
/zvonko/r/r0/fort/cmosp35/LVS/schematic/netlist<br />
count<br />
116 nets<br />
22 terminals<br />
153 nfet<br />
83 pfet<br />
Terminal correspondence points<br />
1 clock<br />
2 in<br />
3 in<br />
4 in<br />
5 in<br />
6 out<br />
7 prog_data<br />
8 prog_data<br />
9 prog_data<br />
10 prog_data<br />
11 prog_datab<br />
12 prog_datab<br />
13 prog_datab<br />
14 prog_datab<br />
15 program<br />
16 program<br />
17 program<br />
18 program<br />
19 program<br />
20 set_reset<br />
21 vdd!<br />
22 vss!<br />
The net-lists match.<br />
layout schematic<br />
inst<strong>an</strong>ces<br />
un-matched 0 0<br />
rewired 0 0<br />
size errors 0 0<br />
pruned 0 0<br />
active 236 236
total 236 236<br />
nets<br />
un-matched 0 0<br />
merged 0 0<br />
pruned 0 0<br />
active 116 116<br />
total 116 116<br />
terminals<br />
un-matched 0 0<br />
matched but<br />
different type 0 0<br />
total 22 22<br />
Probe files from /zvonko/r/r0/fort/cmosp35/LVS/schematic<br />
devbad.out:<br />
netbad.out:<br />
mergenet.out:<br />
termbad.out:<br />
prunenet.out:<br />
prunedev.out:<br />
audit.out:<br />
Probe files from /zvonko/r/r0/fort/cmosp35/LVS/layout<br />
devbad.out:<br />
netbad.out:<br />
mergenet.out:<br />
termbad.out:<br />
prunenet.out:<br />
prunedev.out:<br />
audit.out:
connection_box_right:<br />
@(#)$CDS: LVS version 4.4.5 04/20/2000 16:37 (cds11182) $<br />
Like matching is enabled.<br />
Net swapping is enabled.<br />
Using terminal names as correspondence points.<br />
Net-list summary for /zvonko/r/r0/fort/cmosp35/LVS/layout/netlist<br />
count<br />
51 nets<br />
19 terminals<br />
60 nfet<br />
37 pfet<br />
Net-list summary for<br />
/zvonko/r/r0/fort/cmosp35/LVS/schematic/netlist<br />
count<br />
51 nets<br />
19 terminals<br />
60 nfet<br />
37 pfet<br />
Terminal correspondence points<br />
1 left_lb_input<br />
2 prog_data<br />
3 prog_data<br />
4 prog_data<br />
5 prog_data<br />
6 prog_datab<br />
7 prog_datab<br />
8 prog_datab<br />
9 prog_datab<br />
10 program<br />
11 program<br />
12 right_lb_input<br />
13 set_reset<br />
14 track<br />
15 track<br />
16 track<br />
17 track<br />
18 vdd!<br />
19 vss!<br />
The net-lists match.<br />
layout schematic<br />
inst<strong>an</strong>ces<br />
un-matched 0 0<br />
rewired 0 0<br />
size errors 0 0<br />
pruned 0 0<br />
active 97 97<br />
total 97 97<br />
nets<br />
un-matched 0 0<br />
merged 0 0
pruned 0 0<br />
active 51 51<br />
total 51 51<br />
terminals<br />
un-matched 0 0<br />
matched but<br />
different type 0 0<br />
total 19 19<br />
Probe files from /zvonko/r/r0/fort/cmosp35/LVS/schematic<br />
devbad.out:<br />
netbad.out:<br />
mergenet.out:<br />
termbad.out:<br />
prunenet.out:<br />
prunedev.out:<br />
audit.out:<br />
Probe files from /zvonko/r/r0/fort/cmosp35/LVS/layout<br />
devbad.out:<br />
netbad.out:<br />
mergenet.out:<br />
termbad.out:<br />
prunenet.out:<br />
prunedev.out:<br />
audit.out:
connect_box_bottom:<br />
@(#)$CDS: LVS version 4.4.5 04/20/2000 16:37 (cds11182) $<br />
Like matching is enabled.<br />
Net swapping is enabled.<br />
Using terminal names as correspondence points.<br />
Net-list summary for /zvonko/r/r0/fort/cmosp35/LVS/layout/netlist<br />
count<br />
64 nets<br />
20 terminals<br />
76 nfet<br />
50 pfet<br />
Net-list summary for<br />
/zvonko/r/r0/fort/cmosp35/LVS/schematic/netlist<br />
count<br />
64 nets<br />
20 terminals<br />
76 nfet<br />
50 pfet<br />
Terminal correspondence points<br />
1 bottom_lb_input<br />
2 lb_output<br />
3 powerupb<br />
4 prog_data<br />
5 prog_data<br />
6 prog_data<br />
7 prog_data<br />
8 prog_datab<br />
9 prog_datab<br />
10 prog_datab<br />
11 prog_datab<br />
12 program<br />
13 program<br />
14 top_lb_input<br />
15 track<br />
16 track<br />
17 track<br />
18 track<br />
19 vdd!<br />
20 vss!<br />
The net-lists match.<br />
layout schematic<br />
inst<strong>an</strong>ces<br />
un-matched 0 0<br />
rewired 0 0<br />
size errors 0 0<br />
pruned 0 0<br />
active 126 126<br />
total 126 126<br />
nets<br />
un-matched 0 0
merged 0 0<br />
pruned 0 0<br />
active 64 64<br />
total 64 64<br />
terminals<br />
un-matched 0 0<br />
matched but<br />
different type 0 0<br />
total 20 20<br />
Probe files from /zvonko/r/r0/fort/cmosp35/LVS/schematic<br />
devbad.out:<br />
netbad.out:<br />
mergenet.out:<br />
termbad.out:<br />
prunenet.out:<br />
prunedev.out:<br />
audit.out:<br />
Probe files from /zvonko/r/r0/fort/cmosp35/LVS/layout<br />
devbad.out:<br />
netbad.out:<br />
mergenet.out:<br />
termbad.out:<br />
prunenet.out:<br />
prunedev.out:<br />
audit.out:
Switchbox:<br />
@(#)$CDS: LVS version 4.4.5 04/20/2000 16:37 (cds11182) $<br />
Like matching is enabled.<br />
Net swapping is enabled.<br />
Using terminal names as correspondence points.<br />
Net-list summary for /zvonko/r/r0/plavec/ece1388/chapter3/LVS/layout/netlist<br />
count<br />
45 nets<br />
21 terminals<br />
60 nfet<br />
24 pfet<br />
Net-list summary for /zvonko/r/r0/plavec/ece1388/chapter3/LVS/schematic/netlist<br />
count<br />
45 nets<br />
21 terminals<br />
60 nfet<br />
24 pfet<br />
Terminal correspondence points<br />
1 B<br />
2 B<br />
3 L<br />
4 L<br />
5 R<br />
6 R<br />
7 T<br />
8 T<br />
9 prog_data<br />
10 prog_data<br />
11 prog_data<br />
12 prog_data<br />
13 prog_datab<br />
14 prog_datab<br />
15 prog_datab<br />
16 prog_datab<br />
17 program<br />
18 program<br />
19 program<br />
20 vdd!<br />
21 vss!<br />
The net-lists match.<br />
layout schematic
inst<strong>an</strong>ces<br />
un-matched 0 0<br />
rewired 0 0<br />
size errors 0 0<br />
pruned 0 0<br />
active 84 84<br />
total 84 84<br />
nets<br />
un-matched 0 0<br />
merged 0 0<br />
pruned 0 0<br />
active 45 45<br />
total 45 45<br />
terminals<br />
un-matched 0 0<br />
matched but<br />
different type 0 0<br />
total 21 21<br />
Probe files from /zvonko/r/r0/plavec/ece1388/chapter3/LVS/schematic<br />
devbad.out:<br />
netbad.out:<br />
mergenet.out:<br />
termbad.out:<br />
prunenet.out:<br />
prunedev.out:<br />
audit.out:<br />
Probe files from /zvonko/r/r0/plavec/ece1388/chapter3/LVS/layout<br />
devbad.out:<br />
netbad.out:<br />
mergenet.out:<br />
termbad.out:
prunenet.out:<br />
prunedev.out:<br />
audit.out:
Appendix F<br />
Complete <strong>Layout</strong> Including Pads Report
Logic Element<br />
The Logic Element cell was designed using 3 main components as seen in the schematic<br />
figure below. The 3 elements are a 4 variable look up table, a register, <strong>an</strong>d a mux to select<br />
between a registered <strong>an</strong>d a non-registered output. It is designed in a hierarchal m<strong>an</strong>ner as<br />
all components are inst<strong>an</strong>ces <strong>of</strong> smaller levels <strong>of</strong> design.<br />
The area taken up by the logic element is 64.75u x 61.6u (hxw) as seen in the layout<br />
figure below. It was designed to align with the bottom <strong>an</strong>d right connection blocks.<br />
Logic Element Schematic Figure<br />
Logic Element <strong>Layout</strong> Figure
Connection Bottom Block<br />
The Connection Bottom block cell was designed to connect to logic elements located<br />
above <strong>an</strong>d below to the routing tracks. It is designed in a hierarchal m<strong>an</strong>ner as all<br />
components are inst<strong>an</strong>ces <strong>of</strong> smaller levels <strong>of</strong> design as seen the schematic figure below.<br />
The area taken up by the connection bottom block is 37u x 61.2u (h x w) as seen in the<br />
layout figure below. It was designed to align with the logic element block as well as with<br />
the switch block.<br />
Connection Bottom Block Schematic Figure<br />
Connection Bottom Block <strong>Layout</strong> Figure
Connection Right Block<br />
The Connection Right block cell was designed to connect to logic elements located to the<br />
left <strong>an</strong>d right to the routing tracks. It is designed in a hierarchal m<strong>an</strong>ner as all components<br />
are inst<strong>an</strong>ces <strong>of</strong> smaller levels <strong>of</strong> design as seen the schematic figure below.<br />
The area taken up by the connection right block is 47.6u x 38.85u (h x w) as seen in the<br />
layout figure below. It was designed to align with the logic element block as well as with<br />
the switch block.<br />
Connection Right Block Schematic Figure<br />
Connection Right Block <strong>Layout</strong> Figure
Switch Block<br />
The Switch block cell was designed to connect the four connection blocks located above,<br />
below, left <strong>an</strong>d right <strong>of</strong> the switch block. It is designed in a hierarchal m<strong>an</strong>ner as all<br />
components are inst<strong>an</strong>ces <strong>of</strong> smaller levels <strong>of</strong> design as seen the schematic figure below.<br />
The area taken up by the switch block is 37u x 35.4u (h x w) as seen in the layout figure<br />
below. It was designed to align with the connection bottom block <strong>an</strong>d the connection<br />
right block.<br />
Switch Block Schematic Figure
Switch Block <strong>Layout</strong> Figure<br />
Tile Block
The Tile block cell was designed to connect tiles in each <strong>of</strong> the four sides <strong>of</strong> the tile. It is<br />
designed in a hierarchal m<strong>an</strong>ner as all components are inst<strong>an</strong>ces <strong>of</strong> smaller levels <strong>of</strong><br />
design as seen the schematic figure below. The tile consists <strong>of</strong> 4 major components,<br />
Logic Element, Connection Bottom Block, Connection Right Block, <strong>an</strong>d Switch Block.<br />
All 4 components were designed to minimize the area taken up by the tile.<br />
The area taken up by the tile block is 92.5u x 102.85u (h x w) as seen in the layout figure<br />
below. It was designed to align with the Program Column Tile block <strong>an</strong>d Program Row<br />
Tile Block.<br />
Tile Schematic Figure<br />
Tile <strong>Layout</strong> Figure
Program Row Tile Block<br />
The Program Row Tile Block cell was designed to connect the programming lines in the<br />
tile block to the programming lines generated by this block. It is designed in a hierarchal<br />
m<strong>an</strong>ner as all components are inst<strong>an</strong>ces <strong>of</strong> smaller levels <strong>of</strong> design as seen the schematic<br />
figure below. The program row tile block consists <strong>of</strong> 12 program row blocks as it requires<br />
to generate 12 programming lines per tile.<br />
The layout <strong>of</strong> this cell was down by placing 6 program row blocks in two columns <strong>an</strong>d<br />
stretched over 10 rows as seen in the layout figure below. This was done to align the<br />
height <strong>of</strong> this block with the tile height. This will allow us to generate more tile rows in<br />
the <strong>FPGA</strong>. The area taken up by the program row tile block is 92.5u x 90.4u (h x w) as<br />
seen in the layout figure below. It was designed to align with the Tile block <strong>an</strong>d Program<br />
Row Tile Block.<br />
Program Row Tile Schematic Figure
Program Row Tile <strong>Layout</strong> Figure
Program Column Tile Block<br />
The Program Column Tile Block cell was designed to connect the programming lines in<br />
the tile block to the programming lines generated by this block. It is designed in a<br />
hierarchal m<strong>an</strong>ner as all components are inst<strong>an</strong>ces <strong>of</strong> smaller levels <strong>of</strong> design as seen the<br />
schematic figure below. The program column tile block consists <strong>of</strong> 4 program column<br />
blocks as it requires to generate 4 programming lines per tile.<br />
The layout <strong>of</strong> this cell was down by placing 4 program column blocks in a two by two<br />
matrix as seen in the layout figure below. This was done to align the width <strong>of</strong> this block<br />
with the tile width. This will allow us to generate more tile columns in the <strong>FPGA</strong>. The<br />
area taken up by the program column tile block is 18.5u x 102.85u (h x w) as seen in the<br />
layout figure below. It was designed to align with the Tile block <strong>an</strong>d Program Column<br />
Tile Block.<br />
Program Column Tile Block Schematic Figure
Program Column Tile Block <strong>Layout</strong> Figure<br />
Clock Distribution Tree<br />
The clock distribution tree was designed to minimize clock skew in the <strong>FPGA</strong>. We used<br />
<strong>an</strong> h method to design the layout <strong>of</strong> the clock as seen in the layout figure below.<br />
Clock Distribution Tree <strong>Layout</strong><br />
<strong>FPGA</strong><br />
The <strong>FPGA</strong> Column Tile Block was designed using the cells described earlier. It consists<br />
<strong>of</strong> 16 rows <strong>an</strong>d 15 columns <strong>of</strong> tiles as seen in the figures below. Which gives the user 240<br />
logic elements to use to design a circuit. We have 48 pins that the user c<strong>an</strong> use for inputs<br />
<strong>an</strong>d outputs. However 10 <strong>of</strong> these pins are reserved for clock, 2 for vdd!, 2 for vss!, 2 for<br />
programming bits, 2 for programming clocks, <strong>an</strong>d 1 program enable pin.<br />
<strong>FPGA</strong> <strong>Layout</strong> Figure
<strong>FPGA</strong> Top-Level Schematic:
Final LVS Report:<br />
@(#)$CDS: LVS version 4.4.5 04/20/2000 16:37 (cds11182) $<br />
Like matching is enabled.<br />
Net swapping is enabled.<br />
Using terminal names as correspondence points.<br />
Net-list summary for /zvonko/r/r0/plavec/ece1388/chapter3/LVS/layout/netlist<br />
count<br />
54086 nets<br />
46 terminals<br />
91364 nfet<br />
88 diode<br />
51825 pfet<br />
Net-list summary for /zvonko/r/r0/plavec/ece1388/chapter3/LVS/schematic/netlist<br />
count<br />
54086 nets<br />
46 terminals<br />
91364 nfet<br />
88 diode<br />
51825 pfet<br />
Terminal correspondence points<br />
1 clock<br />
2 col_clk<br />
3 in0<br />
4 in1<br />
5 in10<br />
6 in11<br />
7 in12<br />
8 in13<br />
9 in14<br />
10 in15<br />
11 in16<br />
12 in17<br />
13 in18<br />
14 in2<br />
15 in3<br />
16 in4<br />
17 in5<br />
18 in6<br />
19 in7<br />
20 in8<br />
21 in9<br />
22 out0<br />
23 out1<br />
24 out10<br />
25 out11<br />
26 out12<br />
27 out13<br />
28 out14<br />
29 out15<br />
30 out16<br />
31 out17<br />
32 out18<br />
33 out2<br />
34 out3<br />
35 out4<br />
36 out5<br />
37 out6<br />
38 out7<br />
39 out8<br />
40 out9<br />
41 program_data_col<br />
42 program_data_row<br />
43 program_enable<br />
44 row_clk<br />
45 vdd!<br />
46 vss!
The net-lists match.<br />
layout schematic<br />
inst<strong>an</strong>ces<br />
un-matched 0 0<br />
rewired 0 0<br />
size errors 0 0<br />
pruned 0 0<br />
active 143277 143277<br />
total 143277 143277<br />
nets<br />
un-matched 0 0<br />
merged 0 0<br />
pruned 0 0<br />
active 54086 54086<br />
total 54086 54086<br />
terminals<br />
un-matched 0 0<br />
matched but<br />
different type 0 0<br />
total 46 46<br />
Probe files from /zvonko/r/r0/plavec/ece1388/chapter3/LVS/schematic<br />
devbad.out:<br />
netbad.out:<br />
mergenet.out:<br />
termbad.out:<br />
prunenet.out:<br />
prunedev.out:<br />
audit.out:<br />
Probe files from /zvonko/r/r0/plavec/ece1388/chapter3/LVS/layout<br />
devbad.out:<br />
netbad.out:<br />
mergenet.out:<br />
termbad.out:<br />
prunenet.out:<br />
prunedev.out:<br />
audit.out:
Appendix G<br />
Various Notebook Records