Prestige SOLO 110.pdf - Bloom Lake Farms
Prestige SOLO 110.pdf - Bloom Lake Farms
Prestige SOLO 110.pdf - Bloom Lake Farms
- No tags were found...

Create successful ePaper yourself
Turn your PDF publications into a flip-book with our unique Google optimized e-Paper software.
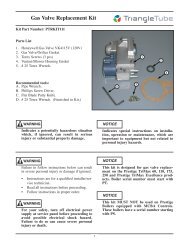
External WiringSECTION VIII- External WiringInstallation ComplianceAll field wiring made during installation mustcomply with:- National Electrical Code NFPA 70 andany other national, state, provincial orlocal codes or requirements.- In Canada, CSA C22.1 CanadianElectrical Code Part 1, and any otherlocal codes.WARNINGELECTRICAL SHOCK HAZARD.Before making any electrical connectionsto the PRESTIGE Solo, disconnectelectrical power supply at the servicepanel. Failure to comply can causesevere personal injury or death.Line Voltage Connections1. Connect a 120 VAC/15A service to the120V terminal strip on the wiring panelbelow the PRESTIGE Solo control module,as shown in Fig. 20, page 32.2. Route the incoming 120 VAC power wirethrough the provided openings in the bottomjacket panel.3. The unit is provided with a service switchlocated on the front panel, check local coderequirements for compliance.NOTICEIf local electrical codes or conditionsrequire an additional service switch, theinstaller must provide and install a fuseddisconnect or 15 amp (minimum) serviceswitch.Domestic Hot Water Aquastat Wiring1. Connect the DHW thermostat (aquastat) tothe 24V terminal strip on the wiring panellocated below the PRESTIGE Solo controlmodule as shown in Fig. 20, page 32.2. Route all wiring through the providedopenings, in the bottom jacket panel. Allowenough wire for access panel to swing openduring servicing.Thermostat WiringNOTICEIsolate 120V wiring from 24V wiring toprevent any potential electrical “noise”.1. Connect room thermostat or the end switch(isolated contact only) of a relay controlpanel to the 24V terminal strip on the wiringpanel below the PRESTIGE Solo controlmodule, as shown in Fig. 20, page 32.2. For proper operation install the room thermostaton an inside wall away from influencesof heat and cold, i.e. water pipes, areasof draft, lighting fixtures and fireplaces.3. Set the thermostat anticipator (if applicable)as follows:- Set for 0.2 amps when wired directly tothe PRESTIGE Solo.- Set to match the total electrical powerrequirements of the connected deviceswhen wired to zone relays or otherdevices. Refer to the relay manufacturers’specifications and the thermostatinstructions for additional informationon the anticipator setting.NOTICEWhen making low voltage connections tothe PRESTIGE, ensure no external voltageis present in the thermostat circuits.If external voltage is present, provide anisolated contact to prevent damage to theboiler control.33