


You also want an ePaper? Increase the reach of your titles
YUMPU automatically turns print PDFs into web optimized ePapers that Google loves.
Linksys <strong>E3000</strong><br />
Chapter 2: Advanced Configuration<br />
••<br />
Wireless-B/G Only If you have both Wireless-B and<br />
Wireless-G (2.4 GHz) devices in your network, select<br />
Wireless-B/G Only.<br />
••<br />
Wireless-B Only If you have only Wireless-B devices,<br />
select Wireless-B Only.<br />
••<br />
Wireless-G Only If you have only Wireless-G devices,<br />
select Wireless-G Only.<br />
••<br />
Wireless-N Only If you have only Wireless-N (2.4 GHz)<br />
devices, select Wireless-N Only.<br />
••<br />
Disabled If you do not have any Wireless-B, Wireless-G<br />
and Wireless-N (2.4 GHz) devices in your network,<br />
select Disabled.<br />
Network Name (SSID) The Service Set Identifier (SSID)<br />
is the network name shared by all devices in a wireless<br />
network. It is case-sensitive and must not exceed 32<br />
keyboard characters. The default is Ciscoxxxxx (xxxxx are<br />
the last five digits of the Router’s serial number, found on<br />
the product label on the left side of the Router’s bottom<br />
panel). The setup software that you use to install your<br />
Router and set up your wireless network changes the<br />
default Network Name to an easy-to-remember name.<br />
NOTE: If you restore the Router’s factory default<br />
settings (by pressing the Reset button or using<br />
the Administration > Factory Defaults screen),<br />
the Network Name will return to its default<br />
value, and all devices on your wireless network<br />
will need to be reconnected.<br />
Channel Width For best performance in a network using<br />
Wireless-B, Wireless-G and Wireless-N (2.4 GHz) devices,<br />
select Auto (20MHz or 40MHz). For a channel width of 20<br />
MHz, keep the default, 20MHz only.<br />
Channel Select the channel from the drop-down list<br />
for Wireless-B, Wireless-G, and Wireless-N (2.4 GHz)<br />
networking. If you are not sure which channel to select,<br />
keep the default, Auto.<br />
SSID Broadcast When wireless clients survey the local<br />
area for wireless networks to associate with, they will<br />
detect the SSID broadcast by the Router. To broadcast the<br />
Router’s SSID, keep the default, Enabled. If you do not<br />
want to broadcast the Router’s SSID, then select Disabled.<br />
Click Save Settings to apply your changes, or click Cancel<br />
Changes to clear your changes.<br />
Wi-Fi Protected Setup<br />
There are three methods available. Use the method that<br />
applies to the client device you are configuring.<br />
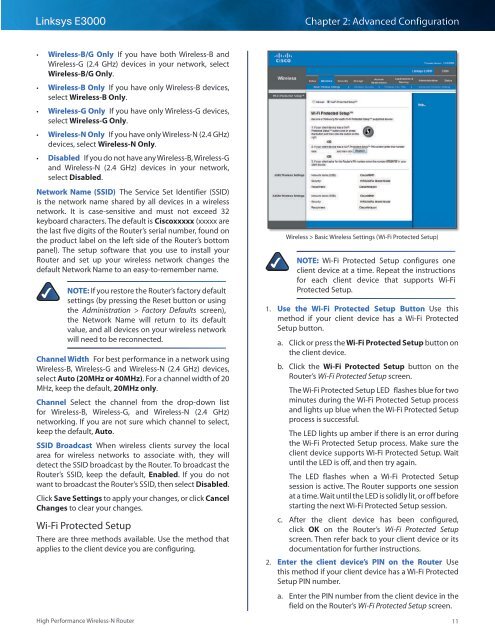
Wireless > Basic Wireless Settings (Wi-Fi Protected Setup)<br />
NOTE: Wi-Fi Protected Setup configures one<br />
client device at a time. Repeat the instructions<br />
for each client device that supports Wi-Fi<br />
Protected Setup.<br />
1. Use the Wi-Fi Protected Setup Button Use this<br />
method if your client device has a Wi-Fi Protected<br />
Setup button.<br />
a. Click or press the Wi-Fi Protected Setup button on<br />
the client device.<br />
b. Click the Wi‐Fi Protected Setup button on the<br />
Router’s Wi-Fi Protected Setup screen.<br />
The Wi-Fi Protected Setup LED flashes blue for two<br />
minutes during the Wi-Fi Protected Setup process<br />
and lights up blue when the Wi-Fi Protected Setup<br />
process is successful.<br />
The LED lights up amber if there is an error during<br />
the Wi‐Fi Protected Setup process. Make sure the<br />
client device supports Wi‐Fi Protected Setup. Wait<br />
until the LED is off, and then try again.<br />
The LED flashes when a Wi‐Fi Protected Setup<br />
session is active. The Router supports one session<br />
at a time. Wait until the LED is solidly lit, or off before<br />
starting the next Wi-Fi Protected Setup session.<br />
c. After the client device has been configured,<br />
click OK on the Router’s Wi-Fi Protected Setup<br />
screen. Then refer back to your client device or its<br />
documentation for further instructions.<br />
2. Enter the client device’s PIN on the Router Use<br />
this method if your client device has a Wi-Fi Protected<br />
Setup PIN number.<br />
a. Enter the PIN number from the client device in the<br />
field on the Router’s Wi-Fi Protected Setup screen.<br />
High Performance Wireless-N Router<br />
11