


You also want an ePaper? Increase the reach of your titles
YUMPU automatically turns print PDFs into web optimized ePapers that Google loves.
Linksys <strong>E3000</strong><br />
Chapter 2: Advanced Configuration<br />
Workgroup Name Enter the workgroup name for the<br />
Router; it should match the workgroup name of the<br />
computers on your local network. The Router’s default is<br />
workgroup.<br />
Server LAN IP Address The local IP address of the<br />
Router’s media and FTP server is displayed.<br />
Server Internet IP Address The Internet IP address of<br />
the Router’s FTP server is displayed.<br />
<strong>User</strong> Management<br />
By default the Router creates two users, admin and guest.<br />
The users are listed by <strong>User</strong> Name and Group.<br />
Create New <strong>User</strong> To create a new user, click this<br />
button. The <strong>User</strong> Account screen appears. Proceed to<br />
Create or Edit a <strong>User</strong> Account, page 24.<br />
Edit To change the settings of a user account, click<br />
Edit, and the <strong>User</strong> Account screen appears. Proceed to<br />
“Create or Edit a <strong>User</strong> Account” on page 24.<br />
Delete To delete a user, click this button.<br />
Group Management<br />
By default the Router creates two user groups, admin and<br />
guest.<br />
The groups are listed by Group Name and Access level.<br />
There are two levels of access, r & w (read-and-write) and<br />
r (read-only).<br />
Create New Group To create a new group of users, click<br />
this button. The Group Account screen appears. Proceed to<br />
“Create or Edit a Group Account” on page 24.<br />
Edit To change the description or access rights of a group,<br />
click Edit, and the Group Account screen appears. Proceed<br />
to “Create or Edit a Group Account” on page 24.<br />
Delete To delete a group, click this button.<br />
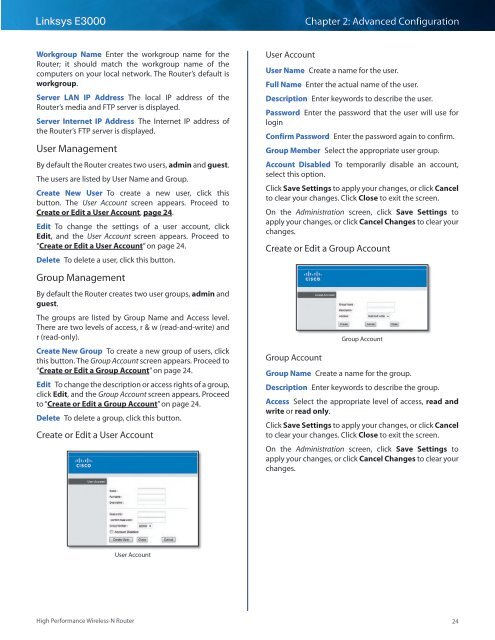
Create or Edit a <strong>User</strong> Account<br />
<strong>User</strong> Account<br />
<strong>User</strong> Name Create a name for the user.<br />
Full Name Enter the actual name of the user.<br />
Description Enter keywords to describe the user.<br />
Password Enter the password that the user will use for<br />
login<br />
Confirm Password Enter the password again to confirm.<br />
Group Member Select the appropriate user group.<br />
Account Disabled To temporarily disable an account,<br />
select this option.<br />
Click Save Settings to apply your changes, or click Cancel<br />
to clear your changes. Click Close to exit the screen.<br />
On the Administration screen, click Save Settings to<br />
apply your changes, or click Cancel Changes to clear your<br />
changes.<br />
Create or Edit a Group Account<br />
Group Account<br />
Group Account<br />
Group Name Create a name for the group.<br />
Description Enter keywords to describe the group.<br />
Access Select the appropriate level of access, read and<br />
write or read only.<br />
Click Save Settings to apply your changes, or click Cancel<br />
to clear your changes. Click Close to exit the screen.<br />
On the Administration screen, click Save Settings to<br />
apply your changes, or click Cancel Changes to clear your<br />
changes.<br />
<strong>User</strong> Account<br />
High Performance Wireless-N Router<br />
24