Tutorials Code augmented reality markers Augmented reality can be achieved in the browser using native web technologies, detecting markers and displaying content 54 DOWNLOAD TUTORIAL FILES www.filesilo.co.uk/webdesigner
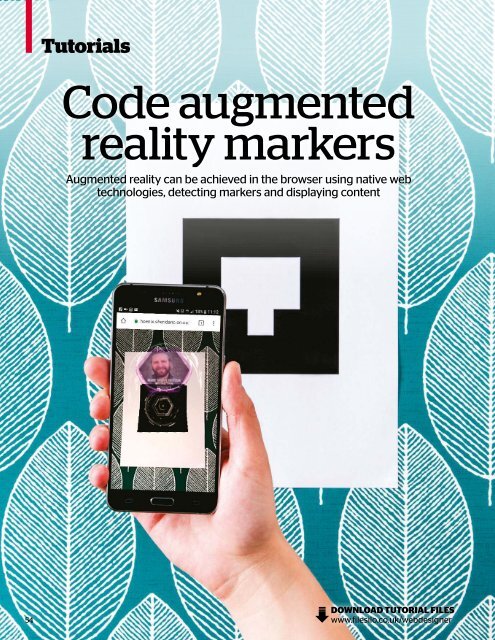
Tutorials A ugmented reality has been around for a while now and it isn’t anything new, however with the support of <strong>Web</strong>RTC (Real-Time Communication), access to the phone’s camera can now be realised on Android devices and on desktop. At present, iOS can’t support this as it hasn’t been implemented in the <strong>Web</strong>Kit browser that powers Safari, but it is in development and you can check the status of it here bit.ly/2qadVFS. If you do have an iOS device though you don’t have to miss out, as you can still use the webcam on your desktop computer. An important note to get this working on the mobile Chrome browser is that the content must be served by a secure socket layer over https rather than standard http. Desktop currently works with regular http though. In this tutorial an augmented reality marker is going to be placed in front of the camera. This will be picked up by the browser and AR.js, and content will be mapped over the top in 3D, sticking to the AR marker. The idea here is that you might want to create a simple 3D résumé, maybe even adding some of your core skills, and then the AR marker could be printed on your business card. Because you can walk around the marker, this is great for content that you might want to see from diferent angles – think of a certain Swedish furniture manufacturer giving you animated steps that can be viewed from any angle! There are so many possibilities that this can be useful for. 1. Add the libraries From the project folder, open the start folder in your code editor and then open up the ‘index.html’ file ready for editing. At this stage the libraries need to be linked up and as this is doing a lot, there are a lot of libraries! These are in three sections for Three.js, JSARToolKit, then the Three.js extension for the ARToolKit and marker. THREEx.ArToolkitContext.baseURL = ‘/‘ 2. CSS styling In the head section of the page, add some script tags and just drop in the style rules here for the body and the canvas element, to ensure they are placed correctly on the page without the default margins added by the browser. body { margin: 0px; overflow: hidden; } canvas { position: absolute; top: 0; left: 0; } 3. Global variables In the body section of the page, add some script tags where the remaining JavaScript code for this tutorial will go. There are a number of variables that are needed; the first line is for Three.js, the second for the AR.js, the third for the model and then a variable to load the model. var renderer, scene, camera; var arToolkitContext, onRenderFcts, arToolkitSource, markerRoot, artoolkitMarker, lastTimeMsec; var model, tube1, tube2, mid, details, pulse; var loader = new THREE.ColladaLoader(); 4. Load the model Before the scene is set up the model will be loaded so that it can be displayed when markers are detected. This is scaled down by 10 to fit exactly onto the AR marker. The model is 10cm for the width and height, so the marker is 1cm which translates to 1 increment in Three.js. loader.load(‘model/scene.dae’, function(collada) { model = collada.scene; model.scale.x = model.scale.y = model. scale.z = 0.1; details = model.getObjectByName(“details”, true); 5. Fix some display issues Still inside the Collada loading code, once the model is loaded there will be a couple of tubes that spin around so they are found in the Collada scene. The first tube is found and its material is grabbed. Here the material is set to just render on the inside of the model, not the outside. tube1 = model.getObjectByName(“tube1”, true); var a = tube1.children[0].material; a.transparent = true; a.side = THREE[“BackSide”]; a.blending = THREE[“AdditiveBlending”]; Blend modes Blending modes change the way that certain coloured pixels blend with pixels that are located below them. Additive blending makes all dark pixels transparent while adding light to the bright pixels. Top left The library AR.js has been downloaded and put into folders for you with all the dependencies, including the Three.js library Top right If the transparency and additive blending is not enabled, the model looks like this when loaded and displayed on top of the AR marker – not very exciting and barely visible! Left Experimenting with the lighting colours can give some different tints. Here a bright, light-blue colour has been applied to the direction light. Try experimenting with the colour of both lights 55