

Web_Designer_Issue_262_2017

Create successful ePaper yourself
Turn your PDF publications into a flip-book with our unique Google optimized e-Paper software.
Tutorials<br />
Code augmented reality markers<br />
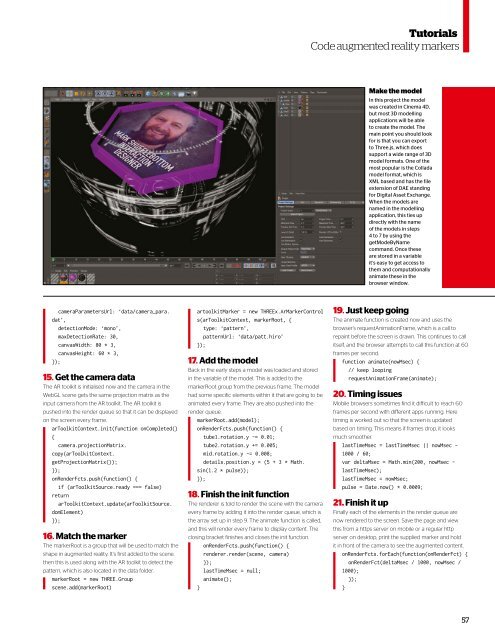
Make the model<br />
In this project the model<br />
was created in Cinema 4D,<br />
but most 3D modelling<br />
applications will be able<br />
to create the model. The<br />
main point you should look<br />
for is that you can export<br />
to Three.js, which does<br />
support a wide range of 3D<br />
model formats. One of the<br />
most popular is the Collada<br />
model format, which is<br />
XML based and has the file<br />
extension of DAE standing<br />
for Digital Asset Exchange.<br />
When the models are<br />
named in the modelling<br />
application, this ties up<br />
directly with the name<br />
of the models in steps<br />
4 to 7 by using the<br />
getModeByName<br />
command. Once these<br />
are stored in a variable<br />
it’s easy to get access to<br />
them and computationally<br />
animate these in the<br />
browser window.<br />
cameraParametersUrl: ‘data/camera_para.<br />
dat’,<br />
detectionMode: ‘mono’,<br />
maxDetectionRate: 30,<br />
canvasWidth: 80 * 3,<br />
canvasHeight: 60 * 3,<br />
});<br />
15. Get the camera data<br />
The AR toolkit is initialised now and the camera in the<br />
<strong>Web</strong>GL scene gets the same projection matrix as the<br />
input camera from the AR toolkit. The AR toolkit is<br />
pushed into the render queue so that it can be displayed<br />
on the screen every frame.<br />
arToolkitContext.init(function onCompleted()<br />
{<br />
camera.projectionMatrix.<br />
copy(arToolkitContext.<br />
getProjectionMatrix());<br />
});<br />
onRenderFcts.push(function() {<br />
if (arToolkitSource.ready === false)<br />
return<br />
arToolkitContext.update(arToolkitSource.<br />
domElement)<br />
});<br />
16. Match the marker<br />
The markerRoot is a group that will be used to match the<br />
shape in augmented reality. It’s first added to the scene,<br />
then this is used along with the AR toolkit to detect the<br />
pattern, which is also located in the data folder.<br />
markerRoot = new THREE.Group<br />
scene.add(markerRoot)<br />
artoolkitMarker = new THREEx.ArMarkerControl<br />
s(arToolkitContext, markerRoot, {<br />
type: ‘pattern’,<br />
patternUrl: ‘data/patt.hiro’<br />
});<br />
17. Add the model<br />
Back in the early steps a model was loaded and stored<br />
in the variable of the model. This is added to the<br />
markerRoot group from the previous frame. The model<br />
had some specific elements within it that are going to be<br />
animated every frame. They are also pushed into the<br />
render queue.<br />
markerRoot.add(model);<br />
onRenderFcts.push(function() {<br />
tube1.rotation.y -= 0.01;<br />
tube2.rotation.y += 0.005;<br />
mid.rotation.y -= 0.008;<br />
details.position.y = (5 + 3 * Math.<br />
sin(1.2 * pulse));<br />
});<br />
18. Finish the init function<br />
The renderer is told to render the scene with the camera<br />
every frame by adding it into the render queue, which is<br />
the array set up in step 9. The animate function is called,<br />
and this will render every frame to display content. The<br />
closing bracket finishes and closes the init function.<br />
onRenderFcts.push(function() {<br />
renderer.render(scene, camera)<br />
});<br />
lastTimeMsec = null;<br />
animate();<br />
}<br />
19. Just keep going<br />
The animate function is created now and uses the<br />
browser’s requestAnimationFrame, which is a call to<br />
repaint before the screen is drawn. This continues to call<br />
itself, and the browser attempts to call this function at 60<br />
frames per second.<br />
function animate(nowMsec) {<br />
// keep looping<br />
requestAnimationFrame(animate);<br />
20. Timing issues<br />
Mobile browsers sometimes find it dificult to reach 60<br />
frames per second with diferent apps running. Here<br />
timing is worked out so that the screen is updated<br />
based on timing. This means if frames drop, it looks<br />
much smoother.<br />
lastTimeMsec = lastTimeMsec || nowMsec -<br />
1000 / 60;<br />
var deltaMsec = Math.min(200, nowMsec -<br />
lastTimeMsec);<br />
lastTimeMsec = nowMsec;<br />
pulse = Date.now() * 0.0009;<br />
21. Finish it up<br />
Finally each of the elements in the render queue are<br />
now rendered to the screen. Save the page and view<br />
this from a https server on mobile or a regular http<br />
server on desktop, print the supplied marker and hold<br />
it in front of the camera to see the augmented content.<br />
onRenderFcts.forEach(function(onRenderFct) {<br />
onRenderFct(deltaMsec / 1000, nowMsec /<br />
1000);<br />
});<br />
}<br />
57


