You also want an ePaper? Increase the reach of your titles
YUMPU automatically turns print PDFs into web optimized ePapers that Google loves.
TRACK BYPASS OUTSIDE MOUNT cont.<br />
8. For OPUS, attach the metal headboard support bracket to the rear of the mounting block.<br />
9. Make necessary adjustments to ensure box out frame is level.<br />
10. Drive headboard fixing screws in all the way.<br />
11. Mount the light block lengths supplied to the rear inside edge of the sideboards (or use<br />
angle brackets instead of light block if preferred).<br />
12. Screw through the light block into the wall or architrave to attach the sideboards.<br />
13. If no bottom board supplied, attach bottom tracks by measuring the distance from the<br />
edge of headboard to centre of each track and position the bottom tracks the same<br />
distance. Use the supplied double-sided tape to fix tracks in place direct to the floor. (Does<br />
not apply to bottom board as track is recessed).<br />
14. Check all necessary hardware/componentry is fitted into the top track and panels.<br />
15. Fit rear panels into the back track first, attaching the wheel carrier brackets to the wheel<br />
carriers in the top track and lock them in place. Compress the bottom guides and release<br />
into place in the bottom track.<br />
16. If fitting co-joined panels, line panels up beside each other and drop hinge pins in to<br />
attach.<br />
17. Make any necessary adjustments at the wheel carriers and sideboards to ensure panels<br />
are squared up and they operate correctly.<br />
18. Cover screw holes with screwcap stickers and gap fill if necessary to finish off.<br />
19. Attach returns to fascia if applicable using L brackets.<br />
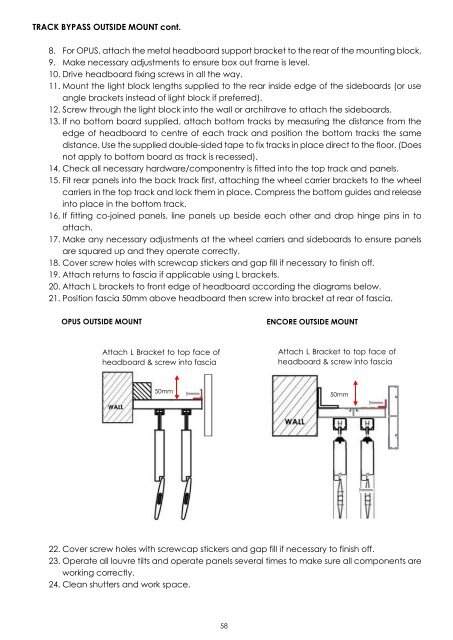
20. Attach L brackets to front edge of headboard according the diagrams below.<br />
21. Position fascia 50mm above headboard then screw into bracket at rear of fascia.<br />
OPUS OUTSIDE MOUNT<br />
ENCORE OUTSIDE MOUNT<br />
Attach L Bracket to top face of<br />
headboard & screw into fascia<br />
Attach L Bracket to top face of<br />
headboard & screw into fascia<br />
50mm<br />
50mm<br />
22. Cover screw holes with screwcap stickers and gap fill if necessary to finish off.<br />
23. Operate all louvre tilts and operate panels several times to make sure all components are<br />
working correctly.<br />
24. Clean shutters and work space.<br />
58


