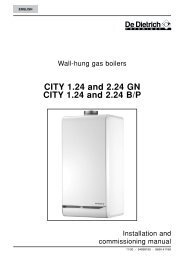
K Control panel
K Control panel
K Control panel

You also want an ePaper? Increase the reach of your titles
YUMPU automatically turns print PDFs into web optimized ePapers that Google loves.
5. START-UP AND OPERATION<br />
5.1 <strong>Control</strong> <strong>panel</strong> without optional features<br />
The initial start-up shall be performed by<br />
a qualified professionnal.<br />
Before turning the boiler on, make sure that the<br />
installation is filled with water.<br />
Carry out the start-up operations in the order<br />
indicated below:<br />
● Boiler temperature regulation by means of the<br />
thermostats<br />
Set the boiler thermostats 5 to the selected position.<br />
In case of a two-stage burner, the stage 2 thermostat<br />
must always be set to a value which is approximately 5°C<br />
less than that of the stage 1 thermostat.<br />
If required, move the maximum temperature stop as shown<br />
below.<br />
Moving the thermostat stop:<br />
The stop is factory-set to limit the maximum temperature<br />
to 75°C. To move the stop, proceed as follows:<br />
- Pull the thermostat button out.<br />
- Remove the stop using pliers.<br />
- Place the stop in the hole corresponding to the<br />
desired higher temperature (maximum 90°C).<br />
30<br />
0<br />
l<br />
9 1<br />
19<br />
6A<br />
3 2 5<br />
8502N100<br />
If there is no regulator, it is advised never<br />
to set the boiler thermostats below mark<br />
4 (approximately 40°C) in order to avoid<br />
any risk of combustion products condensing<br />
on the walls of the boiler.<br />
● Set switch 1 to the manual position .<br />
● regulator in heating cabinet<br />
Refer to the instructions supplied with this regulator.<br />
● Make sure that safety thermostat 9 is ready. To do<br />
so, unscrew the hexagonal cap and press the reset<br />
button with a screwdriver.<br />
● Set the burner and heating pump switches 2 to the<br />
Winter position.<br />
● Set the main On/off switch 3 to the On position.<br />
9 8 7 6 5 4 3 2 1<br />
40-<br />
35-<br />
50-<br />
45-<br />
30-<br />
50+<br />
90+<br />
70+<br />
75+<br />
80+<br />
9 8 7 6 5 4 3 2 1<br />
8358N023