- Page 1 and 2:
Table of Contents Symbian OS C++ fo
- Page 3 and 4:
Reprinted August 2003 All Rights Re
- Page 5 and 6:
� consultants, trainers, and auth
- Page 7 and 8:
Symbian OS C++ for Mobile Phones fo
- Page 9 and 10:
When you're ready to use the Symbia
- Page 11 and 12:
improvement. She has a reputation f
- Page 13 and 14:
John works in the partner projects
- Page 15 and 16:
If you've never seen Symbian OS bef
- Page 17 and 18:
within a particular application. In
- Page 19 and 20:
There are a number of other ways in
- Page 21 and 22:
programs - namely, to handle and re
- Page 23 and 24:
There is no need to trap the call t
- Page 25 and 26:
abld build winscw udeb The winscw p
- Page 27 and 28:
If you're curious, you might want t
- Page 29 and 30:
If your connectivity software does
- Page 31 and 32:
Chapter 2: System Structure Overvie
- Page 33 and 34:
Figure 2.2 Figure 2.3 Symbian OS OE
- Page 35 and 36:
Note Actually, for performance reas
- Page 37 and 38:
To be executed, an executable has t
- Page 39 and 40:
The kernel itself has two major com
- Page 41 and 42:
ROM handling is easy. The ROM consi
- Page 43 and 44:
You can control the stack size in a
- Page 45 and 46:
industry standard, slightly smaller
- Page 47 and 48:
A server also uses its own active o
- Page 49 and 50:
In order to minimize any difficulty
- Page 51 and 52:
� The top-level project name in t
- Page 53 and 54:
Title DLL Source Group Headers Desc
- Page 55 and 56:
Chapter 3: C++ and Object Orientati
- Page 57 and 58:
The fundamental rule is, use names
- Page 59 and 60:
Category Examples Description Const
- Page 61 and 62:
3.2.6 Summary Naming conventions ar
- Page 63 and 64:
Convenience functions are trivial w
- Page 65 and 66:
� When declaring a virtual functi
- Page 67 and 68:
used in preference to old style C c
- Page 69 and 70:
Java uses interfaces too: in Java,
- Page 71 and 72:
� Whether these are private or pu
- Page 73 and 74:
If the cardinality is not 1-to-1, t
- Page 75 and 76:
Figure 4.1 At the bottom is the GDI
- Page 77 and 78:
In addition to the four C++ classes
- Page 79 and 80:
In addition, as indicated by the SO
- Page 81 and 82:
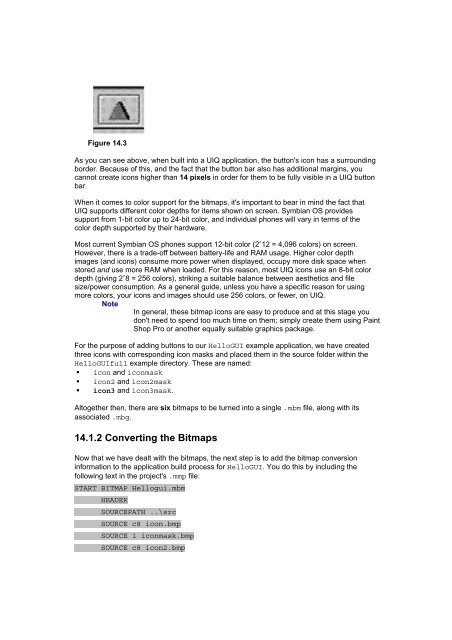
Figure 4.3 SDK and then browse to t
- Page 83 and 84:
eturn KErrNone; } Important You mus
- Page 85 and 86:
private: // from CEikDocument CEikA
- Page 87 and 88:
ConstructL() performs second-phase
- Page 89 and 90:
hellogui's application view is a co
- Page 91 and 92:
The other things we haven't seen in
- Page 93 and 94:
form described above advertises the
- Page 95 and 96:
} RESOURCE TBUF r_hellogui_text_hel
- Page 97 and 98:
CQikAppUi::HandleWsEventL(const TWs
- Page 99 and 100:
4.9 Terminating the Application By
- Page 101 and 102:
debug stepping, variable watching,
- Page 103 and 104:
5.1 Strings and Memory To understan
- Page 105 and 106:
� HBufC* is a pointer to a heap-b
- Page 107 and 108:
strlen() doesn't include the traili
- Page 109 and 110:
The Des() function returns a TPtr c
- Page 111 and 112:
TBuf helloWorld(_L("hello")); greet
- Page 113 and 114:
TDes& parameters. Symbian OS itself
- Page 115 and 116:
5.4 More Text APIs Symbian OS uses
- Page 117 and 118:
encodings of Unicode that use seque
- Page 119 and 120:
Chapter 6: Error Handling and Clean
- Page 121 and 122:
Even user input errors can be handl
- Page 123 and 124:
Note It also demonstrates that the
- Page 125 and 126:
eak; So, the New 1 menu item alloca
- Page 127 and 128:
this line yourself, and then rerun
- Page 129 and 130:
case EMagicCmdNew2: delete iObject2
- Page 131 and 132:
If the new(ELeave) fails, then iObj
- Page 133 and 134:
If you're writing a function, and t
- Page 135 and 136:
} You can invoke these functions fr
- Page 137 and 138:
Any one of the calls to UseL() may
- Page 139 and 140:
case EMagicCmdUse4: { CY* y = new(E
- Page 141 and 142:
� Functions that can leave must o
- Page 143 and 144:
CZ::NewL() was actually coded waste
- Page 145 and 146:
TAny*. The cleanup code will deallo
- Page 147 and 148:
successfully). This means you have
- Page 149 and 150:
User::Leave(KErrNone). This appears
- Page 151 and 152:
systems outside my control, and res
- Page 153 and 154:
Chapter 7: Resource Files Overview
- Page 155 and 156:
Data Type Description BUF A Unicode
- Page 157 and 158:
} MENU_ITEM { command = EExampleCmd
- Page 159 and 160:
A single resource file supports 409
- Page 161 and 162:
Filename Description EeikCmdExit, a
- Page 163 and 164:
RESOURCE MENU_PANE r_hellogui_hello
- Page 165 and 166:
0E [uncompressed data run length] 0
- Page 167 and 168:
Chapter 8: Basic APIs Overview We'v
- Page 169 and 170:
IMPORT_C void Write(TInt aPos, cons
- Page 171 and 172:
_LIT8(KTxt2," world"); buf->InsertL
- Page 173 and 174:
Dynamic buffers are also used to st
- Page 175 and 176:
Class name Description [*] CArrayFi
- Page 177 and 178:
In v7.0, the structure of ROM image
- Page 179 and 180:
} In a function such as FormatList(
- Page 181 and 182:
library. The next few pages should
- Page 183 and 184:
Using this technique, your program
- Page 185 and 186:
� The original program consisted
- Page 187 and 188:
pointer, and no method of directly
- Page 189 and 190:
Figure 9.1 It's a pretty Spartan di
- Page 191 and 192:
Note 9.2.3 The Controller As descri
- Page 193 and 194:
TInt iLength; // Length - determine
- Page 195 and 196:
void SetHit(TInt aX, TInt aY); // H
- Page 197 and 198:
The functions to do this are Functi
- Page 199 and 200:
User::After(1) is guaranteed to wai
- Page 201 and 202:
{ public: // Construct/destruct/set
- Page 203 and 204:
This begins by creating a new windo
- Page 205 and 206:
); aRect.iTl.iX+iBorderSize+i*iTile
- Page 207 and 208:
else gc.SetPenColor(KRgbYellow); gc
- Page 209 and 210:
control framework needs to know whe
- Page 211 and 212:
the board. It then uses these coord
- Page 213 and 214:
Calculate board size in twips, and
- Page 215 and 216:
iRightBorder.Move(offset); iBoardRe
- Page 217 and 218:
private: // Construct/restore void
- Page 219 and 220:
ViewCmdHitFleet() shows how the con
- Page 221 and 222:
There are no surprises in the comma
- Page 223 and 224:
}; MENU_ITEM {command=EEikCmdZoomIn
- Page 225 and 226:
The framework handles creating a fi
- Page 227 and 228:
void TShip::ExternalizeL(RWriteStre
- Page 229 and 230:
void CGameAppUi::HandleCommandL(TIn
- Page 231 and 232:
the target view. Because such messa
- Page 233 and 234:
TInt iCursorX; TInt iCursorY; TUid
- Page 235 and 236:
display area) and to handle a parti
- Page 237 and 238:
Create and load a bitmap iHideBitma
- Page 239 and 240:
This version formats the message ID
- Page 241 and 242:
Chapter 10: Dialogs and Concrete Co
- Page 243 and 244:
Figure 10.2 I got this by typing Ct
- Page 245 and 246:
Finally, note that buttons can't be
- Page 247 and 248:
for 'control'. I'll always use 'con
- Page 249 and 250:
CEikDialog* dialog = new(ELeave) CE
- Page 251 and 252:
Simply put, the dialog has a title,
- Page 253 and 254:
OK is handled by OkToExitL(). In fa
- Page 255 and 256:
Any of the checks or file operation
- Page 257 and 258:
}; id = EGameControlIdProtocol; con
- Page 259 and 260:
Listen"; } type = EEikCtChoiceList;
- Page 261 and 262:
TUid protocol = TUid::Uid(choicelis
- Page 263 and 264:
10.3.2 Adding Buttons If you want t
- Page 265 and 266:
Function Description virtual void S
- Page 267 and 268:
� specify initialization data for
- Page 269 and 270:
CEikBorderedControl CEikBorderedCon
- Page 271 and 272:
� eikon.rh and Qikon.rh contain t
- Page 273 and 274:
Class Header ID CEikGlobalTextEdito
- Page 275 and 276:
UIs provide many other standard dia
- Page 277 and 278:
Figure 11.1 As it happens, this scr
- Page 279 and 280:
gc.DrawText(*iHelloWorld, rect, bas
- Page 281 and 282:
The two points that define Trect ca
- Page 283 and 284:
The clipping region defines the reg
- Page 285 and 286:
virtual void DrawBitmap(const TRect
- Page 287 and 288:
Figure 11.5 From the diagram: � T
- Page 289 and 290:
In theory, then, you don't need to
- Page 291 and 292:
So far, we have suggested that you
- Page 293 and 294:
DrawBorders(); DrawTiles(); } but t
- Page 295 and 296:
It turns out that working out exact
- Page 297 and 298:
Now it's time to be precise about h
- Page 299 and 300:
Figure 11.10 It has a single window
- Page 301 and 302:
{ public: . . . static CExampleHell
- Page 303 and 304:
case 2: return EAmountOfControls; }
- Page 305 and 306:
finished. When the BeginRedraw()fun
- Page 307 and 308:
Default settings are assured here:
- Page 309 and 310:
First and foremost, a control is a
- Page 311 and 312:
class CCoeControl : public CBase {
- Page 313 and 314:
You can set a control's position an
- Page 315 and 316:
IMPORT_C virtual void Draw(const TR
- Page 317 and 318:
� If you select OK on a dialog -
- Page 319 and 320:
In this chapter, I've concentrated
- Page 321 and 322:
TKeyResponse COppFleetView::OfferKe
- Page 323 and 324:
TEventCode is the type of window se
- Page 325 and 326:
notification, and changing the curs
- Page 327 and 328:
From the preceding discussion, it s
- Page 329 and 330:
� if the Set interval button is s
- Page 331 and 332:
� The general-purpose control des
- Page 333 and 334:
private: ... MCoeControlObserver* i
- Page 335 and 336:
Special-purpose events should be ha
- Page 337 and 338:
Figure 12.4 Key events are offered
- Page 339 and 340: A control should change its appeara
- Page 341 and 342: 12.4.3 Grabbing the Pointer-down Co
- Page 343 and 344: ProcessPointerEventL() implements t
- Page 345 and 346: In the last chapter, we concentrate
- Page 347 and 348: making them lighter or darker. For
- Page 349 and 350: Chapter 13: Files, Streams, and Sto
- Page 351 and 352: Note Strictly, documents are not th
- Page 353 and 354: Figure 13.2 The file server provide
- Page 355 and 356: � changing directory and file att
- Page 357 and 358: important in Symbian OS, so it's pr
- Page 359 and 360: Figure 13.5: � Write file allows
- Page 361 and 362: TryChangeFocusToL(EExampleControlId
- Page 363 and 364: file.Close(); // Finished with user
- Page 365 and 366: Update view iAppView->DrawNow(); }
- Page 367 and 368: } // Finish CleanupStack::PopAndDes
- Page 369 and 370: external stream and de-serialize wh
- Page 371 and 372: RwriteStream Functions RReadStream
- Page 373 and 374: You'll remember that I used this, w
- Page 375 and 376: Technique Application descriptor wh
- Page 377 and 378: Let's consider the file format of t
- Page 379 and 380: � create, write, and close the ap
- Page 381 and 382: Figure 13.10 The main document is a
- Page 383 and 384: through the DBMS. For more on using
- Page 385 and 386: Figure 13.13 There is a small class
- Page 387 and 388: � Where an application's .ini fil
- Page 389: The first step of the process is to
- Page 393 and 394: id=EHelloGuiCmd0; flags=EEikToolBar
- Page 395 and 396: Figure 14.4 abld build winscw udeb
- Page 397 and 398: For the purpose of this book, we'll
- Page 399 and 400: #include RESOURCE AIF_DATA { capti
- Page 401 and 402: 1 file(s) copied. When this has fin
- Page 403 and 404: The way the Certificate Generator w
- Page 405 and 406: The body of this file should be obv
- Page 407 and 408: Don't expect the installed applicat
- Page 409 and 410: � Every application should fill t
- Page 411 and 412: � Use bold style for active text
- Page 413 and 414: Overview This chapter discusses wri
- Page 415 and 416: Class Description CExampleApplicati
- Page 417 and 418: Class Description Figure 15.3 conta
- Page 419 and 420: aDeviceRect.Center().iY - boxInPixe
- Page 421 and 422: } fontSpec)); The key function here
- Page 423 and 424: The second case will cause problems
- Page 425 and 426: I'm careful to draw every pixel: I
- Page 427 and 428: SetZoomOutL() works the other way r
- Page 429 and 430: ealistic print code would take acco
- Page 431 and 432: Figure 15.7 The base class for bitm
- Page 433 and 434: lit them efficiently from a shared
- Page 435 and 436: #define KRgbYellow TRgb(0x00ffff) #
- Page 437 and 438: world colors mapped down onto black
- Page 439 and 440: Figure 15.8 The GUI used in the Psi
- Page 441 and 442:
In terms of applications, the appli
- Page 443 and 444:
Overview So far in this book, we've
- Page 445 and 446:
Figure 16.2 The starting point for
- Page 447 and 448:
if (iController->Engine().IsMyTurn(
- Page 449 and 450:
device, I will have to publish thes
- Page 451 and 452:
� If your request didn't get thro
- Page 453 and 454:
Communications is full of this kind
- Page 455 and 456:
The game will connect and you can s
- Page 457 and 458:
Figure 16.9 The controller contains
- Page 459 and 460:
iEngine->iOppFleet.SetShipType(aX,
- Page 461 and 462:
if(!iController->IsMyTurn()) iEikon
- Page 463 and 464:
Of course, the opponent's response
- Page 465 and 466:
wrong with it. And it may not alway
- Page 467 and 468:
fleet.SetHit(x,y); // update view i
- Page 469 and 470:
With this scheme, each chat message
- Page 471 and 472:
For a minimum level of skill, the c
- Page 473 and 474:
CONE maintains an outstanding reque
- Page 475 and 476:
Figure 17.2 It is also worth mentio
- Page 477 and 478:
some function that will later gener
- Page 479 and 480:
So the scheduler handles precisely
- Page 481 and 482:
CActive implements the Cancel() fun
- Page 483 and 484:
A RunL() function can stop the acti
- Page 485 and 486:
}; Figure 17.9 Member functions her
- Page 487 and 488:
Function Description Stop() Decreas
- Page 489 and 490:
17.3.1 Maintaining an Outstanding R
- Page 491 and 492:
Change visibility of app view text
- Page 493 and 494:
static CMultiPartHello* NewL(CActiv
- Page 495 and 496:
iTimer.After(iStatus, iDelay); SetA
- Page 497 and 498:
I prefer to hide active objects fro
- Page 499 and 500:
In active objects, higher priority
- Page 501 and 502:
Figure 18.1 Some simple server tran
- Page 503 and 504:
A new session has a handle that is
- Page 505 and 506:
Figure 18.4 Before any subsessions
- Page 507 and 508:
Figure 18.5 When the buffer is full
- Page 509 and 510:
Related servers can be run in the s
- Page 511 and 512:
� Request the window server to dr
- Page 513 and 514:
This is because, when a client thre
- Page 515 and 516:
Figure 18.8 18.4.1 Thread Basics Th
- Page 517 and 518:
GetDesLength() return this as their
- Page 519 and 520:
class RSessionBase : public RHandle
- Page 521 and 522:
RSubSessionBase - client-side sub-s
- Page 523 and 524:
Bootstrap code for a server should
- Page 525 and 526:
The CSharableSession class provides
- Page 527 and 528:
RMessage is not intended for deriva
- Page 529 and 530:
The GSDP server presented here has
- Page 531 and 532:
IMPORT_C TInt GetGdpProtocolInfo(TI
- Page 533 and 534:
with all four slots, even if you do
- Page 535 and 536:
}; RGsdpSession::Listen() calls CGs
- Page 537 and 538:
inline RGsdpSession() : iHandler(0)
- Page 539 and 540:
If, in the first step above, the ke
- Page 541 and 542:
The GSDP client API implements a sy
- Page 543 and 544:
� Function() gives me the request
- Page 545 and 546:
Basically, the setter stores its ar
- Page 547 and 548:
As we saw in Chapter 17, any API pr
- Page 549 and 550:
Many Symbian OS servers use polymor
- Page 551 and 552:
construct shutdown timer iShutdown=
- Page 553 and 554:
void CGsdpProtocolUpdater::RunL() {
- Page 555 and 556:
GSDP clients can select the protoco
- Page 557 and 558:
} }; } }; } version_no = 1; display
- Page 559 and 560:
} aFromPort, aData); If iLastError
- Page 561 and 562:
� The datagram arrives via a GDP
- Page 563 and 564:
AddPacket() is a method provided by
- Page 565 and 566:
iReceiveMessage.Complete(KErrNone);
- Page 567 and 568:
� The client program launches a n
- Page 569 and 570:
server.Close(); return died.Int();
- Page 571 and 572:
CGsdpScheduler::TServerStart start;
- Page 573 and 574:
aStart.SignalL(); CActiveScheduler:
- Page 575 and 576:
19.4 Summary In this chapter, we've
- Page 577 and 578:
Figure 20.1 Typically, a communicat
- Page 579 and 580:
This encapsulation is important, as
- Page 581 and 582:
else // Everything was OK, leave th
- Page 583 and 584:
suite of protocols: UDP, TCP, ICMP
- Page 585 and 586:
member of the GDP-SMS session objec
- Page 587 and 588:
This puts it into an initial state,
- Page 589 and 590:
void CGdpSmsSender::TSendMsgState::
- Page 591 and 592:
If, for some reason, the operation
- Page 593 and 594:
RSmsSocketReadStream readstream(iRe
- Page 595 and 596:
Bluetooth is composed of a hierarch
- Page 597 and 598:
Figure 20.10 shows two sequential o
- Page 599 and 600:
As with GDP-SMS, the SendL() functi
- Page 601 and 602:
Once connected, the sockets interfa
- Page 603 and 604:
err = iListenSocket.Listen(4); User
- Page 605 and 606:
iReceiver.iReadSocket.Read(iReceive
- Page 607 and 608:
Appendix 1: Example Projects Overvi
- Page 609 and 610:
AppForge development software integ
- Page 611 and 612:
Psion has a long history of using S
- Page 613 and 614:
Appendix 3: TOGS Guide and Referenc
- Page 615 and 616:
protected: TUid iDtor_ID_Key; }; CG
- Page 617 and 618:
eturn KErrNone; } TInt CGdpLoopback
- Page 619 and 620:
packet to the initiating partner: t
- Page 621 and 622:
inline RGsdpSession() : iHandler(0)
- Page 623 and 624:
Function Description MGsdpPacketHan
- Page 625 and 626:
RGCP TOGS is designed to support tu
- Page 627 and 628:
Packet structure RGCP uses GSDP as
- Page 629 and 630:
State Meaning responses are handled
- Page 631 and 632:
Figure A3.10 Here's CRgcpSession's
- Page 633 and 634:
void GsdpHandleL(const TDesC8& aDat
- Page 635 and 636:
virtual void RgcpHandleBound() = 0;
- Page 637 and 638:
State Meaning Listening You have ch
- Page 639 and 640:
From To Occurs When other player, t
- Page 641 and 642:
Opcode Name Details want-second.Res
- Page 643 and 644:
Appendix 4: Emulator Reference Over
- Page 645 and 646:
Figure A4.2 This source compatibili
- Page 647 and 648:
Figure A4.5 An emulator configurati
- Page 649 and 650:
Each Symbian OS .exe built for the
- Page 651 and 652:
In different UIs, there can be addi
- Page 653 and 654:
ARM data alignment rules are strict
- Page 655 and 656:
Key Description W Dump full window
- Page 657 and 658:
event handling threads 569 events,
- Page 659 and 660:
Application Programming Interfaces
- Page 661 and 662:
Boolean data type 55 Boss Puzzle di
- Page 663 and 664:
CGsdpSession 650 CanReceivePacket()
- Page 665 and 666:
certificate file 472 Certificate Ge
- Page 667 and 668:
ServiceL error handling 646 CGsdpSe
- Page 669 and 670:
CObjectIx class 614 CodeWarrior deb
- Page 671 and 672:
context switching 27 performance is
- Page 673 and 674:
CSession class 598, 614, 624 CShara
- Page 675 and 676:
text 501 fonts 495 GDI 507 line dra
- Page 677 and 678:
const rule, breaking 334 descriptio
- Page 679 and 680:
DrawVerticalBorder() function 238 D
- Page 681 and 682:
ExternalizeL() function 261 testing
- Page 683 and 684:
files 416 copying to emulator 773 s
- Page 685 and 686:
G game datagram protocol see GDP pr
- Page 687 and 688:
drawing 237 zooming 245 GetZoom() f
- Page 689 and 690:
graphics interaction 370 pick corre
- Page 691 and 692:
Install() function CActiveScheduler
- Page 693 and 694:
graphics interaction handling 370 O
- Page 695 and 696:
summary 485 MakeVisible() function
- Page 697 and 698:
multithreading 43 MVC 287 controlle
- Page 699 and 700:
packets see datagrams palettes 516
- Page 701 and 702:
private key 472 privilege boundarie
- Page 703 and 704:
ReceiveAllL() 697 ReceivePacket() f
- Page 705 and 706:
Revo 23 RFCOMM 701 RFile class 46 v
- Page 707 and 708:
RWriteStream 425 streams 430 vs. RF
- Page 709 and 710:
CGraphicsContext class 324 SetBrush
- Page 711 and 712:
simple getter functions 60 single-p
- Page 713 and 714:
Static() function CCoeEnv class 357
- Page 715 and 716:
ESOCK sockets server 526 ETEL telep
- Page 717 and 718:
TDisplayMode 516 Telephony server 6
- Page 719 and 720:
TParsePtr 418 TParsePtrC 418 TPckg
- Page 721 and 722:
derivation relationships 75 Unicode
- Page 723:
flicker-free redraw 354 invalid reg