SERVICE MANUAL MR-G57N-T-NZ - B.d.t.
SERVICE MANUAL MR-G57N-T-NZ - B.d.t.
SERVICE MANUAL MR-G57N-T-NZ - B.d.t.

You also want an ePaper? Increase the reach of your titles
YUMPU automatically turns print PDFs into web optimized ePapers that Google loves.
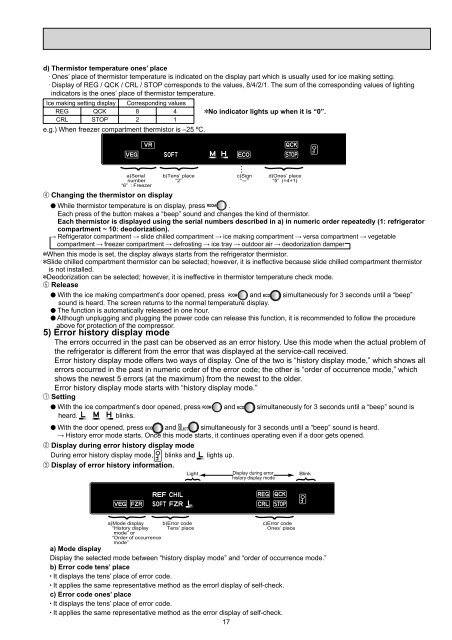
d) Thermistor temperature ones’ place<br />
Ones’ place of thermistor temperature is indicated on the display part which is usually used for ice making setting.<br />
Display of REG / QCK / CRL / STOP corresponds to the values, 8/4/2/1. The sum of the corresponding values of lighting<br />
indicators is the ones’ place of thermistor temperature.<br />
Ice making setting display Corresponding values<br />
REG QCK 8 4 No indicator lights up when it is “0”.<br />
CRL STOP 2 1<br />
e.g.) When freezer compartment thermistor is –25 ºC.<br />
a)Serial<br />
number<br />
“6” : Freezer<br />
Changing the thermistor on display<br />
b)Tens’ place<br />
“2”<br />
c)Sign<br />
“-”<br />
d)Ones’ place<br />
“5” (=4+1)<br />
While thermistor temperature is on display, press .<br />
Each press of the button makes a “beep” sound and changes the kind of thermistor.<br />
Each thermistor is displayed using the serial numbers described in a) in numeric order repeatedly (1: refrigerator<br />
compartment ~ 10: deodorization).<br />
Refrigerator compartment slide chilled compartment ice making compartment versa compartment vegetable<br />
compartment freezer compartment defrosting ice tray outdoor air deodorization damper<br />
When this mode is set, the display always starts from the refrigerator thermistor.<br />
Slide chilled compartment thermistor can be selected; however, it is ineffective because slide chilled compartment thermistor<br />
is not installed.<br />
Deodorization can be selected; however, it is ineffective in thermistor temperature check mode.<br />
Release<br />
With the ice making compartment’s door opened, press and simultaneously for 3 seconds until a “beep”<br />
sound is heard. The screen returns to the normal temperature display.<br />
The function is automatically released in one hour.<br />
Although unplugging and plugging the power code can release this function, it is recommended to follow the procedure<br />
above for protection of the compressor.<br />
5) Error history display mode<br />
The errors occurred in the past can be observed as an error history. Use this mode when the actual problem of<br />
the refrigerator is different from the error that was displayed at the service-call received.<br />
Error history display mode offers two ways of display. One of the two is “history display mode,” which shows all<br />
errors occurred in the past in numeric order of the error code; the other is “order of occurrence mode,” which<br />
shows the newest 5 errors (at the maximum) from the newest to the older.<br />
Error history display mode starts with “history display mode.”<br />
Setting<br />
With the ice compartment’s door opened, press and simultaneously for 3 seconds until a “beep” sound is<br />
heard. blinks.<br />
With the door opened, press and simultaneously for 3 seconds until a “beep” sound is heard.<br />
History error mode starts. Once this mode starts, it continues operating even if a door gets opened.<br />
Display during error history display mode<br />
During error history display mode, blinks and lights up.<br />
Display of error history information.<br />
Light<br />
a)Mode display b)Error code<br />
“History display Tens’ place<br />
mode” or<br />
“Order of occurrence<br />
mode”<br />
Display during error<br />
history display mode<br />
c)Error code<br />
Ones’ place<br />
a) Mode display<br />
Display the selected mode between “history display mode” and “order of occurrence mode.”<br />
b) Error code tens’ place<br />
It displays the tens’ place of error code.<br />
It applies the same representative method as the errorl display of self-check.<br />
c) Error code ones’ place<br />
It displays the tens’ place of error code.<br />
It applies the same representative method as the error display of self-check.<br />
17<br />
Blink