SERVICE MANUAL MR-G57N-T-NZ - B.d.t.
SERVICE MANUAL MR-G57N-T-NZ - B.d.t.
SERVICE MANUAL MR-G57N-T-NZ - B.d.t.

Create successful ePaper yourself
Turn your PDF publications into a flip-book with our unique Google optimized e-Paper software.
OPERATING PROCEDURE<br />
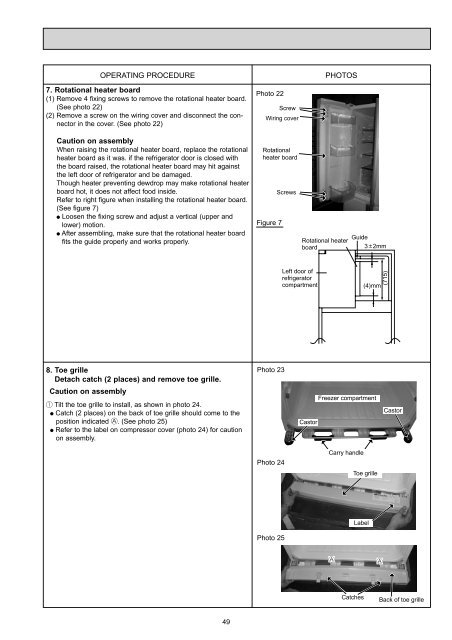
7. Rotational heater board<br />
(1) Remove 4 fixing screws to remove the rotational heater board.<br />
(See photo 22)<br />
(2) Remove a screw on the wiring cover and disconnect the connector<br />
in the cover. (See photo 22)<br />
Caution on assembly<br />
When raising the rotational heater board, replace the rotational<br />
heater board as it was. if the refrigerator door is closed with<br />
the board raised, the rotational heater board may hit against<br />
the left door of refrigerator and be damaged.<br />
Though heater preventing dewdrop may make rotational heater<br />
board hot, it does not affect food inside.<br />
Refer to right figure when installing the rotational heater board.<br />
(See figure 7)<br />
Loosen the fixing screw and adjust a vertical (upper and<br />
lower) motion.<br />
After assembling, make sure that the rotational heater board<br />
fits the guide properly and works properly.<br />
8. Toe grille<br />
Detach catch (2 places) and remove toe grille.<br />
Caution on assembly<br />
Tilt the toe grille to install, as shown in photo 24.<br />
Catch (2 places) on the back of toe grille should come to the<br />
position indicated . (See photo 25)<br />
Refer to the label on compressor cover (photo 24) for caution<br />
on assembly.<br />
49<br />
Photo 22<br />
Screw<br />
Wiring cover<br />
Rotational<br />
heater board<br />
Figure 7<br />
Photo 23<br />
Photo 24<br />
Photo 25<br />
Screws<br />
Left door of<br />
refrigerator<br />
compartment<br />
PHOTOS<br />
Rotational heater<br />
board<br />
Castor<br />
Guide<br />
3 2mm<br />
(4)mm<br />
Freezer compartment<br />
Carry handle<br />
Toe grille<br />
Label<br />
Catches<br />
(715)<br />
Castor<br />
Back of toe grille