Create successful ePaper yourself
Turn your PDF publications into a flip-book with our unique Google optimized e-Paper software.
57<br />
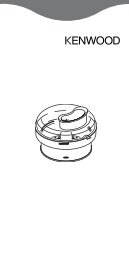
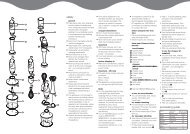
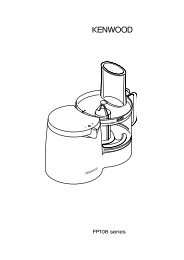
centrifugal juicer (if supplied)<br />
Use the centrifugal juicer for making juice from firm fruit and vegetables.<br />
a pusher<br />
b lid<br />
c pulp remover<br />
d filter drum<br />
e bowl<br />
f juicing spout<br />
g juicer drive adaptor<br />
to use the centrifugal juicer<br />
1 Fit the juicer drive adaptor onto the power unit – push down lightly to<br />
ensure the adaptor is located correctly.<br />
2 Then fit the juicer bowl. Place the handle towards the back and turn clockwise<br />
until it locks .<br />
3 Place the pulp remover into the filter drum - ensuring the tabs locate with the<br />
slots in the bottom of the drum .<br />
4 Fit the filter drum .<br />
5 Place the attachment lid onto the bowl, turn until it locks and the feed tube sits<br />
over the handle Your juicer will not operate if the bowl or lid are<br />
not fitted correctly 57 into the interlock.<br />
6 Place a suitable glass or jug under the juice outlet.<br />
7 Cut the food to fit the feed tube. 57<br />
8 Select auto 57and<br />
push down evenly with the pusher - never put your<br />
fingers in the feed tube. Process fully before adding more.<br />
● After 57adding<br />
the last piece, let the juicer run for a further 30 seconds to<br />
extract all the juice from the filter drum.<br />
safety<br />
● Do not use the juicer if the filter is damaged.<br />
● The cutting blades on the base of the filter drum are very sharp, take care<br />
when handling and cleaning the drum.<br />
● Only use the pusher supplied. Never put your fingers in the feed tube.<br />
Unplug before unblocking the feed tube.<br />
● Before removing the lid, switch off and wait for the filter to stop.<br />
important<br />
● If the juicer starts to vibrate, switch off and empty the pulp from the drum.<br />
(The juicer vibrates if the pulp becomes unevenly distributed).<br />
● Maximum capacity that can be processed at one time is 1Kg of fruit or<br />
vegetables (refer to speed chart).<br />
● Some very hard foods may make your juicer slow down or stop. If this<br />
happens switch off and unblock the filter.<br />
● Switch off and clear the pulp collector regularly during use.<br />
hints<br />
● Before processing remove stones and pips (eg pepper, melon, plum) and<br />
tough skins (eg melon, pineapple). You don’t need to peel or core apples<br />
and pears.<br />
● Use firm, fresh fruit and vegetables.<br />
● To maximise juice extraction place small quantities at a time in the feed tube<br />
and push down slowly.<br />
● Citrus fruit - peel and remove the white pith, otherwise the juice may taste<br />
bitter. For best results use the citrus press.<br />
attachment storage box<br />
Your food processor is supplied with a storage box for your bowl<br />
attachments and discs.<br />
1 Fit the whisk, knife blade, dough tool and discs into the storage box when<br />
not<br />
in use .<br />
2 The storage box is fitted with a safety lock - close the lid and slide the<br />
latch to the left to lock . To open slide the latch to the right .<br />
care & cleaning<br />
● Always switch off and unplug before cleaning.<br />
● Handle the blades and 57 cutting discs with care - they are extremely sharp.<br />
●<br />
57 Some foods may discolour the plastic. 57 This is perfectly normal and won’t<br />
harm the plastic or affect the flavour of your food. Rub with a cloth dipped in<br />
vegetable oil to remove the discolouration.<br />
6<br />
power unit<br />
● Wipe with a damp cloth, then dry. Ensure that the interlock area is clear of<br />
food debris.<br />
● Store excess cord in the storage area at the back of the machine<br />
detachable drive shaft/juicer drive adaptor<br />
.<br />
● Wipe with a damp cloth, then dry.<br />
● Do not immerse the drive shaft or adaptor in water.<br />
liquidiser/mill<br />
1 Empty the goblet/jar before unscrewing it from the blade 57 unit.<br />
2 Wash the goblet/jar by hand.<br />
3 Remove and wash the seals.<br />
4 Don’t touch the sharp blades – brush them clean using hot soapy water,<br />
then rinse thoroughly under the tap. Don’t immerse the blade unit in<br />
water.<br />
5 Leave to dry upside down.<br />
twin beater geared whisk<br />
● Detach the beaters from the drive head by gently pulling them free. Wash in<br />
warm soapy water.<br />
● Wipe the drive head with a damp cloth, then dry.<br />
Do not immerse the drive head in water.<br />
all other parts<br />
● Wash by hand, then dry.<br />
● Alternatively they are dishwasher safe and can be washed on the top rack of<br />
your dishwasher. Avoid placing items on the bottom rack directly over the<br />
heating element. A short low temperature (Maximum 50°C) programme is<br />
recommended.<br />
item suitable for<br />
dishwashing<br />
main, midi & mini bowl, lid, pushers, spatula ✔<br />
liquidiser glass goblet, lid, filler cap ✔<br />
blade unit and seal for liquidiser and mill ✘<br />
glass mill jar ✔<br />
knife blades, dough tool, maxi blend canopy ✔<br />
whisk beaters ✔<br />
whisk drive head ✘<br />
discs ✔<br />
citrus press ✔<br />
centrifugal juicer ✘<br />
detachable drive shaft ✘<br />
juicer drive adaptor ✘<br />
service & customer care<br />
● If the cord is damaged it must, for safety reasons, be replaced by Kenwood<br />
or an authorised Kenwood repairer.<br />
● If you experience any problems with the operation of the<br />
processor, before calling for assistance refer to the<br />
troubleshooting guide.<br />
If you need help with:<br />
● using your appliance or<br />
● servicing or repairs<br />
Contact the shop where you bought your appliance.<br />
● Designed and engineered by Kenwood in the UK<br />
● Made in China