SITRANS LR200 (HART) Quick Start Manual - Siemens
SITRANS LR200 (HART) Quick Start Manual - Siemens
SITRANS LR200 (HART) Quick Start Manual - Siemens

Create successful ePaper yourself
Turn your PDF publications into a flip-book with our unique Google optimized e-Paper software.
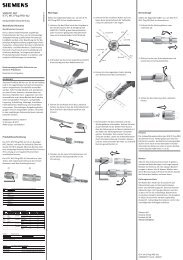
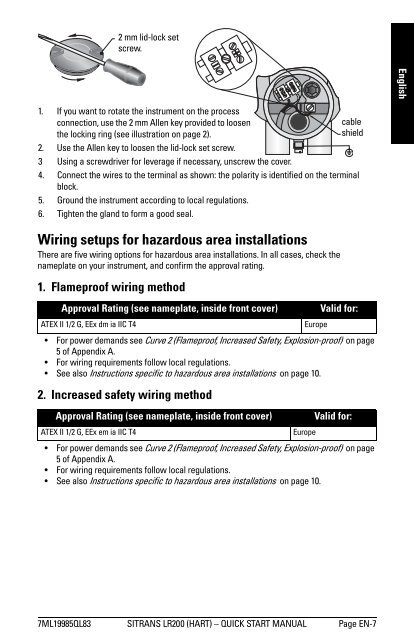
2 mm lid-lock set<br />
screw.<br />
1. If you want to rotate the instrument on the process<br />
connection, use the 2 mm Allen key provided to loosen<br />
cable<br />
the locking ring (see illustration on page 2).<br />
shield<br />
2. Use the Allen key to loosen the lid-lock set screw.<br />
3 Using a screwdriver for leverage if necessary, unscrew the cover.<br />
4. Connect the wires to the terminal as shown: the polarity is identified on the terminal<br />
block.<br />
5. Ground the instrument according to local regulations.<br />
6. Tighten the gland to form a good seal.<br />
Wiring setups for hazardous area installations<br />
There are five wiring options for hazardous area installations. In all cases, check the<br />
nameplate on your instrument, and confirm the approval rating.<br />
1. Flameproof wiring method<br />
Approval Rating (see nameplate, inside front cover) Valid for:<br />
ATEX II 1/2 G, EEx dm ia IIC T4 Europe<br />
• For power demands see Curve 2 (Flameproof, Increased Safety, Explosion-proof) on page<br />
5 of Appendix A.<br />
• For wiring requirements follow local regulations.<br />
• See also Instructions specific to hazardous area installations on page 10.<br />
2. Increased safety wiring method<br />
Approval Rating (see nameplate, inside front cover) Valid for:<br />
ATEX II 1/2 G, EEx em ia IIC T4 Europe<br />
• For power demands see Curve 2 (Flameproof, Increased Safety, Explosion-proof) on page<br />
5 of Appendix A.<br />
• For wiring requirements follow local regulations.<br />
• See also Instructions specific to hazardous area installations on page 10.<br />
7ML19985QL83 <strong>SITRANS</strong> <strong>LR200</strong> (<strong>HART</strong>) – QUICK START MANUAL Page EN-7<br />
English