1 - Cash Registers
1 - Cash Registers
1 - Cash Registers

Create successful ePaper yourself
Turn your PDF publications into a flip-book with our unique Google optimized e-Paper software.
8<br />
3<br />
4<br />
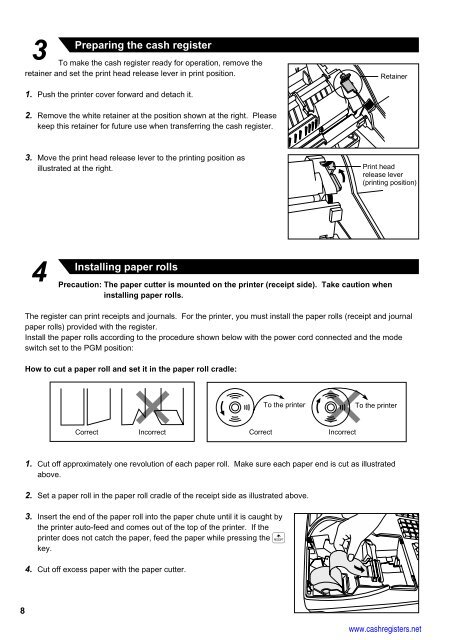
Preparing the cash register<br />
To make the cash register ready for operation, remove the<br />
retainer and set the print head release lever in print position.<br />
1. Push the printer cover forward and detach it.<br />
2. Remove the white retainer at the position shown at the right. Please<br />
keep this retainer for future use when transferring the cash register.<br />
3. Move the print head release lever to the printing position as<br />
illustrated at the right.<br />
Installing paper rolls<br />
Precaution: The paper cutter is mounted on the printer (receipt side). Take caution when<br />
installing paper rolls.<br />
The register can print receipts and journals. For the printer, you must install the paper rolls (receipt and journal<br />
paper rolls) provided with the register.<br />
Install the paper rolls according to the procedure shown below with the power cord connected and the mode<br />
switch set to the PGM position:<br />
How to cut a paper roll and set it in the paper roll cradle:<br />
Correct Incorrect<br />
1. Cut off approximately one revolution of each paper roll. Make sure each paper end is cut as illustrated<br />
above.<br />
2. Set a paper roll in the paper roll cradle of the receipt side as illustrated above.<br />
3. Insert the end of the paper roll into the paper chute until it is caught by<br />
the printer auto-feed and comes out of the top of the printer. If the<br />
printer does not catch the paper, feed the paper while pressing the {<br />
key.<br />
4. Cut off excess paper with the paper cutter.<br />
Correct<br />
To the printer<br />
Incorrect<br />
Retainer<br />
Print head<br />
release lever<br />
(printing position)<br />
To the printer<br />
www.cashregisters.net