1 - Cash Registers
1 - Cash Registers
1 - Cash Registers

You also want an ePaper? Increase the reach of your titles
YUMPU automatically turns print PDFs into web optimized ePapers that Google loves.
4<br />
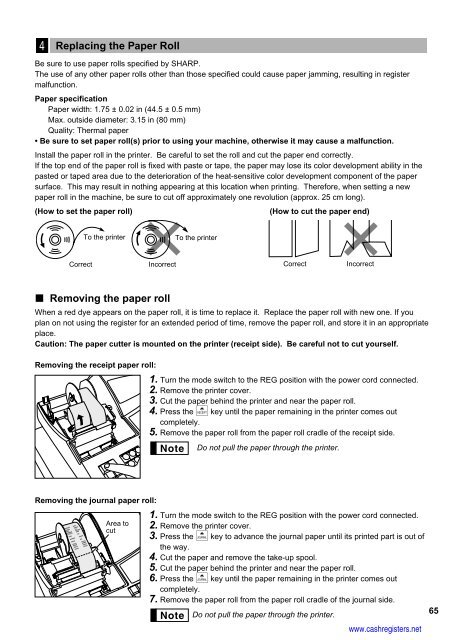
Replacing the Paper Roll<br />
Be sure to use paper rolls specified by SHARP.<br />
The use of any other paper rolls other than those specified could cause paper jamming, resulting in register<br />
malfunction.<br />
Paper specification<br />
Paper width: 1.75 ± 0.02 in (44.5 ± 0.5 mm)<br />
Max. outside diameter: 3.15 in (80 mm)<br />
Quality: Thermal paper<br />
• Be sure to set paper roll(s) prior to using your machine, otherwise it may cause a malfunction.<br />
Install the paper roll in the printer. Be careful to set the roll and cut the paper end correctly.<br />
If the top end of the paper roll is fixed with paste or tape, the paper may lose its color development ability in the<br />
pasted or taped area due to the deterioration of the heat-sensitive color development component of the paper<br />
surface. This may result in nothing appearing at this location when printing. Therefore, when setting a new<br />
paper roll in the machine, be sure to cut off approximately one revolution (approx. 25 cm long).<br />
(How to set the paper roll) (How to cut the paper end)<br />
Correct<br />
To the printer<br />
Removing the paper roll<br />
When a red dye appears on the paper roll, it is time to replace it. Replace the paper roll with new one. If you<br />
plan on not using the register for an extended period of time, remove the paper roll, and store it in an appropriate<br />
place.<br />
Caution: The paper cutter is mounted on the printer (receipt side). Be careful not to cut yourself.<br />
Removing the receipt paper roll:<br />
Removing the journal paper roll:<br />
Area to<br />
cut<br />
Incorrect<br />
To the printer<br />
Correct Incorrect<br />
1. Turn the mode switch to the REG position with the power cord connected.<br />
2. Remove the printer cover.<br />
3. Cut the paper behind the printer and near the paper roll.<br />
4. Press the { key until the paper remaining in the printer comes out<br />
completely.<br />
5. Remove the paper roll from the paper roll cradle of the receipt side.<br />
Do not pull the paper through the printer.<br />
1. Turn the mode switch to the REG position with the power cord connected.<br />
2. Remove the printer cover.<br />
3. Press the } key to advance the journal paper until its printed part is out of<br />
the way.<br />
4. Cut the paper and remove the take-up spool.<br />
5. Cut the paper behind the printer and near the paper roll.<br />
6. Press the } key until the paper remaining in the printer comes out<br />
completely.<br />
7. Remove the paper roll from the paper roll cradle of the journal side.<br />
Do not pull the paper through the printer.<br />
www.cashregisters.net<br />
65