

Assembly Instructions / Instrucciones de ensamblaje - Swing-N-Slide
Assembly Instructions / Instrucciones de ensamblaje - Swing-N-Slide
Assembly Instructions / Instrucciones de ensamblaje - Swing-N-Slide

Create successful ePaper yourself
Turn your PDF publications into a flip-book with our unique Google optimized e-Paper software.
<strong>Assembly</strong> <strong>Instructions</strong> / <strong>Instrucciones</strong> <strong>de</strong> <strong>ensamblaje</strong><br />
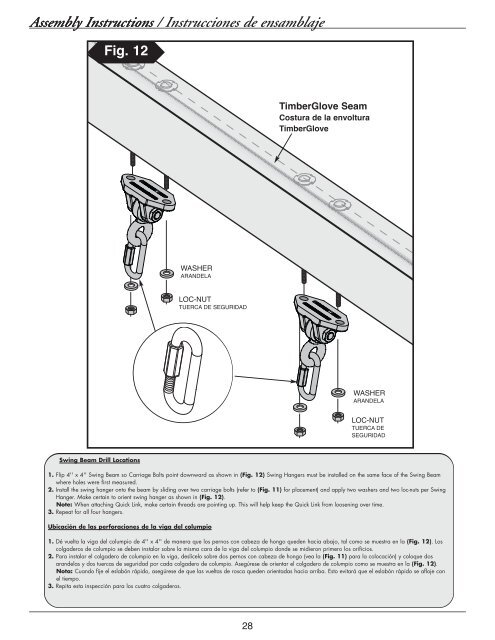
Fig. 12<br />
TimberGlove Seam<br />
Costura <strong>de</strong> la envoltura<br />
TimberGlove<br />
WASHER<br />
ARANDELA<br />
LOC-NUT<br />
TUERCA DE SEGURIDAD<br />
WASHER<br />
ARANDELA<br />
LOC-NUT<br />
TUERCA DE<br />
SEGURIDAD<br />
<strong>Swing</strong> Beam Drill Locations<br />
1. Flip 4'' x 4'' <strong>Swing</strong> Beam so Carriage Bolts point downward as shown in (Fig. 12) <strong>Swing</strong> Hangers must be installed on the same face of the <strong>Swing</strong> Beam<br />
where holes were first measured.<br />
2. Install the swing hanger onto the beam by sliding over two carriage bolts (refer to (Fig. 11) for placement) and apply two washers and two loc-nuts per <strong>Swing</strong><br />
Hanger. Make certain to orient swing hanger as shown in (Fig. 12).<br />
Note: When attaching Quick Link, make certain threads are pointing up. This will help keep the Quick Link from loosening over time.<br />
3. Repeat for all four hangers.<br />
Ubicación <strong>de</strong> las perforaciones <strong>de</strong> la viga <strong>de</strong>l columpio<br />
1. Dé vuelta la viga <strong>de</strong>l columpio <strong>de</strong> 4'' x 4'' <strong>de</strong> manera que los pernos con cabeza <strong>de</strong> hongo que<strong>de</strong>n hacia abajo, tal como se muestra en la (Fig. 12). Los<br />
colga<strong>de</strong>ros <strong>de</strong> columpio se <strong>de</strong>ben instalar sobre la misma cara <strong>de</strong> la viga <strong>de</strong>l columpio don<strong>de</strong> se midieron primero los orificios.<br />
2. Para instalar el colga<strong>de</strong>ro <strong>de</strong> columpio en la viga, <strong>de</strong>slícelo sobre dos pernos con cabeza <strong>de</strong> hongo (vea la (Fig. 11) para la colocación) y coloque dos<br />
aran<strong>de</strong>las y dos tuercas <strong>de</strong> seguridad por cada colga<strong>de</strong>ro <strong>de</strong> columpio. Asegúrese <strong>de</strong> orientar el colga<strong>de</strong>ro <strong>de</strong> columpio como se muestra en la (Fig. 12).<br />
Nota: Cuando fije el eslabón rápido, asegúrese <strong>de</strong> que las vueltas <strong>de</strong> rosca que<strong>de</strong>n orientadas hacia arriba. Esto evitará que el eslabón rápido se afloje con<br />
el tiempo.<br />
3. Repita esta inspección para los cuatro colga<strong>de</strong>ros.<br />
28


