

Assembly Instructions / Instrucciones de ensamblaje - Swing-N-Slide
Assembly Instructions / Instrucciones de ensamblaje - Swing-N-Slide
Assembly Instructions / Instrucciones de ensamblaje - Swing-N-Slide

Create successful ePaper yourself
Turn your PDF publications into a flip-book with our unique Google optimized e-Paper software.
R<br />
<strong>Assembly</strong> <strong>Instructions</strong> / <strong>Instrucciones</strong> <strong>de</strong> <strong>ensamblaje</strong><br />
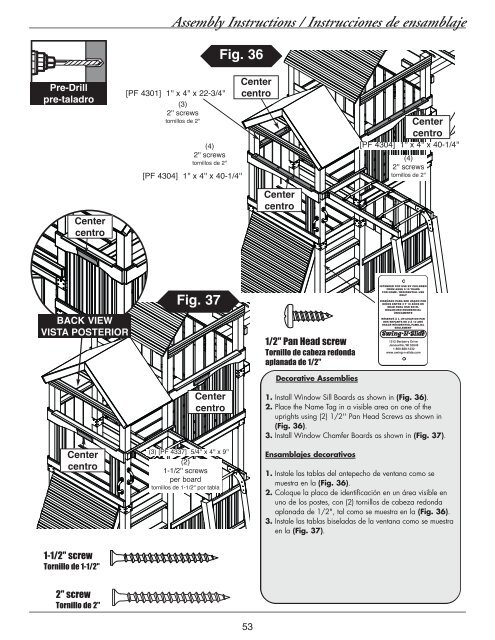
Fig. 36<br />
Pre-Drill<br />
pre-taladro<br />
Center<br />
centro<br />
[PF 4301] 1'' x 4'' x 22-3/4''<br />
(3)<br />
2'' screws<br />
tornillos <strong>de</strong> 2''<br />
(4)<br />
2'' screws<br />
tornillos <strong>de</strong> 2''<br />
[PF 4304] 1'' x 4'' x 40-1/4''<br />
Center<br />
centro<br />
Center<br />
centro<br />
Center<br />
centro<br />
[PF 4304] 1'' x 4'' x 40-1/4''<br />
(4)<br />
2'' screws<br />
tornillos <strong>de</strong> 2''<br />
BACK VIEW<br />
VISTA POSTERIOR<br />
Fig. 37<br />
1/2'' Pan Head screw<br />
Tornillo <strong>de</strong> cabeza redonda<br />
aplanada <strong>de</strong> 1/2''<br />
INTENDED FOR USE BY CHILDREN<br />
FROM AGES 2-10 YEARS<br />
FOR HOME / RESIDENTIAL USE<br />
ONLY<br />
DISEÑADO PARA SER USADO POR<br />
NIÑOS ENTRE 2 Y 10 AÑOS DE<br />
EDAD PARA USO EN EL<br />
HOGAR/USO RESIDENCIAL<br />
ÚNICAMENTE<br />
RÉSERVÉ À L_UTILISATION PAR<br />
DES ENFANTS DE 2 À 10 ANS<br />
USAGE RÉSIDENTIEL/FAMILIAL<br />
SEULEMENT<br />
1212 Barberry Drive<br />
Janesville, WI 53545<br />
1-800-888-1232<br />
www.swing-n-sli<strong>de</strong>.com<br />
Decorative Assemblies<br />
Center<br />
centro<br />
Center<br />
centro<br />
(3) [PF 4337] 5/4'' x 4'' x 9''<br />
(2)<br />
1-1/2'' screws<br />
per board<br />
tornillos <strong>de</strong> 1-1/2'' por tabla<br />
1. Install Window Sill Boards as shown in (Fig. 36).<br />
2. Place the Name Tag in a visible area on one of the<br />
uprights using (2) 1/2'' Pan Head Screws as shown in<br />
(Fig. 36).<br />
3. Install Window Chamfer Boards as shown in (Fig. 37).<br />
Ensamblajes <strong>de</strong>corativos<br />
1. Instale las tablas <strong>de</strong>l antepecho <strong>de</strong> ventana como se<br />
muestra en la (Fig. 36).<br />
2. Coloque la placa <strong>de</strong> i<strong>de</strong>ntificación en un área visible en<br />
uno <strong>de</strong> los postes, con (2) tornillos <strong>de</strong> cabeza redonda<br />
aplanada <strong>de</strong> 1/2", tal como se muestra en la (Fig. 36).<br />
3. Instale las tablas biseladas <strong>de</strong> la ventana como se muestra<br />
en la (Fig. 37).<br />
1-1/2'' screw<br />
Tornillo <strong>de</strong> 1-1/2"<br />
2'' screw<br />
Tornillo <strong>de</strong> 2''<br />
53


