


Create successful ePaper yourself
Turn your PDF publications into a flip-book with our unique Google optimized e-Paper software.
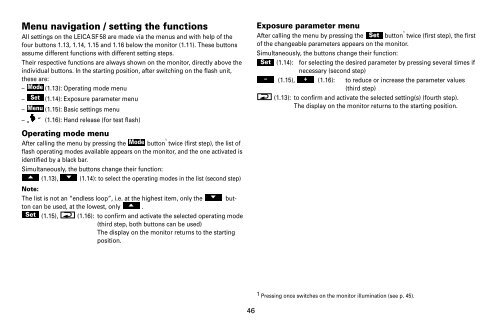
Menu navigation / setting the functions<br />
All settings on the LEICA <strong>SF</strong> <strong>58</strong> are made via the menus and with help of the<br />
four buttons 1.13, 1.14, 1.15 and 1.16 below the monitor (1.11). These buttons<br />
assume different functions with different setting steps.<br />
Their respective functions are always shown on the monitor, directly above the<br />
individual buttons. In the starting position, after switching on the flash unit,<br />
these are:<br />
– (1.13): Operating mode menu<br />
– (1.14): Exposure parameter menu<br />
– (1.15): Basic settings menu<br />
– „ “ (1.16): Hand release (for test flash)<br />
Operating mode menu<br />
After calling the menu by pressing the button 1<br />
Mode<br />
Set<br />
Menu<br />
Mode twice (first step), the list of<br />
flash operating modes available appears on the monitor, and the one activated is<br />
identified by a black bar.<br />
Simultaneously, the buttons change their function:<br />
�<br />
Note:<br />
(1.13), � (1.14): to select the operating modes in the list (second step)<br />
The list is not an “endless loop”, i.e. at the highest item, only the � button<br />
can be used, at the lowest, only � .<br />
Set (1.15), (1.16): to confirm and activate the selected operating mode<br />
(third step, both buttons can be used)<br />
The display on the monitor returns to the starting<br />
position.<br />
46<br />
Exposure parameter menu<br />
After calling the menu by pressing the button 1<br />
Set<br />
twice (first step), the first<br />
of the changeable parameters appears on the monitor.<br />
Simultaneously, the buttons change their function:<br />
Set (1.14): for selecting the desired parameter by pressing several times if<br />
necessary (second step)<br />
– (1.15), + (1.16): to reduce or increase the parameter values<br />
(third step)<br />
(1.13): to confirm and activate the selected setting(s) (fourth step).<br />
The display on the monitor returns to the starting position.<br />
1 Pressing once switches on the monitor illumination (see p. 45).