

XC-F10 M-F10 S-F10-LRW - Service.pioneer-eur.com - Pioneer
XC-F10 M-F10 S-F10-LRW - Service.pioneer-eur.com - Pioneer
XC-F10 M-F10 S-F10-LRW - Service.pioneer-eur.com - Pioneer

You also want an ePaper? Increase the reach of your titles
YUMPU automatically turns print PDFs into web optimized ePapers that Google loves.
2 Installing 2 Connecting and Up Connecting Up<br />
Connecting the CD tuner to the<br />
amplifier<br />
Connect the CD tuner to the amplifier as described below. If you<br />
also have the optional CD-R recorder, see their ac<strong>com</strong>panying<br />
instructions before following the instructions on this page. This<br />
will make connecting up several <strong>com</strong>ponents easier.<br />
• Important: When connecting or disconnecting the system<br />
cable, make sure that the power is switched off and the unit<br />
unplugged from the wall outlet.<br />
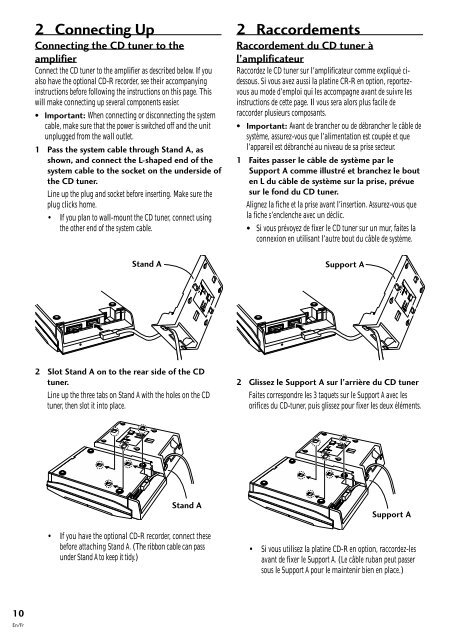
1 Pass the system cable through Stand A, as<br />
shown, and connect the L-shaped end of the<br />
system cable to the socket on the underside of<br />
the CD tuner.<br />
Line up the plug and socket before inserting. Make sure the<br />
plug clicks home.<br />
• If you plan to wall-mount the CD tuner, connect using<br />
the other end of the system cable.<br />
2 Raccordements<br />
Raccordement du CD tuner à<br />
l’amplificat<strong>eur</strong><br />
Raccordez le CD tuner sur l’amplificat<strong>eur</strong> <strong>com</strong>me expliqué cidessous.<br />
Si vous avez aussi la platine CR-R en option, reportezvous<br />
au mode d’emploi qui les ac<strong>com</strong>pagne avant de suivre les<br />
instructions de cette page. Il vous sera alors plus facile de<br />
raccorder plusi<strong>eur</strong>s <strong>com</strong>posants.<br />
• Important: Avant de brancher ou de débrancher le câble de<br />
système, assurez-vous que l’alimentation est coupée et que<br />
l’appareil est débranché au niveau de sa prise sect<strong>eur</strong>.<br />
1 Faites passer le câble de système par le<br />
Support A <strong>com</strong>me illustré et branchez le bout<br />
en L du câble de système sur la prise, prévue<br />
sur le fond du CD tuner.<br />
Alignez la fiche et la prise avant l’insertion. Assurez-vous que<br />
la fiche s’enclenche avec un déclic.<br />
• Si vous prévoyez de fixer le CD tuner sur un mur, faites la<br />
connexion en utilisant l’autre bout du câble de système.<br />
Stand A<br />
Support A<br />
2 Slot Stand A on to the rear side of the CD<br />
tuner.<br />
Line up the three tabs on Stand A with the holes on the CD<br />
tuner, then slot it into place.<br />
2 Glissez le Support A sur l’arrière du CD tuner<br />
Faites correspondre les 3 taquets sur le Support A avec les<br />
orifices du CD-tuner, puis glissez pour fixer les deux éléments.<br />
Stand A<br />
• If you have the optional CD-R recorder, connect these<br />
before attaching Stand A. (The ribbon cable can pass<br />
under Stand A to keep it tidy.)<br />
Support A<br />
• Si vous utilisez la platine CD-R en option, raccordez-les<br />
avant de fixer le Support A. (Le câble ruban peut passer<br />
sous le Support A pour le maintenir bien en place.)<br />
10<br />
En/Fr


