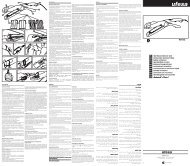
BV4625 BV4630 إرﺷïºØ¯Ø§Øª اï»ïºïº¸ï»ï»´ï» AR - Ufesa
BV4625 BV4630 إرﺷïºØ¯Ø§Øª اï»ïºïº¸ï»ï»´ï» AR - Ufesa
BV4625 BV4630 إرﺷïºØ¯Ø§Øª اï»ïºïº¸ï»ï»´ï» AR - Ufesa

You also want an ePaper? Increase the reach of your titles
YUMPU automatically turns print PDFs into web optimized ePapers that Google loves.
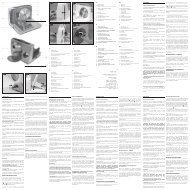
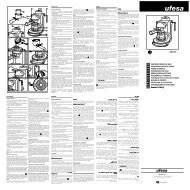
Do the same to attach the other rod. Before switching the hand<br />
mixer on, make sure that the rods are fitted correctly.<br />
The whisks can be inserted into either hole.<br />
However the dough hooks have specific holes. The dough hook<br />
with the washer fitted to the shank must be inserted into the<br />
widest hole on the food mixer. (Figure 2)<br />
Mixer foot:<br />
Open the safety cover (10) located at the back of the hand mixer.<br />
(Figure 3) Insert the mixer foot (6) into its housing, lining up the<br />
guide arrows. (Figure 4)<br />
Turn the mixer foot (6) clockwise until you notice it stop. (1/4 turn)<br />
(Figure 5)<br />
The blade on the mixer foot is protected by a small plastic cover.<br />
Make sure to remove this before attempting to use the mixer foot.<br />
The edge of the blade is very sharp, so be careful not to injure<br />
yourself.<br />
As a safety measure make sure to remove the whisks or dough<br />
hooks before inserting the mixer foot.<br />
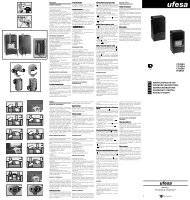
USING THE HAND MIXER ON THE SUPPORT WITH<br />
ROTATING BOWL Model BV-4630<br />
Fitting the motor housing to the support:<br />
Rest the front of the hand mixer into its housing on the support<br />
(11). (Figure 6)<br />
Press down on the hand mixer so that it locks in correctly. (Figure<br />
7)<br />
Check that the hand mixer has been fitted correctly.<br />
Fitting the food bowl onto the support:<br />
Press the support retaining clip (12) allowing the support to swing<br />
up. (Figure 8)<br />
Place the food bowl (17) onto the support (11).<br />
Swing the top of the support down onto the bowl so that it slots<br />
on correctly. (Figure 9)<br />
Check that the bowl is slotted onto the base correctly.<br />
Whisks and dough hooks:<br />
To insert the whisks (8) or dough hooks (9), first swing the support<br />
(11) back up by pressing the support retaining clip (12).<br />
Insert the shank into the rod holes, turning it slightly so that it locks<br />
into position. (Figure 10)<br />
Do the same for the other rod and then make sure that the rods<br />
are fitted correctly.<br />
The whisks can be inserted into either hole.<br />
However the dough hooks have specific holes. The dough hook<br />
with the washer fitted to the shank must be inserted into the<br />
widest hole on the food mixer. (Figure 11)<br />
Swing the top of the support down onto the bowl so that it slots<br />
on correctly. (Figure 12)<br />
ATTENTION: Make sure that the hand mixer is unplugged and<br />
the speed switch is set to “0” before fitting the whisks or the<br />
dough hooks.<br />
USE<br />
Whisks and dough hooks:<br />
Once the rods have been fitted correctly, plug the hand mixer into<br />
the electric socket and select a suitable speed, based on what<br />
you intend to mix.<br />
To prevent splashing, insert the whisks (8) or dough hooks (9) into<br />
the food before you switch the mixer on.<br />
Place the rods into the centre of the food that you wish to mix.<br />
Select a suitable speed for work you intend to do.<br />
Move the rods about constantly to ensure an even mix.<br />
When mixing dough, it is best to start off with the liquid ingredients,<br />
adding solids gradually to obtain an even mix.<br />
To release the rods, set the speed selector to the “0” position,<br />
unplug the appliance from the wall socket and press the whisk<br />
release button (2), (Figure 13).<br />
Working with the support with rotating bowl: Model<br />
BV-4630<br />
With the rods inserted correctly into the hand mixer, mounted on<br />
the support with the bowl, proceed in the same way as using the<br />
hand mixer manually.<br />
To release the rods when using the support, set the speed<br />
selector to “0” and unplug the appliance from the mains. To release<br />
the rods, first swing the support (11) up by pressing the<br />
support retaining clip (12).<br />
Press the whisk release button (2) .<br />
To take the hand mixer (1) off the support (11), press the hand<br />
mixer release clip (14) and lift the mixer upward (Figure 14)<br />
Mixer foot:<br />
Once the mixer foot has been fitted correctly, plug the hand mixer<br />
into the electric socket.<br />
The mixer foot can only be used at maximum speed, set the<br />
speed selector “4” to any position other than “0” and activate the<br />
function using the turbo speed button “5”.<br />
The speed selector function “4” is not operative when the mixer<br />
foot is attached to the blender<br />
Always place the mixing jug on a flat, stable surface.<br />
Keep a firm grip on both the mixer and the jug during use. (Figure<br />
15)<br />
To prevent splashing, insert the mixer foot into the food before<br />
you switch it on.<br />
Move the mixer foot about constantly to ensure an even blend.<br />
The edge of the blade is very sharp, so be careful not to injure<br />
yourself.<br />
As a safety measure make sure to remove the whisks or dough<br />
hooks before inserting the mixer foot.<br />
ATTENTION: When finished, set the speed selector to the “0”<br />
position, unplug the appliance from the wall socket and take<br />
the mixer foot off the motor housing so it can be cleaned.<br />
Make sure to close the protective cover “10” before attempting<br />
to fit the whisks or dough hooks. Once you have done this the<br />
speed selector “4” will be operative again.<br />
<strong>BV4625</strong>/30.indd 8 8/2/07 09:06:13