2011 FOX RACING SHOX OWNER'S MANUAL - Bike-Manual.com
2011 FOX RACING SHOX OWNER'S MANUAL - Bike-Manual.com
2011 FOX RACING SHOX OWNER'S MANUAL - Bike-Manual.com

Create successful ePaper yourself
Turn your PDF publications into a flip-book with our unique Google optimized e-Paper software.
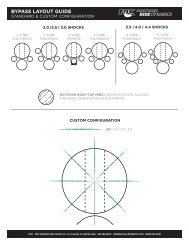
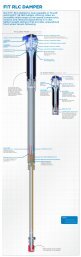
9»»»Compress your fork a few times to ensure the settling of the lower leg into its lowest friction point on the axle.Close the dropout QR levers until the backside of each lever contacts the lower leg.NOTE: As you move the dropout QR levers from open towards their closed position, you should begin to feel tension whenthe levers pass halfway closed. If necessary, adjust each dropout QR lever to the correct amount of cam tension with a 5mm hex key wrench.Spin the wheel to check the free clearance of the brake rotor in the caliper.WARNING: Never use any other tool other than hand pressure to tighten the 15QR or 20QR levers onto the lower legs.Over-tightening the QR levers or improperly adjusting the 15QR axle nut can damage the axle, axle nut or fork dropouts,leading to a sudden failure with one or more of these <strong>com</strong>ponents, resulting with SERIOUS INJURY OR DEATH.ENGLISHINSTALLING THE 40 FRONT WHEEL»»»»»»Loosen the four (4) axle pinch bolts on the lower leg with a 5 mm hex key wrench.Using a 5 mm hex key wrench, turn the axle counter-clockwise to loosen and remove.As you guide the brake rotor into the front caliper, place the wheel between the dropouts of the fork, and slide the axle inthrough the fork dropouts and hub.Using a 5 mm hex key torque wrench, turn and tighten the axle clockwise into the lower leg to 19 in-lb (2.15 Nm) torque.Tighten the two left side dropout pinch-bolts (from the seated rider’s perspective) to 19 in-lb (2.15 Nm) torque.Compress the fork on the bike a couple of times, to let the right side of the dropout settle to its low-friction point. Tightenthe two right side dropout pinch-bolts to 19 in-lb (2.15 Nm) torque.INSTALLING THE SHIMANO REMOTE LOCKOUT LEVER ASSEMBLY»»»WARNING: Always use the Remote cable holder assembly to secure the Remote fork cable housing to the fork crown.Unsecured cable housing can snag and cause a crash, resulting in SERIOUS INJURY OR DEATH.Use the following procedure for installing the Shimano Remote Lockout lever, for <strong>FOX</strong> Remote fork or rear shock products:With a 3 mm hex key wrench, loosen the handlebar clamp bolt on the under side of the Shimano Remote Lockout leverassembly.Remove the left or right hand grip from the handlebar, given which configuration you purchased.Slide the assembly onto the handlebar. Be sure 1) the lockout release button is facing out towards the end of the handlebar,and 2) the cable adjusting barrel is pointing towards the center of the bike, above the hand brake lever assembly. This willbe true for either the left or right-hand setup configuration.