

Delonghi Nespresso Delonghi Latissima Touch EN550.BM - notice
Delonghi Nespresso Delonghi Latissima Touch EN550.BM - notice
Delonghi Nespresso Delonghi Latissima Touch EN550.BM - notice

You also want an ePaper? Increase the reach of your titles
YUMPU automatically turns print PDFs into web optimized ePapers that Google loves.
EN Special care for your rapid DE Special care for your rapid ES Special care for your rapid CZ Special care for your rapid<br />
4°<br />
cappuccino SyStem (r.c.S.)<br />
cappuccino SyStem (r.c.S.)<br />
cappuccino SyStem (r.c.S.)<br />
cappuccino SyStem (r.c.S.)<br />
important: refer<br />
important: refer<br />
important: refer<br />
important: refer<br />
to User manual for<br />
to User manual for<br />
to User manual for<br />
to User manual for<br />
complete instructions.<br />
complete instructions.<br />
complete instructions.<br />
complete instructions.<br />
1- For a perfect milk froth, use skimmed 1- For a perfect milk froth, use skimmed 1- For a perfect milk froth, use skimmed 1- For a perfect milk froth, use skimmed<br />
or semi-skimmed milk at refrigerator<br />
or semi-skimmed milk at refrigerator<br />
or semi-skimmed milk at refrigerator<br />
or semi-skimmed milk at refrigerator<br />
temperature (about 4° C).<br />
temperature (about 4° C).<br />
temperature (about 4° C).<br />
temperature (about 4° C).<br />
1<br />
2- Rinse after each milk based preparation. 2- Rinse after each milk based preparation. 2- Rinse after each milk based preparation. 2- Rinse after each milk based preparation.<br />
Place a recipient under milk outlet, press<br />
Place a recipient under milk outlet, press<br />
Place a recipient under milk outlet, press<br />
Place a recipient under milk outlet, press<br />
and hold the «CLEAN» button until<br />
and hold the «CLEAN» button until<br />
and hold the «CLEAN» button until<br />
and hold the «CLEAN» button until<br />
machine stops pumping automatically<br />
machine stops pumping automatically<br />
machine stops pumping automatically<br />
machine stops pumping automatically<br />
(approx. 15 sec.).<br />
(approx. 15 sec.).<br />
(approx. 15 sec.).<br />
(approx. 15 sec.).<br />
Machine starts rinsing, stops automatically<br />
Machine starts rinsing, stops automatically<br />
Machine starts rinsing, stops automatically<br />
Machine starts rinsing, stops automatically<br />
( ~15sec.).<br />
( ~15sec.).<br />
( ~15sec.).<br />
( ~15sec.).<br />
3- Place the milk container in the fridge 3- Place the milk container in the fridge 3- Place the milk container in the fridge 3- Place the milk container in the fridge<br />
immediately.<br />
immediately.<br />
immediately.<br />
immediately.<br />
4- Every two days, disassemble the<br />
4- Every two days, disassemble the<br />
4- Every two days, disassemble the<br />
4- Every two days, disassemble the<br />
Rapid Cappuccino System and clean<br />
Rapid Cappuccino System and clean<br />
Rapid Cappuccino System and clean<br />
Rapid Cappuccino System and clean<br />
all components in the upper level of a<br />
all components in the upper level of a<br />
all components in the upper level of a<br />
all components in the upper level of a<br />
2<br />
dishwasher.<br />
dishwasher.<br />
dishwasher.<br />
dishwasher.<br />
FR Special care for your rapid IT Special care for your rapid PT Special care for your rapid HU Special care for your rapid<br />
cappuccino SyStem (r.c.S.)<br />
cappuccino SyStem (r.c.S.)<br />
cappuccino SyStem (r.c.S.)<br />
cappuccino SyStem (r.c.S.)<br />
4°<br />
important: refer<br />
important: refer<br />
important: refer<br />
important: refer<br />
to User manual for<br />
to User manual for<br />
to User manual for<br />
to User manual for<br />
complete instructions.<br />
complete instructions.<br />
complete instructions.<br />
complete instructions.<br />
1- For a perfect milk froth, use skimmed 1- For a perfect milk froth, use skimmed 1- For a perfect milk froth, use skimmed 1- For a perfect milk froth, use skimmed<br />
or semi-skimmed milk at refrigerator<br />
or semi-skimmed milk at refrigerator<br />
or semi-skimmed milk at refrigerator<br />
or semi-skimmed milk at refrigerator<br />
temperature (about 4° C).<br />
temperature (about 4° C).<br />
temperature (about 4° C).<br />
temperature (about 4° C).<br />
2- Rinse after each milk based preparation. 2- Rinse after each milk based preparation. 2- Rinse after each milk based preparation. 2- Rinse after each milk based preparation.<br />
3<br />
Place a recipient under milk outlet, press<br />
Place a recipient under milk outlet, press<br />
Place a recipient under milk outlet, press<br />
Place a recipient under milk outlet, press<br />
and hold the «CLEAN» button until<br />
and hold the «CLEAN» button until<br />
and hold the «CLEAN» button until<br />
and hold the «CLEAN» button until<br />
machine stops pumping automatically<br />
machine stops pumping automatically<br />
machine stops pumping automatically<br />
machine stops pumping automatically<br />
(approx. 15 sec.).<br />
(approx. 15 sec.).<br />
(approx. 15 sec.).<br />
(approx. 15 sec.).<br />
Machine starts rinsing, stops automatically<br />
Machine starts rinsing, stops automatically<br />
Machine starts rinsing, stops automatically<br />
Machine starts rinsing, stops automatically<br />
( ~15sec.).<br />
( ~15sec.).<br />
( ~15sec.).<br />
( ~15sec.).<br />
3- Place the milk container in the fridge 3- Place the milk container in the fridge 3- Place the milk container in the fridge 3- Place the milk container in the fridge<br />
immediately.<br />
immediately.<br />
immediately.<br />
immediately.<br />
4- Every two days, disassemble the<br />
4- Every two days, disassemble the<br />
4- Every two days, disassemble the<br />
4- Every two days, disassemble the<br />
Rapid Cappuccino System and clean<br />
Rapid Cappuccino System and clean<br />
Rapid Cappuccino System and clean<br />
Rapid Cappuccino System and clean<br />
all components in the upper level of a<br />
all components in the upper level of a<br />
all components in the upper level of a<br />
all components in the upper level of a<br />
dishwasher.<br />
dishwasher.<br />
dishwasher.<br />
dishwasher.<br />
4<br />
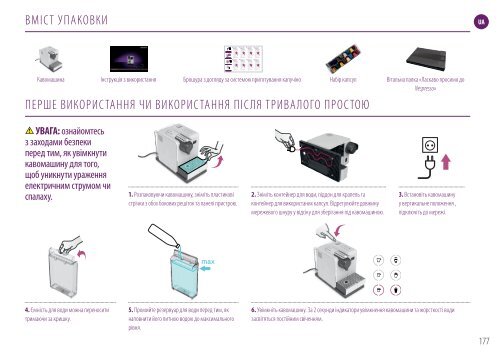
ВМІ СТ У ПАКОВКИ<br />
UA<br />
Кавомашина<br />
Інструкція з використання<br />
Брошура з догляду за системою приготування капучіно<br />
Набір капсул<br />
ПЕРШЕ ВИКОРИСТАННЯ Ч И ВИКОРИСТАННЯ ПІ СЛЯ ТРИВАЛОГО ПРОСТОЮ<br />
Вітальна папка «Ласкаво просимо до<br />
<strong>Nespresso</strong>»<br />
УВАГА: ознайомтесь<br />
з заходами безпеки<br />
перед тим, як увімкнути<br />
кавомашину для того,<br />
щоб уникнути ураження<br />
електричним струмом чи<br />
спалаху.<br />
1. Розпаковуючи кавомашину, зніміть пластикові<br />
стрічки з обох бокових решіток та панелі пристрою.<br />
2. Зніміть контейнер для води, піддон для крапель та<br />
контейнер для використаних капсул. Відрегулюйте довжину<br />
мережевого шнуру у відсіку для зберігання під кавомашиною.<br />
3. Встановіть кавомашину<br />
у вертикальне положення ,<br />
підключіть до мережі.<br />
4. Ємність для води можна переносити<br />
тримаючи за кришку.<br />
5. Промийте резервуар для води перед тим, як<br />
наповнити його питною водою до максимального<br />
рівня.<br />
6. Увімкніть кавомашину. За 2 секунди індикатори увімкнення кавомашини та жорсткості води<br />
засвітяться постійним свіченням.<br />
177<br />
7484_UM_LATTISSIMA_RESTYLE_Z2A.indb 177 03.10.14 14:49


