REMS Curvo REMS Curvo 50 REMS Akku-Curvo REMS Sinus
REMS Curvo REMS Curvo 50 REMS Akku-Curvo REMS Sinus
REMS Curvo REMS Curvo 50 REMS Akku-Curvo REMS Sinus

Create successful ePaper yourself
Turn your PDF publications into a flip-book with our unique Google optimized e-Paper software.
eng <strong>REMS</strong> <strong>Curvo</strong> / <strong>REMS</strong> <strong>Curvo</strong> <strong>50</strong> / <strong>REMS</strong> <strong>Akku</strong>-<strong>Curvo</strong> eng<br />
CE conformity mark<br />
1. Technical Data<br />
1.1. Article numbers<br />
<strong>REMS</strong> <strong>Curvo</strong> drive unit 580000<br />
<strong>REMS</strong> <strong>Akku</strong>-<strong>Curvo</strong> drive unit Li-Ion 580002<br />
<strong>REMS</strong> <strong>Curvo</strong> <strong>50</strong> drive unit 580100<br />
Square driver 35 – <strong>50</strong>, support 35 – <strong>50</strong> 582110<br />
Square driver 10 – 40, support 10 – 40 582120<br />
Insert bolt 582036<br />
Rapid charger Li-Ion/Ni-Cd 230 V, <strong>50</strong> – 60 Hz, 65 W 571560<br />
<strong>REMS</strong> battery Li-Ion 18 V, 2.6 Ah 565215<br />
<strong>REMS</strong> bending spray, 400 ml 140120<br />
1.2. Capacity<br />
No cracks or wrinkles shall occur during professional cold bending. Pipe qualities<br />
and sizes which do not guarantee this are not suited to be bent with <strong>REMS</strong><br />
<strong>Curvo</strong>, <strong>REMS</strong> <strong>Curvo</strong> <strong>50</strong> and <strong>REMS</strong> <strong>Akku</strong>-<strong>Curvo</strong>.<br />
Hard copper pipes are cold bendable up to Ø 18 mm according to DIN EN<br />
1057, minimum radii must be complied with. Bending formers and back formers<br />
for larger bending radii can be supplied.<br />
<strong>REMS</strong> <strong>Curvo</strong><br />
● Hard, half-hard, soft copper pipes, also thin walled, Ø 10 – 35 mm, ⅜ –1⅜”.<br />
● Soft, jacketed copper pipe, also thin walled, Ø 10 – 18 mm.<br />
● Stainless steel pipes of the pressfitting systems Ø 12 – 28 mm.<br />
● Jacketed C-steel pipes of the pressfitting systems Ø 12 – 28 mm.<br />
● Soft precision steel pipes Ø 10 – 30 mm, wall thickness ≤ 1.5 mm.<br />
● Steel pipes DIN EN 10255 (DIN 2440) ¼” – ¾”.<br />
● Electrical installation pipes DIN EN <strong>50</strong>086 Ø 16 – 32 mm.<br />
● Composite pipes Ø 14 – 40 mm.<br />
Largest bending angle 180°<br />
<strong>REMS</strong> <strong>Curvo</strong> <strong>50</strong><br />
● Steel pipes as per DIN EN 10255 (DIN 2440) ¼” – 1¼”.<br />
● Hard, half-hard and soft copper tubes Ø 10 – 42 mm.<br />
● Thin walled copper tubes Ø 10 – 35 mm.<br />
● Stainless steel tubes of pressfitting systems Ø 12 – 42 mm.<br />
● Composite tubes Ø 14 – <strong>50</strong> mm.<br />
Largest bending angle 90°<br />
<strong>REMS</strong> <strong>Akku</strong>-<strong>Curvo</strong><br />
● Hard, half-hard, soft copper pipes, also thin walled, Ø 10 – 28 mm, ⅜ – 1⅛”.<br />
● Soft, jacketed copper pipe, also thin walled, Ø 10 – 18 mm.<br />
● Stainless steel pipes of the pressfitting systems Ø 12 – 28 mm.<br />
● Jacketed C-steel pipes of the pressfitting systems Ø 12 – 28 mm.<br />
● Soft precision steel pipes Ø 10 – 28 mm, wall thickness ≤ 1.5 mm.<br />
● Steel pipes DIN EN 10255 Ø ¼ – ½”.<br />
● Electrical installation pipes DIN EN <strong>50</strong>086 Ø 16 – 25 mm.<br />
● Composite pipes Ø 14 – 32 mm<br />
Largest bending angle 180°<br />
1.3. Speed <strong>Curvo</strong> <strong>Curvo</strong> <strong>50</strong> <strong>Akku</strong>-<strong>Curvo</strong><br />
Speed infinitely<br />
adjustable 0…4 rpm 0…1 rpm 0…3.33 rpm<br />
1.4. Electrical data<br />
<strong>REMS</strong> <strong>Curvo</strong>, 230 V, 1~, <strong>50</strong> – 60 Hz; 1000 W; 4.8 A or<br />
<strong>REMS</strong> <strong>Curvo</strong> <strong>50</strong> 110 V, 1~, <strong>50</strong> – 60 Hz; 1000 W; 9.6 A,<br />
Intermittent service S3 15% 2/14 min,<br />
double insulated, interference-suppressed.<br />
Protection class IP 20<br />
<strong>REMS</strong> <strong>Akku</strong>-<strong>Curvo</strong> 18 V =<br />
Rapid charger (1 h) Input 230 V~; <strong>50</strong> – 60 Hz; 65 W<br />
Output 12 –18 V =<br />
1.5. Dimensions (mm) <strong>Curvo</strong> <strong>Curvo</strong> <strong>50</strong> <strong>Akku</strong>-<strong>Curvo</strong><br />
L×W×H: 585×215×140 640×240×95 540×280×140<br />
(23”×8½”×5½”) (25”×9½”×3¾”) (21¼”×11”×5½”)<br />
1.6. Weights<br />
Drive unit 8.3 kg 16.9 kg 9 kg (with batt.)<br />
(18.3 lb) (37.3 lb) (19.8 lb)<br />
Bending former 0.2..1.6 kg 4.44..7.8 kg 0.2..1.6 kg<br />
(½..3½ lb) (9.8..17.2 lb) (½..3½ lb)<br />
Back former 0.1..0.2 kg 0.25..0.42 kg 0.1..0.2 kg<br />
(¼..½ lb) (0.55..0.9 lb) (¼..½ lb)<br />
Insert bolt 0.4 kg (⅞ lb) 0.4 kg (⅞ lb) 0.4 kg (⅞ lb)<br />
<strong>REMS</strong> battery Li-Ion<br />
18 V, 2.6 Ah 0.63 kg (1.4 lb)<br />
1.7. Noise information<br />
Emission at<br />
workplace 82 dB (A) 90 dB (A) 90 dB (A)<br />
1.8. Vibrations <strong>Curvo</strong> <strong>Curvo</strong> <strong>50</strong> <strong>Akku</strong>-<strong>Curvo</strong><br />
Weighted effective<br />
value of acceleration 2.5 m/s² 2.5 m/s² 2.5 m/s²<br />
The indicated weighted effective value of acceleration has been measured<br />
against standard test procedures and can be used by way of comparison with<br />
another device. The indicated weighted effective value of acceleration can also<br />
be used as a preliminary evaluation of the exposure.<br />
CAUTION<br />
The indicated weighted effective value of acceleration can differ during operation<br />
from the indicated value, dependent on the manner in which the device is<br />
used. Dependent upon the actual conditions of use (periodic duty) it may be<br />
necessary to establish safety precautions for the protection of the operator.<br />
2. Preparations for Use<br />
2.1. Electrical connection<br />
WARNING<br />
Pay attention to mains voltage! Check whether the voltage specified on the<br />
rating plate matches the mains voltage before connecting the drive machine<br />
or the rapid charger. Only operate the electrical device on the mains via a 30 mA<br />
fault current protection device (FI switch) on building sites or similar types of<br />
installation.<br />
The battery and spare batteries delivered with the <strong>REMS</strong> <strong>Akku</strong>-<strong>Curvo</strong> are not<br />
charged. Charge the batteries before using for the first time. Only use the <strong>REMS</strong><br />
rapid charger (Art. No. 571560) for charging.<br />
Electronic complete discharge protection of the battery<br />
<strong>REMS</strong> <strong>Akku</strong>-<strong>Curvo</strong> will be equipped with an electronic complete discharge<br />
protection as of 2011-05-01. If the machine switches off during the bending<br />
process, the battery must be recharged or replaced by a charged battery.<br />
Rapid charger Li-Ion/Ni-Cd (Art. No. 571560)<br />
The green control lamp lights steadily when the mains plug is plugged in. If the<br />
battery is inserted into the rapid charger the green control lamp flashes and<br />
the battery is charged. Charging of the battery is completed when the green<br />
control lamp lights steadily. If the red control lamp flashes, the battery is defective.<br />
If the red control lamp comes on and remains on, this indicates that the<br />
temperature of the rapid charger and / or the battery is outside the permissible<br />
range of +5°C to +40°C.<br />
NOTICE<br />
The rapid chargers are not suitable for using outdoors. Non-rechargeable<br />
batteries may not be charged. The Ni-Cd and Li-Ion batteries cannot be<br />
interchanged in the drive machine.<br />
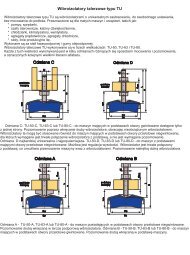
2.2. Selecting the bending tools<br />
<strong>REMS</strong> <strong>Curvo</strong>, <strong>REMS</strong> <strong>Akku</strong>-<strong>Curvo</strong><br />
Put a bending former (1) (Fig. 1) corresponding to the pipe size onto the square<br />
(2). The mounting is designed such that the bending former can only be fully<br />
fitted in one direction. Place in readiness the back former (3) sui table for the<br />
pipe size and the insert bolt (4).<br />
<strong>REMS</strong> <strong>Curvo</strong> <strong>50</strong>, Ø 35 – <strong>50</strong><br />
Put a bending former (1) (Fig. 1) corresponding to the pipe size onto the square<br />
(12). The mounting is designed such that the bending former can only be fully<br />
fitted in one direction. Place in readiness the back former (3) sui table for the<br />
pipe size and the insert bolt (4). Insert the appropriate sized back former (3),<br />
the support (11) and the insert bolt (4).<br />
<strong>REMS</strong> <strong>Curvo</strong> <strong>50</strong>, Ø 10 – 40<br />
Remove adaptor block (12) and replace with adaptor block (14) into the drive<br />
unit. Put a bending former (1) (Fig. 1) corresponding to the pipe size onto the<br />
square (14). The mounting is designed such that the bending former can only<br />
be fully fitted in one direction. Insert the appropriate sized back former (3), the<br />
support (13) and the insert bolt (4).<br />
NOTICE<br />
When using the <strong>REMS</strong> <strong>Curvo</strong> <strong>50</strong>, the support (11) and (13) respec tively<br />
should be attached above the bending and back formers, for all sizes.<br />
Up to and including sizes 24 R75 (¾” R75), the support (15) should also<br />
be attached below. This is mounted on one side on the adaptor block<br />
collar (14), and on the other side with the locating pin (16) in the outermost<br />
bore hole of the support (15) marked out in the housing (see 3.1.).<br />
The drive unit gets damaged when bending without this support!<br />
3. Operation<br />
3.1. Working procedure<br />
Turn/slide setting ring/slide (7) to »L« (reverse). Press inching switch (8) while<br />
gripping the motor handle (9) at the same time. The bending former turns<br />
clockwise into its starting position in which the slipping clutch is effective.<br />
Release the inching switch immediately. Do not put unnecessary load on the<br />
clutch. Turn/slide setting ring/slide (7) to »R« (forward). Place pipe into bending<br />
former so that the pipe end projects at least 10 mm beyond the driver (10).<br />
With the pipe sizes 22 to <strong>50</strong> mm, the pipe must be pressed into the radius of<br />
the bending former. Lower the insert bolt (4) through the matching back former<br />
(3) and into the corresponding hole bored in the machine.