

IMPORTANT SAFETY INSTRUCTIONS SAVE THESE ... - Janome
IMPORTANT SAFETY INSTRUCTIONS SAVE THESE ... - Janome
IMPORTANT SAFETY INSTRUCTIONS SAVE THESE ... - Janome

You also want an ePaper? Increase the reach of your titles
YUMPU automatically turns print PDFs into web optimized ePapers that Google loves.
3<br />
5<br />
1 cm<br />
2<br />
5 cm<br />
6<br />
4<br />
53<br />
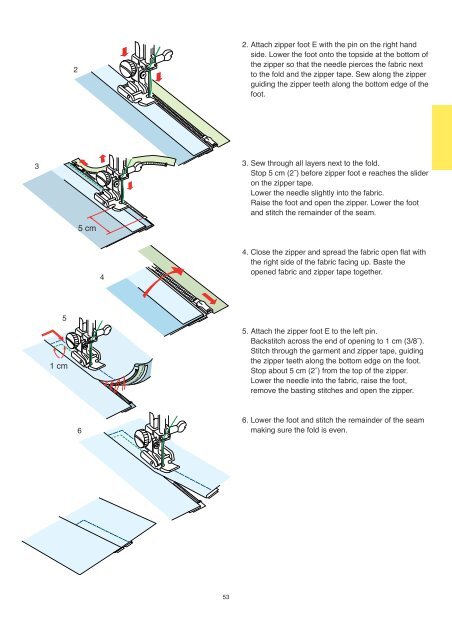
2. Attach zipper foot E with the pin on the right hand<br />
side. Lower the foot onto the topside at the bottom of<br />
the zipper so that the needle pierces the fabric next<br />
to the fold and the zipper tape. Sew along the zipper<br />
guiding the zipper teeth along the bottom edge of the<br />
foot.<br />
3. Sew through all layers next to the fold.<br />
Stop 5 cm (2˝) before zipper foot e reaches the slider<br />
on the zipper tape.<br />
Lower the needle slightly into the fabric.<br />
Raise the foot and open the zipper. Lower the foot<br />
and stitch the remainder of the seam.<br />
4. Close the zipper and spread the fabric open flat with<br />
the right side of the fabric facing up. Baste the<br />
opened fabric and zipper tape together.<br />
5. Attach the zipper foot E to the left pin.<br />
Backstitch across the end of opening to 1 cm (3/8˝).<br />
Stitch through the garment and zipper tape, guiding<br />
the zipper teeth along the bottom edge on the foot.<br />
Stop about 5 cm (2˝) from the top of the zipper.<br />
Lower the needle into the fabric, raise the foot,<br />
remove the basting stitches and open the zipper.<br />
6. Lower the foot and stitch the remainder of the seam<br />
making sure the fold is even.


