

IMPORTANT SAFETY INSTRUCTIONS SAVE THESE ... - Janome
IMPORTANT SAFETY INSTRUCTIONS SAVE THESE ... - Janome
IMPORTANT SAFETY INSTRUCTIONS SAVE THESE ... - Janome

You also want an ePaper? Increase the reach of your titles
YUMPU automatically turns print PDFs into web optimized ePapers that Google loves.
5<br />
6<br />
3<br />
7<br />
1<br />
6<br />
4<br />
4<br />
7<br />
2<br />
5<br />
11<br />
1<br />
10<br />
3<br />
2<br />
8<br />
9<br />
94<br />
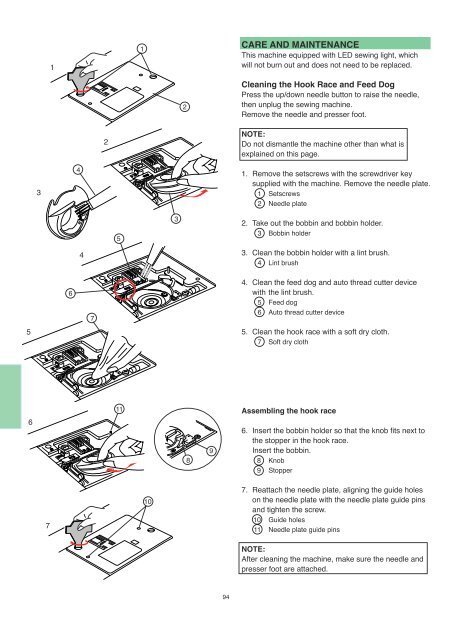
CARE AND MAINTENANCE<br />
This machine equipped with LED sewing light, which<br />
will not burn out and does not need to be replaced.<br />
Cleaning the Hook Race and Feed Dog<br />
Press the up/down needle button to raise the needle,<br />
then unplug the sewing machine.<br />
Remove the needle and presser foot.<br />
NOTE:<br />
Do not dismantle the machine other than what is<br />
explained on this page.<br />
1. Remove the setscrews with the screwdriver key<br />
supplied with the machine. Remove the needle plate.<br />
1 Setscrews<br />
2 Needle plate<br />
2. Take out the bobbin and bobbin holder.<br />
3 Bobbin holder<br />
3. Clean the bobbin holder with a lint brush.<br />
4 Lint brush<br />
4. Clean the feed dog and auto thread cutter device<br />
with the lint brush.<br />
5 Feed dog<br />
6 Auto thread cutter device<br />
5. Clean the hook race with a soft dry cloth.<br />
7 Soft dry cloth<br />
Assembling the hook race<br />
6. Insert the bobbin holder so that the knob fits next to<br />
the stopper in the hook race.<br />
Insert the bobbin.<br />
8 Knob<br />
9 Stopper<br />
7. Reattach the needle plate, aligning the guide holes<br />
on the needle plate with the needle plate guide pins<br />
and tighten the screw.<br />
10 Guide holes<br />
11 Needle plate guide pins<br />
NOTE:<br />
After cleaning the machine, make sure the needle and<br />
presser foot are attached.


