

Transmission and Differential.pdf - Ken Gilbert
Transmission and Differential.pdf - Ken Gilbert
Transmission and Differential.pdf - Ken Gilbert

Create successful ePaper yourself
Turn your PDF publications into a flip-book with our unique Google optimized e-Paper software.
3-4 [W2E0] SERVICE PROCEDURE<br />
2. Rear <strong>Differential</strong> (VA-Type)<br />
5) Oil seal<br />
Replace if deformed or damaged, <strong>and</strong> at every<br />
disassembling.<br />
6) <strong>Differential</strong> carrier<br />
Replace if the bearing bores are worn or damaged.<br />
7) <strong>Differential</strong> case<br />
Replace if its sliding surfaces are worn or cracked.<br />
8) Companion flange<br />
Replace if the oil seal lip contacting surfaces have<br />
flaws.<br />
E: ASSEMBLY<br />
1) Precautions for assembling<br />
Assemble in the reverse order of disassembling.<br />
Check <strong>and</strong> adjust each part during assembly.<br />
Keep the shims <strong>and</strong> washers in order, so that<br />
they are not misinstalled.<br />
Thoroughly clean the surfaces on which the<br />
shims, washers <strong>and</strong> bearings are to be installed.<br />
Apply gear oil when installing the bearings <strong>and</strong><br />
thrust washers.<br />
Be careful not to mix up the right <strong>and</strong> left h<strong>and</strong><br />
cups of the bearings.<br />
Replace the oil seal with new one at every disassembly.<br />
Apply chassis grease between the lips<br />
when installing the oil seal.<br />
G3M0079<br />
2) Adjust preload for front <strong>and</strong> rear bearings.<br />
Adjust the bearing preload with spacer <strong>and</strong> washer<br />
between front <strong>and</strong> rear bearings. Pinion height<br />
adjusting washer are not affected by this adjustment.<br />
The adjustment must be carried out without<br />
oil seal inserted.<br />
24<br />
(1) Press rear bearing race into differential carrier<br />
with ST1 <strong>and</strong> ST2.<br />
ST1 398477701 HANDLE<br />
ST2 398477702 DRIFT<br />
(2) Press front bearing race into differential carrier<br />
with ST1 <strong>and</strong> ST2.<br />
ST1 398477701 HANDLE<br />
ST2 498447110 DRIFT<br />
G3M0080<br />
(3) Insert front bearing cone.<br />
CAUTION:<br />
Use a new front bearing cone.<br />
(4) Insert ST into case with pinion height<br />
adjusting shim <strong>and</strong> rear bearing cone fitted onto<br />
it.<br />
CAUTION:<br />
Re-use the used washer if not deformed.<br />
Use a new rear bearing cone.<br />
ST 498447150 DUMMY SHAFT<br />
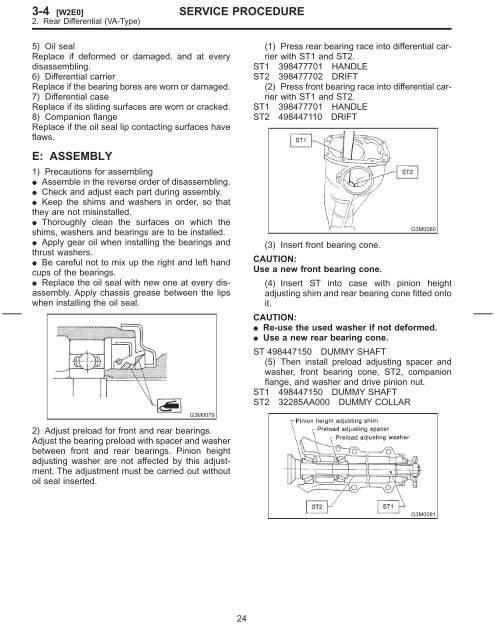
(5) Then install preload adjusting spacer <strong>and</strong><br />
washer, front bearing cone, ST2, companion<br />
flange, <strong>and</strong> washer <strong>and</strong> drive pinion nut.<br />
ST1 498447150 DUMMY SHAFT<br />
ST2 32285AA000 DUMMY COLLAR<br />
G3M0081


